How to Clean Washing Machine Pipes Effectively
Clogged or slow-draining pipes behind a washing machine can cause water backups, foul odors, and laundry downtime. This guide provides practical steps using common tools to clear washer drain lines safely and effectively for American homes.
The focus is on simple methods that don’t require professional service, with clear safety notes and ready-to-use techniques for typical laundry rooms and standpipes.
Quick Answer
Start with a gentle flush to gauge drain resistance, then use a washing machine drain hose clog remover tool or a drain auger snake for washing machine pipe cleaning to dislodge buildup. If blocks persist, extend your approach with a laundry standpipe drain cleaning brush kit to scrub the interior walls and remove debris.
What You’ll Need
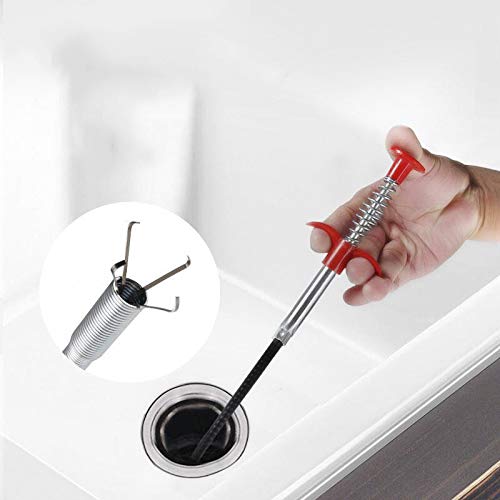
- Washing machine drain hose clog remover tool
- Drain auger snake for washing machine pipe cleaning
- Laundry standpipe drain cleaning brush kit
- Bucket, towels, and a flashlight
- Gloves and safety glasses
- Old towels or rags for water control


Before You Start
Prepare the area by moving the washer, unplugging it, and placing towels to catch spills. Identify the standpipe or drain outlet and have a valve-ready container nearby. Safety first: disconnect power, avoid boiling water, and never force tools without visible resistance.
Time estimates: typically 30–60 minutes for a straightforward unclog and up to 2 hours for a stubborn blockage requiring more probing. Check local building codes if you’re unsure about drain configurations.
Step-By-Step: How To Clean Washing Machine Pipes
- Disconnect the washing machine from the power outlet and water supply, then pull the unit away from the wall to access the drain area.
- Place a bucket under the standpipe/outlet to catch any wastewater that may back up during the process.
- Remove the drain hose from the standpipe and inspect for kinks or obvious clogs. Reconnect loosely to test flow with a small amount of water.
- Insert the washing machine drain hose clog remover tool into the standpipe or directly into the drain line and rotate slowly to break up residual material.
- If the clog persists, extend with a drain auger snake for washing machine pipe cleaning. Feed the snake in gently, turning the handle to hook or break debris.
- Withdraw the auger slowly, cleaning the head as you go. Repeat several times to maximize debris removal.
- Use a laundry standpipe drain cleaning brush kit to scrub inside the standpipe and the interior walls of the drain housing. Rinse with water as you work.
- Reassemble the drain hose, reconnect power, and run a short wash cycle with hot water to flush residual material through the line.
- Check the drain for a consistent flow. If water backs up again, repeat steps 4–7 or consider a more thorough cleaning of the trap and vent line if accessible.
- Once clear, wipe down the area, reposition the washer, and monitor the next few loads for lingering odors or slow drainage.
- If the blockage recurs after repeated attempts, consider professional inspection to evaluate piping or vent issues beyond routine cleaning.
- Document the method you used and the results for future maintenance, so the system remains ready for regular cleaning intervals.
Troubleshooting
| Symptom | Likely Cause | Fix | Prevention |
|---|---|---|---|
| Water backs up during a wash | Blockage in standpipe or drain hose | Use drain auger snake and cleaning brushes; re-check with a test run | Clean monthly, avoid flushing large items |
| Slow draining even after cleaning | Sticky residue or partial clog | Repeat with the clog remover tool and brush kit; inspect trap | Use mesh screens and run hot water periodically |
| Unusual odors | Organic buildup in standpipe | Scrub interior with brush kit; flush with hot water | Keep lid off during drying, run monthly flushes |
| Water leaks around the drain area | Loose connections or damaged hose | Secure connections; replace damaged hose if needed | Inspect hoses annually and replace as necessary |
Common Mistakes
- Using excessive force with augers which can damage pipes
- Ignoring safety steps or electrical disconnections
- Forcing hoses back into the standpipe without clearing a path
- Neglecting to clean the trap and vent areas when feasible
Tips For Best Results
- Run a small amount of hot water before and after cleaning to loosen residue
- Keep a regular maintenance schedule to prevent buildup
- Match brush kit sizes to the diameter of the standpipe for best scrubbing action
- Use a lint screen or filter in the washer’s drain path to minimize debris
Call A Professional
Contact a licensed plumber if:
- The blockage persists after multiple cleanings
- You notice recurring leaks or standing water despite clear drains
- There is evidence of pipe damage, rust, or unusual installation configurations
FAQ
What is the first sign of a clogged washing machine pipe?
Slow drainage or water backing up into the washer or standpipe.
Can I use chemical cleaners to unblock the pipes?
Chemicals can damage pipes and props; mechanical tools are safer for washer lines.
How often should I clean my washing machine pipes?
Typically every 3–6 months, or when drainage slows noticeably.
Do I need to remove the trap to clean it?
Often not, but in some installations, cleaning the trap improves results.
Will cleaning affect laundry odors?
Yes, removing buildup reduces odors; flush with hot water after cleaning.
Buying Guide
When choosing tools for washing machine pipe cleaning, consider size, compatibility, and durability. Think about how often you expect to use the tools and whether you prefer a kit that covers multiple tasks or specialized devices for rapid clearing.
Key buying factors to weigh include:
- Size and fit: Make sure the auger snake and brushes fit your standpipe diameter and washer drain hose size.
- Ease of use: Look for tools with comfortable handles, smooth rotation, and clear instructions.
- Durability: Stainless steel or high-quality plastics resist corrosion and wear from repeated use.
- Kit completeness: A set that includes a drain hose tool, an auger snake, and a brush kit saves time.
- Volume capacity: For large households, a robust tool supports frequent cleaning without damage.
- Safety features: Insulated handles and protective gloves compatibility aid safe operation.
- Replacement parts: Availability of replacement heads and brushes helps extend tool life.
Consider whether you want a single kit for occasional use or a more comprehensive set designed for regular maintenance. If you are uncertain about installation or drainage configurations, consulting a pro can help determine the best approach for your home.
Leave a Reply