How to Get Rid of Scuff Marks on a Car
Scuff marks on a car’s surface are common, especially on high-traffic streets or during parking lot maneuvers. This guide lays out a practical, step-by-step approach to restore a smooth, uniform finish using common detailing tools. The methods below balance effectiveness with paint-safe practices to minimize risk of further damage.
Whether you’re dealing with light surface scuffs or deeper abrasions, the right combination of technique and products can restore the look of the paint without full repainting. The steps emphasize using a gentle touch and proper cleansers to avoid introducing swirls or permanent marks.
Quick Answer
For light scuffs: start with a microfiber cloth and a dedicated car scratch remover kit with rubbing compound, then follow with a microfiber detailing towel set. For deeper scratches, consider a dual action car polisher kit and professional-grade polish to minimize further damage while leveling the surface.
What You’ll Need
- Car scratch remover kit with rubbing compound microfiber cloths
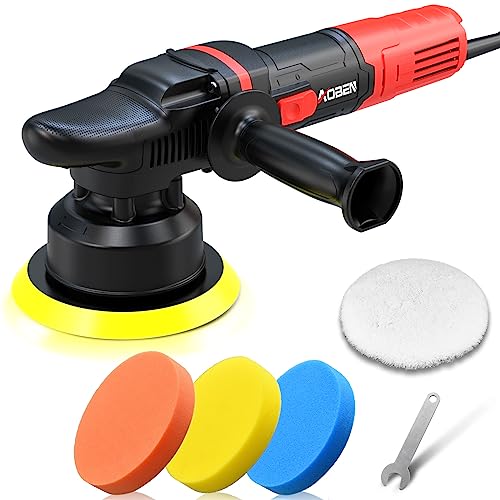
- Dual action car polisher kit 6 inch pads
- Microfiber detailing towel set for car paint cleaning


Before You Start
Prepare a clean, shaded workspace and wash the vehicle thoroughly to remove surface dirt. Dry the area completely before inspecting the scuff. Work in small sections to avoid product drying lines. Avoid direct sunlight and high heat during treatment, which can cause products to dry too quickly and reduce performance. Time estimates vary by scuff depth: light marks may take 10–15 minutes per panel, deeper abrasions 20–40 minutes per panel.
Step-By-Step: How To Remove Car Scuff Marks
- Inspect the scuff: distinguish between the paint-transfer scuffs and clearcoat damage. Mark the area if needed for consistent work.
- Choose a cleaner: apply a small amount of the car scratch remover kit with rubbing compound to a clean microfiber cloth.
- Apply gently: rub the scuff in a circular motion with light pressure, overlapping passes until the mark fades.
- If needed, switch to a fresh cloth and reapply the compound, continuing the same gentle motion until the surface looks uniform.
- Buff with a microfiber detailing towel set to remove residue and inspect the finish under bright light.
- For deeper marks, switch to the dual action car polisher kit with a 6 inch pad and use a light, overlapping pass to even the surface.
- Wipe and recheck: if the scuff remains, repeat the polishing passes in small increments to avoid removing too much clearcoat.
- Finish with a dedicated detail spray or wax to restore shine and add a protective layer.
- Compare panels: look for uniform color and gloss across treated areas to ensure a seamless blend with surrounding paint.
- Clean tools after use and store them in a dry place to maintain effectiveness for future touch-ups.
- Document results for future reference and consider applying a quarterly detail routine to prevent future scuff buildup.
Troubleshooting
| Symptom | Likely Cause | Fix | Prevention |
|---|---|---|---|
| Scratch remains after first pass | Deeper abrasion or stubborn residue | Repeat with light pressure; switch to a finer polish | Use a protective wax after polishing to reduce future friction |
| Hazy or dull area after treatment | Residue left behind | Thoroughly wipe with a clean microfiber towel and detail spray | Work in shade and remove product promptly |
| Swirl marks appear | Overly aggressive rubbing | Switch to a softer cloth and gentler motion | Use proper pads and compatible compounds |
| Color mismatch across panel | Uneven polish application | Evenly re-polish the entire affected area | Maintain consistent technique and lighting |
Common Mistakes
- Using excessive pressure or heat, which can burnish the paint or remove clearcoat
- Skipping a test spot to gauge reactiveness of the product
- Working on a dirty surface, which grinds dirt into the finish
- Neglecting to using the appropriate pads for the product type
Tips For Best Results
- Always start with the mildest method and escalate only if needed
- Use a dedicated car scratch remover kit with rubbing compound specifically designed for automotive finishes
- Match pad stiffness to your vehicle’s paint and the level of correction required
- Apply thin, even coats to prevent over-saturation and ensure uniform shine
- Finish with a sealant or wax to protect against UV and environmental damage
Call A Professional
Seek professional help if there is:
- Visible paint transfer down to bare metal
- Extensive scratching or sanding marks
- Uncertain color matching after repair
- Persistent issues after multiple DIY sessions
FAQ
Can I use household products to remove car scuffs?
Household cleaners are not recommended for automotive finishes as they can be too harsh or not formulated for clearcoat protection.
Will polishing remove my clearcoat?
When done correctly with proper pads and products, polishing should not remove clearcoat; aggressive techniques can cause wear.
How do I know if a scratch is too deep for DIY fixes?
Deep scratches that expose primer or metal usually require professional assessment and possible repainting.
Should I wax immediately after a scratch repair?
Yes, applying wax or sealant after the repair helps protect the area and blend the finish with the rest of the car.
Buying Guide
When choosing tools and products to remove scuff marks, consider several factors to ensure long-term results. Size, noise, and energy use matter for home garages and professional shops alike. Look for user-friendly kits with clear instructions and compatible pads for your polisher. A compact kit with versatile cutting compounds can handle both light scuffs and moderate scratches. Consider a microfiber towel set designed for safe paint cleaning to avoid introducing new scratches during cleanup. A dual action polisher offers safer, more consistent results on most factory finishes, reducing the likelihood of swirl marks. Placement matters as well; work in a cool, shaded area with ample ventilation and a stable work surface. For ongoing maintenance, pairing a scratch remover kit with a protective wax or sealant provides ongoing defense against future scuffs and dirt buildup.
Leave a Reply