How to Get Rid of Scratches on Car Window
Scratches on car windows, especially the windshield and side windows, can be unsightly and sometimes distracting while driving. This guide provides practical, step-by-step methods using commonly available products to reduce or remove shallow scratches. It focuses on safe practices for glass surfaces and helps readers decide when to pursue professional help.
Quick Answer
For shallow, light scratches, use a windshield scratch remover kit or a car window glass polishing compound kit with a soft applicator. Work slowly in small circular motions, testing on inconspicuous areas first, and follow up with a dedicated glass sealant. For deeper gouges or cracks, stop and contact a professional to avoid compromising the glass integrity.
What You’ll Need
- Windshield scratch remover kit
- Car window glass polishing compound kit
- Auto glass scratch repair kit for windshield and windows
- Microfiber cloths
- Masking tape (optional for control)
- Plastic or glass-safe rubbing compound
- Isopropyl alcohol and clean water for cleaning

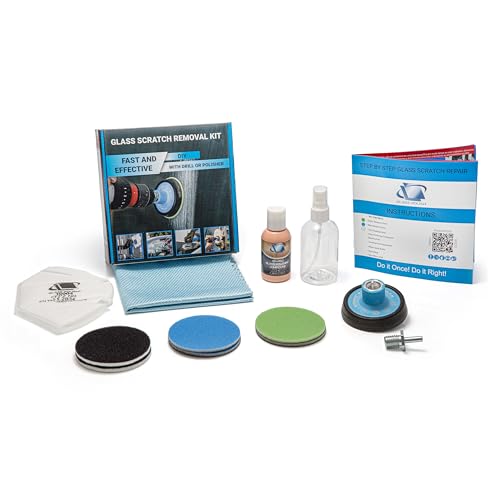
Before You Start
Before attempting any repair, inspect the scratch depth. If the scratch is through the clear coat or affects the edge of the glass, it may require replacement. Always work in a shaded, clean area and avoid direct sunlight. Use protective gloves if needed and ensure the vehicle is off and cool. Test any product on a small, hidden area first to confirm it does not smear or worsen the scratch.
Step-By-Step: How To Remove Scratches From Car Window
- Clean the glass surface thoroughly with isopropyl alcohol and a microfiber cloth to remove dust, oil, and debris.
- Mask a small surrounding area with tape if you want a precise repair zone, reducing the chance of product spill onto adjacent glass.
- Select the appropriate kit: one of the windsheild scratch remover kit, car window glass polishing compound kit, or auto glass scratch repair kit for windshield and windows.
- Apply a small amount of the chosen compound to the applicator pad. Begin with a light touch and apply in a consistent, circular motion over the scratch for 30–60 seconds.
- Wipe away residue with a clean microfiber cloth. Inspect the area. If the scratch remains visible, repeat in short intervals up to a few times, ensuring not to overheat the glass.
- For deeper or longer scratches, use a slightly coarser compound followed by a finer polish to smooth the surface. Finish with a final polish using a clean pad.
- Wipe down the area again with alcohol to remove any remaining residues. Optionally apply a glass sealant or protective coating to reduce future visibility of minor scratches.
- Test visibility from different angles and lighting. If the scratch is still evident or compromises safety, consult a professional.
- Repeat on adjacent panels if necessary, but avoid excessive abrasion that could weaken the glass or reduce clarity.
- Clean the entire window with a quality glass cleaner to restore clarity and remove any residual haze created during polishing.
- Document results and maintain a routine inspection schedule to catch new scratches early.
- Store any unused products in a cool, dry place and follow all manufacturer safety instructions.
Troubleshooting
| Symptom | Likely Cause | Fix | Prevention |
|---|---|---|---|
| Haze or streaks after polishing | Residue left on glass | Wipe with alcohol and a clean cloth; repeat polishing lightly | Use a microfiber cloth and clean water during cleaning steps |
| Scratch still visible after polishing | Scratch deeper than surface | Stop and seek professional inspection | Avoid aggressive rubbing and limit DIY attempts for deep damage |
| Scratches worsen after use | Overheating or excessive pressure | Reduce pressure and cooldown between steps | Test in mild areas first and work slowly |
| Glass feels rough to touch | Rubbing compound residue | Thoroughly clean with alcohol and a lint-free cloth | Finish with a final polish and sealant |
Common Mistakes
- Using heavy pressure or long continuous rubbing, which can cause micro-fractures
- Choosing the wrong grade of polish for the scratch depth
- Failing to fully clean the surface before applying products
- Ignoring safety warnings or testing products in visible areas first
Avoid these missteps to improve the chances of a successful repair and to protect the glass integrity.
Tips For Best Results
- Work in a shaded, cool area to prevent product drying too quickly and causing streaks
- Use a new or clean applicator pad for each pass to avoid reintroducing debris
- Begin with the finest polish and progress to coarser options only if needed
- Apply a protective coating after polishing to reduce the appearance of future minor scratches
- Regularly inspect windows and address scratches early to prevent propagation
Call A Professional
Seek professional help if a scratch is deep, if there are cracks, chips near the edge, or if the repair would require making the windshield structurally compromised. Immediate professional service is advised for safety-critical components and for any suspected structural damage.
FAQ
Can I repair deep scratches on a windshield myself?
Deep scratches or gouges often require professional assessment and may need glass replacement.
Will these kits affect my windshield warranty?
Most DIY kits are intended for minor, non-structural scratches; check your vehicle warranty terms for exclusions.
How long does a typical DIY scratch repair take?
Most repairs take 15–45 minutes per scratch, plus time for cleaning and drying.
Should I seal the glass after repair?
Yes, applying a protective sealant can improve water beading and reduce the appearance of minor future scratches.
Buying Guide
When choosing a solution to remove scratches on car windows, consider several factors to get the best results and value. Size and depth of the scratch influence product choice; for shallow marks, a windshield scratch remover kit or car window glass polishing compound kit is often sufficient. Noise, energy use, and efficiency are less relevant for hand-applied kits, but ease of use and the quality of the polishing pad matter.
Key buying factors include:
- Scratch depth and location: Shallow surface scratches respond best to standard kits, while deeper gouges may require professional services.
- Product compatibility: Ensure the kit is suitable for automotive glass and not intended for laminated or safety glass only.
- Applicator quality: Microfiber pads and non-scratch pads help minimize new damage.
- Ease of use: Look for clear instructions, quick-dry formulas, and minimal steps.
- Protective finish: A post-repair sealant or glaze can improve clarity and resistance to future scratches.
- Brand and compatibility: Consider reputable brands offering comprehensive auto glass scratch repair kits for windshield and windows.
Placement considerations: the windshield and front side windows may experience more stress from temperature changes and road debris. Choose products designed specifically for automotive glass and ensure the kit covers both windshield and window repairs if you own multiple glass panels. Compare kits by the included accessories, drying times, and the likelihood of achieving a clear finish. If there is any doubt about the glass’s structural integrity, a professional evaluation is prudent.
Leave a Reply