How to Clean Vents in a House
Clean air starts with clean vents. Regularly inspecting and refreshing your home’s supply and return vents helps improve airflow, reduce dust buildup, and promote better indoor air quality. This guide explains a practical, do-it-yourself approach that works for most houses with a standard HVAC system.
Whether you’re tackling stubborn dust or preparing for seasonal changes, following a structured method can save time and prevent damage. The steps below emphasize safety, efficiency, and using common household tools alongside purpose-built vent cleaning gear.
Quick Answer
To clean vents effectively, gather a flexible vent cleaning brush set, a multi-size air duct wand kit, and a vacuum with a hose attachment. Remove vent covers, scrub loose debris, vacuum the duct intake, and reattach covers. For stubborn grime, use the brush set with flexible rods to reach deep into the ducts, then vacuum again to pull particulates out.
What You’ll Need
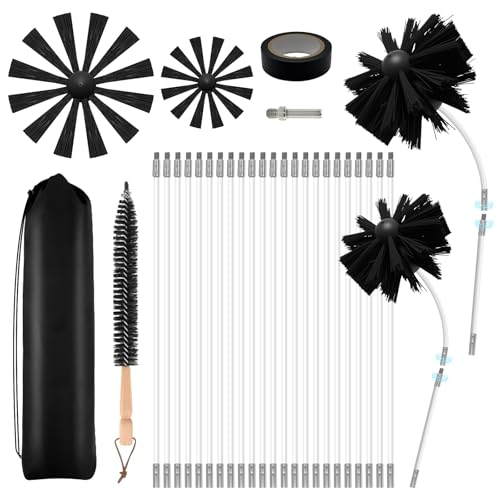
- HVAC vent cleaning brush set with flexible rods
- air duct cleaning wand kit with multiple sizes
- vacuum hose attachment crevice tool for vent cleaning


Before You Start
Turn off the HVAC system to prevent dust from circulating while you work. Place drop cloths or old towels around the vent area to catch debris. Wear a dust mask and safety glasses to protect yourself from fine particles. Estimate 15–45 minutes per level of your home, depending on the number of vents and accessibility. Do not force vents or bend ducts, which can cause damage. If you notice mold, excessive moisture, or persistent odors, stop and consult a professional.
Step-By-Step: How To Clean Vents In A House
- Turn off the HVAC system at the thermostat and main breaker to ensure no airflow while you work.
- Carefully remove each vent cover using a screwdriver, taking note of mounting screws for reassembly.
- Wipe the vent covers with a damp cloth; if needed, use mild soap to remove built-up grime. Dry thoroughly before reattachment.
- Attach the vacuum hose to reach inside the vent opening and extract loose dust from the immediate area.
- Use the HVAC vent cleaning brush set with flexible rods to scrub the interior surfaces of the duct near the vent opening, working away from the opening to dislodge dust.
- Insert the air duct cleaning wand kit in progressively smaller sizes to loosen debris deeper inside the ductwork while vacuuming continuously.
- After loosening debris, run the vacuum along the duct path with the crevice tool to pull particulates from the interior as you withdraw the wand.
- Reassemble vent covers, ensuring they sit flush against the wall or ceiling and that all screws are tightened securely.
- Turn the HVAC system back on and run on a low speed to test airflow. Listen for unusual noises, and check for air leaks around vent covers.
Troubleshooting
| Symptom | Likely Cause | Fix | Prevention |
|---|---|---|---|
| Weak airflow after cleaning | Objets or loose debris in ducts | Reopen a vent and vacuum again, inspect accessible sections | Clean vents before increasing system runtime |
| Dust returns quickly | Insufficient cleaning or leaks in ductwork | Clean thoroughly and seal obvious gaps; consider professional duct inspection | Schedule periodic maintenance |
| Unpleasant odor after cleaning | Mold or moisture inside ducts | Stop and have ducts inspected for mold; avoid disturbing mold without proper containment | Control humidity and address leaks |
| Vent covers won’t sit flush | Damaged cover or warped mounting | Replace damaged covers or bending back into shape carefully | Handle covers gently during cleaning |
Common Mistakes
- Using high-pressure methods or forcing tools into tight ducts
- Neglecting the return-air vents, which can circulate dust back into rooms
- Skipping safety gear or working without turning off power
- Ignoring mold or moisture problems in ducts
Taking time to plan a careful, systematic clean reduces the chance of reintroducing dust and can extend the life of your HVAC system.
Tips For Best Results
- Clean vent covers first to reduce surface dust before addressing interior ducts.
- Work room-by-room to avoid missing vents or duplicating efforts.
- Use the right wand size for each duct opening to maximize debris removal.
- Combine vacuuming with brushing to improve particle extraction.
- Schedule regular checks—seasonal cleaning aligns with heating or cooling cycles.
Call A Professional
Consider a professional if you encounter any of these signs: persistent mold, visible pest activity inside ducts, or extensive duct system damage. If you’re uncomfortable using power tools near electrical components, or if cleaning requires duct disassembly beyond accessible areas, a licensed technician is recommended.
FAQ
What is the best tool for cleaning HVAC vents?
The combination of a flexible vent cleaning brush set, an air duct cleaning wand kit, and a vacuum hose attachment provides comprehensive access and debris removal.
How often should vents be cleaned?
In general, clean accessible vents every 6–12 months, with deeper duct cleaning every few years depending on use, pets, and indoor air quality concerns.
Can cleaning cause dust to spread?
Careful, staged cleaning with the system off minimizes dust spread. Use a vacuum and damp cloths to capture debris as you work.
Is there a risk of mold when cleaning vents?
Yes, mold can be present in damp ducts. If you see growth, stop and consult a professional with mold remediation experience.
Should I clean the whole duct system or just the registers?
Start with registers and adjacent ducts; if dust recurs or airflow is poor, a full duct cleaning may be warranted and should be performed by professionals.
Buying Guide
When choosing tools to clean vents, focus on performance, compatibility, and ease of use. Consider the following factors to compare options and make a smart purchase.
Size and compatibility
Look for a wand kit and brushes with multiple sizes to fit common vent openings and duct dimensions. Modular, flexible rods help reach tight corners without over-forcing components.
Noise level and ease of use
Choose lightweight, ergonomic tools with smooth operation. Some wand systems offer quick-release couplers and swivel joints to reduce effort and noise during use.
Energy efficiency and system impact
Cleaning should improve airflow without overworking the blower. Use tools that extract dust efficiently to support proper system efficiency rather than forcing more air through cluttered ducts.
Controls and safety
Prefer gear that requires minimal disassembly of the vent and avoids direct contact with electrical components. Ensure proper grounding and wear protective equipment during use.
Placement and storage
Store tools compactly in a dedicated box or bag. Consider wall-mounted racks near the utility area for quick access and safe storage away from children and pets.
Leave a Reply