How to Clean Up Stringing on a 3D Print
Stringing in 3D printing occurs when tiny strands of filament ooze from the nozzle as it travels between features. This guide covers practical methods to reduce or remove stringing and achieve cleaner prints. Following structured steps can help both beginners and more experienced makers optimize extrusion and finish.
With the right tools and technique, you can minimize post-processing time and improve print quality. The focus here is on safe, repeatable methods that work across common plastics like PLA and PETG, while offering options for delicate or challenging geometries.
Quick Answer
Control retraction, temperature, and travel paths to cut stringing. If stringing appears during idle moves, adjust retraction distance and speed, lower nozzle temperature in small increments, and enable a straight travel path. For stubborn cases, finish with trimming and light deburring for a smooth surface.
What You’ll Need
- 3D printing stringing cleanup deburring tool
- hobby knife precision cutter for 3D printed parts
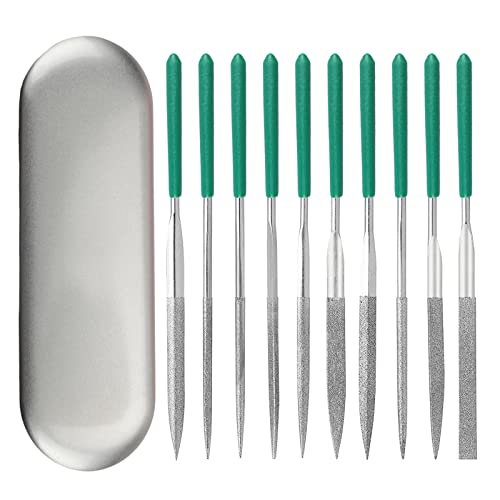
- needle file set for 3D print finishing


Before You Start
Before tackling stringing, verify printer calibration: bed level, extrusion multiplier, and filament diameter. Apply a test cube or bridge to observe stringing patterns. Time estimates vary with the print size and material, typically from 15 minutes for minor cleanup to several hours for large parts that need extensive finishing. Avoid touching hot nozzle or hot surfaces to prevent burns. Wear eye protection when trimming or filing and work in a well-ventilated area.
Step-By-Step: How To Clean Up Stringing On A 3D Print
- Run a small test print with a known problem area to observe stringing behavior.
- Increase retraction length gradually in 0.5 mm increments and test with short travel moves.
- Reduce nozzle temperature by 2–5 degrees Celsius at a time and re-test; avoid going below material-specific minimums.
- Enable a retraction mode during rapid back-and-forth moves to minimize ooze.
- Inspect surfaces and identify the most affected areas that require cleanup rather than full part reprint.
- Use a needle file set for precise smoothing on small stringing remnants along edges.
- Carefully trim stray strands with a hobby knife, keeping blades sharp for clean cuts without gouges.
- Finish with light deburring to restore sharp edges and uniform contours where needed.
- Re-run a targeted test print after adjustments to confirm improvements before committing to production parts.
Troubleshooting
| Symptom | Likely Cause | Fix | Prevention |
|---|---|---|---|
| Stringing occurs on long travels | Filament oozing during moves | Increase retraction, enable coasting, adjust temperature | Calibrate eject/retract settings; use faster travel moves |
| Strings near joints or bridges | Ooze during non-print moves | Lower temperature and optimize travel path | Split long moves into shorter ones where possible |
| Over-deposition causing blobs | Too high extrusion multiplier | Decrease extrusion factor slightly; check filament diameter | Calibrate filament profile; re-test with small prints |
| Ridges after cleanup | Excess material near edges | Lightly file or trim with precision tool | Finish with consistent sanding and polishing |
Common Mistakes
- Raising temperature without adjusting retraction, which increases oozing.
- Relying solely on post-processing instead of addressing core settings.
- Using dull knives or rough files that scratch or gouge surfaces.
- Neglecting cooling and print speed settings for high-precision areas.
- Skipping test prints after each adjustment, leading to inefficient troubleshooting.
Tips For Best Results
- Keep tools sharp and organized; a fresh blade makes cleaner cuts without tearing filament.
- Conduct small, iterative tests to verify each change’s impact on stringing.
- Document settings that work well for different filaments (PLA vs PETG) for quick reference.
- Use a steady, low-stress filing technique to avoid creating new surface imperfections.
- Combine settings optimization with gentle finishing for professional-looking parts.
Call A Professional
If prints repeatedly show severe stringing despite careful adjustments, consider if the issue might be hardware-related, such as a worn hotend or a mis-calibrated extruder. Seek professional service if you notice persistent under-extrusion, frequent clogs, or inconsistent layer adhesion that basic tuning cannot resolve.
FAQ
What causes stringing on a 3D print?
Stringing typically results from oozing filament during non-print moves, often influenced by temperature, retraction, and travel path settings.
Is it better to lower temperature than to increase retraction?
Generally both should be adjusted in balance; lowering temperature reduces oozing, while increasing retraction minimizes filament leakage between moves.
Can I fix stringing without reprinting?
Yes, many cases can be improved with trimming, filing, and light sanding, but severe cases may require adjustments to printer settings or a reprint.
Which tools are essential for post-processing stringing?
A stringing cleanup tool, a precision hobby knife, and a needle file set are commonly useful for careful cleanup.
When should I replace the nozzle?
Replace if wear causes extrusion inconsistencies, bigger blobs, or unpredictable stringing that cannot be corrected with tuning.
Does material type affect stringing?
Yes; materials like PETG and flexible filaments can string more easily and may require different temperature and retraction profiles than PLA.
Buying Guide
When selecting tools for cleaning up stringing on 3D prints, consider factors such as size, compatibility with your filament, and ease of use. Key buying factors include:
- Tool versatility — A dedicated stringing cleanup tool, precision hobby knife, and needle file set cover a broad range of cleanup tasks.
- Material compatibility — Tools should work with common filaments like PLA, PETG, and ABS without marring surfaces.
- Ergonomics and safety — comfortable handles and sharp blades reduce fatigue and risk during cleanup.
- Durability — High-quality blades and hardened files last longer under repeated use.
- Storage and organization — A compact, organized kit makes cleanup faster and more reliable.
For best results, pair these accessories with calibrated printer settings and a scheduled maintenance routine. Do you plan to tackle more complex prints or multi-part assemblies? A well-curated toolkit can save time and improve consistency across projects.
Leave a Reply