How to Clean a Shark Cordless Pro Vacuum
The Shark Cordless Pro is a popular handheld choice for quick cleanups and daily maintenance. Proper cleaning extends its life, preserves suction, and keeps allergens at bay. This guide outlines a practical, step-by-step approach to thorough cleaning and upkeep that fits typical American homes and lifestyles.
Quick Answer
To keep your Shark Cordless Pro performing well: empty the bin regularly, rinse the filter under cold water until clear, check the brush roll for hair, and replace worn attachments as needed. Schedule a full cleaning routine every 4–6 weeks depending on use.
What You’ll Need
- Shark Cordless Pro vacuum filter replacement kit HEPA
- Shark cordless vacuum crevice tool attachment
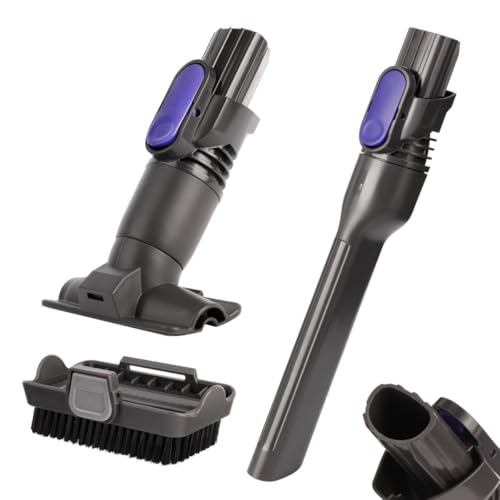
- Vacuum cleaning tool set for Shark cordless vacuum


Before You Start
Clear the area of small objects that could jam the brush roll. Ensure the vacuum is turned off and unplugged from any charging dock before disassembly. Allow the unit to cool if it has recently been used for a lengthy period. Be gentle with the wand and detachable parts to avoid cracks or loose connections. A typical cleaning session takes about 15–25 minutes for routine maintenance, while a deep clean may take 30–45 minutes.
Step-By-Step: How To Clean The Shark Cordless Pro
- Power down and detach: Turn off the vacuum, disconnect from the charger, and detach the wand or brush head as needed to access all components.
- Empty the dust cup: Hold the unit over a trash can and press the release to empty the dust cup. Tap out any stubborn debris to ensure maximum suction.
- Check the brush roll: Roll the brush to locate tangles. If hair or fibers are wrapped around the bristles, cut them away with scissors and remove with your fingers or a small tool.
- Rinse the filter: Remove the filter and rinse under cold running water until clear. Do not use soap, hot water, or a dryer cycle. Gently shake to remove excess water and let air dry completely for at least 24 hours.
- Inspect the filter housing: Wipe the housing with a dry cloth. If there is residue, wipe with a damp cloth and allow to dry before reassembly.
- Clean attachments: Wash the crevice tool attachment and any other cleaning tools with mild soap and water. Rinse and dry thoroughly before reuse.
- Reassemble: Once all components are dry, reattach the filter, brush head, and any attachments. Ensure each piece clicks securely into place.
- Test run: Power the unit on briefly to confirm proper operation and check for unusual noises or loss of suction.
- Schedule regular maintenance: Set a reminder every 4–6 weeks to repeat the routine, with more frequent cleaning for high-traffic homes or pets.
- Store properly: Keep the unit in a cool, dry place and avoid storing with a damp filter inside the housing.
Troubleshooting
| Symptom | Likely Cause | Fix | Prevention |
|---|---|---|---|
| Reduced suction | Clogged dust cup or filter | Empty cup and rinse filter thoroughly | Clean after heavy use |
| Brush roll not spinning | Hair or threads wrapped around brush | Remove tangles and reset | Regularly clean brush after use |
| Unusual noises | Debris in brush or misaligned parts | Clear debris and reseat parts | Inspect during routine maintenance |
| Loss of battery power | Low charge or worn battery | Charge fully; if persistent, contact support | Store at mid-charge and avoid extreme temps |
| Filter won’t dry completely | Moist filter installed | Ensure filter is fully dry before reinstall | Air-dry in a well-ventilated area |
Common Mistakes
- Rinsing the filter with hot water or soap, which can degrade filtration
- Not letting the filter dry completely, leading to mold or odor
- Forgetting to remove hair from the brush roll, reducing suction
- Using harsh cleaners on plastic housings, which can cause damage
- Skipping attachments and tools during maintenance, reducing overall effectiveness
Tips For Best Results
- Run the brush roll under slow, even pressure to avoid tangling fibers from carpets or rugs
- Keep a dedicated cleaning routine for pet owners to manage hair buildup
- To extend filter life, consider a backup filter kit and rotate usage
- Store tools in a designated bin for quick access during cleaning sessions
Call A Professional
Signs that professional service is needed include persistent loss of suction after cleaning steps, unusual motor noises, or a cracked housing. If the unit fails to power on after a full charge and basic troubleshooting, contact the manufacturer’s support or an authorized repair technician. Do not attempt internal repairs beyond the prescribed maintenance steps.
FAQ
How often should I clean the Shark Cordless Pro?
Frequency depends on usage, but a routine clean every 4–6 weeks helps maintain suction and performance.
Can I wash the HEPA filter?
Yes, rinse under cold water until clear and allow to dry completely before reinstalling.
What attachments are essential for cleaning?
Key attachments include the crevice tool and a general vacuum cleaning tool set for the cordless model.
Is it okay to use shampoo or soap on attachments?
Avoid strong cleaners on plastic parts; use mild soap and water for tools, then dry thoroughly.
Buying Guide
When shopping for replacement parts or additional tools for the Shark Cordless Pro, consider factors like compatibility, build quality, and the availability of genuine replacement parts. You’ll want items that fit your model and preserve suction power. Look for HEPA-rated filters for better allergen control and durable crevice tools for tight spaces. A comprehensive vacuum cleaning tool set can extend the life of your cordless system by providing versatile cleaning options for floors, upholstery, and car interiors. If you have pets or high-traffic areas, investing in compatible replacements ensures consistent performance over time.
Additional Considerations
Size and weight influence maneuverability around stairs and furniture. Noise level matters for quiet cleaning sessions, especially in apartments or late evenings. Energy efficiency is typically tied to the battery and motor performance, so check specifications for runtime per charge. Controls should be intuitive, with an easy-access release for quick tool changes. Place the unit on charge in a dry area away from heat sources. With the right accessories, maintenance becomes a simple routine, not a chore.
Leave a Reply