How to Clean Dusty Records: A Practical Guide
Dusty vinyl records can degrade sound quality and attract further grime. This guide outlines safe, effective methods for cleaning dusty records at home, with practical steps, checklists, and troubleshooting tips. It covers quick fixes and longer-term care so collectors can protect treasured LPs without damaging their surfaces.
Quick Answer
For most dusty records, start with a carbon fiber vinyl record cleaning brush to lift loose dust, then finish with a microfiber cloth or a dedicated cleaning kit. Use a record cleaning machine only for stubborn grime or deep cleaning, following the device’s instructions to avoid damage.
What You’ll Need
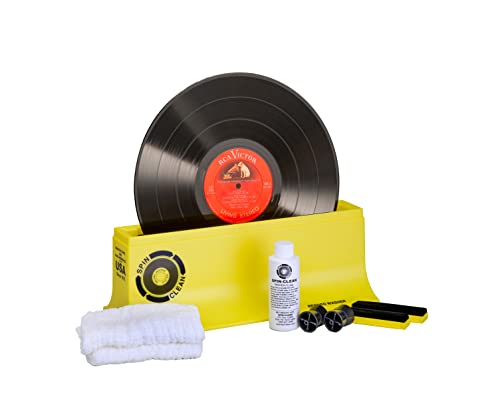
- Carbon fiber vinyl record cleaning brush (anti-static)
- Vinyl record cleaning kit microfiber cleaning cloths
- Record cleaning machine for vinyl LPs


Before You Start
Prepare a clean, low-dust workspace and handle records by the edges. Avoid touching the grooves to prevent oil transfer. Check that the record is fully dry before returning to its sleeve. For safety, unplug electronic cleaning devices when not in use and keep liquids away from turntables. Time estimates vary: a quick dusting takes about 5–10 minutes per record, while deep cleaning may require 20–30 minutes.
Step-By-Step: How To Clean Dusty Records
- Inspect the record under good lighting for visible dust and surface grime.
- Brush with a carbon fiber vinyl record cleaning brush, sweeping from outside to inside to lift loose dust.
- Wipe surfaces with a microfiber cleaning cloth to remove remaining particles, using gentle, even strokes.
- Apply a cleaning solution only if the manufacturer recommends it; never soak the record unless your kit specifies a wet cleaning method.
- If using a cleaning kit, follow the instruction sequence: apply, spread evenly, and lift away residue with lint-free wipes.
- For stubborn grime, run a record cleaning machine according to the device manual, ensuring the disc is properly centered and dry before playback.
- Dry the record thoroughly with a clean cloth to prevent water spots or residue on grooves.
- Place the record back into its inner sleeve, then into the outer jacket to minimize future dust exposure.
- Evaluate playback after cleaning; repeat steps if noise persists, but avoid over-cleaning which can wear grooves.
- Store records upright in a cool, dry area with minimal humidity to reduce new dust buildup.
- Maintain a regular cleaning routine, especially for frequently played albums.
- Periodically check cleaning tools for wear; replace brushes and cloths when lint or fibers shed.
Troubleshooting
| Symptom | Likely Cause | Fix | Prevention |
|---|---|---|---|
| Persistent crackling or pops after cleaning | Groove residue or static buildup | Re-clean with a fresh microfiber cloth and, if needed, a gentle cleaning solution | Regularly dust and dry-clean records before playback |
| Water spots after wet cleaning | Residual moisture | Dry thoroughly with a lint-free cloth and air-dry in a dust-free area | Use minimal moisture and ensure complete drying |
| Cloth fibers sticking to grooves | Lint from cloth | Switch to another clean microfiber cloth and wipe lightly | Pre-wash or use lint-free rags |
| Brush shedding fibers on vinyl surface | Worn brush | Replace brush promptly and clean the record by hand | Store brushes dry and clean, not in humid locations |
| Turntable or cleaning machine stalls | Device misalignment or overload | Check alignment, reset, or consult the manual | Follow device limits and maintenance schedule |
Common Mistakes To Avoid
- Using household cleaners that contain ammonia or alcohol on vinyl surfaces
- Wetting records too heavily or letting moisture sit in grooves
- Rubbing aggressively with a cloth, which can scratch surfaces
- Cleaning in a dusty environment, which reintroduces particles
- Over-cleaning a single record, risking groove wear
Tips For Best Results
- Work in a low-dust area and keep sleeves closed when not handling records
- Always handle records by the edges to avoid fingerprints
- Store cleaned records vertically in dust-free jackets with adequate padding
- Rotate cleaning tools to prevent cross-contamination between records
- Test cleaning methods on a less valuable record before applying to prized LPs
Call A Professional
Seek professional help if a record has heavy warp, deep scratches, or persistent mold growth that cleaning cannot resolve. Stop cleaning immediately if you notice bubbling, unusual odors, or discolored vinyl, and consult a professional restorer or specialist repair service.
FAQ
Can I clean records with water alone?
Water should be used sparingly and only when recommended by the cleaning kit; excessive moisture can damage grooves.
Is a cleaning machine worth it for casual collectors?
For frequent collectors, a cleaning machine can save time and improve results, but a brush and microfiber approach works well for occasional cleaning.
How often should I clean my records?
Dust-prone records benefit from regular light cleaning after playback; deep cleaning every few plays helps maintain sound quality.
Will cleaning remove all pops and crackles?
Cleaning reduces surface dust and superficial grime but will not fix deeper groove damage or severe wear.
Buying Guide
When choosing products to clean dusty records, consider size and compatibility with your setup, noise level, energy efficiency, controls, and placement. For casual use, a carbon fiber brush plus microfiber cloths offer a low-cost, low-effort solution that minimizes static. If you regularly handle a large collection, a dedicated record cleaning machine can streamline maintenance, provided it fits your turntable and space. Look for anti-static features to minimize static charges that attract dust, and ensure that cleaning cloths are lint-free and machine-washable. Think about storage: a clean, organized shelf with labeled sleeves reduces the overhead of ongoing cleaning. Finally, match tools to your records’ needs—thick pressings, delicate vintage discs, and heavily used LPs may require different approaches or professional assessment. Are you optimizing for budget, speed, or absolute quality? Your answer will guide the best combination of tools and methods.
Leave a Reply