How to Clean Interior Doors
Interior doors accumulate dust, fingerprints, and smudges from daily use. With the right tools and a simple routine, cleaning all sides of a door—including crevices and hinges—becomes quick and effective. This guide walks through safe methods, practical steps, and common mistakes to avoid, helping homeowners restore doors to their best look.
Careful cleaning not only improves appearance but can extend the life of finishes. The approach below emphasizes gentle, effective techniques that work on wood, painted, and hollow-core doors while minimizing moisture that could warp or stain surfaces.
Quick Answer
Mix a mild cleaning solution, then wipe with microfiber cleaning cloths for interior doors. For frames and hinges, use a long-handled cleaning brush for door frames and an angled scrub brush for door crevices and hinges. Dry with a clean cloth and buff to a shine. Repeat periodically to keep doors looking fresh.
What You’ll Need
The following tools and materials cover typical interior door cleaning tasks. Use the items as described to avoid water damage or finish wear.
- Microfiber cleaning cloths for interior doors
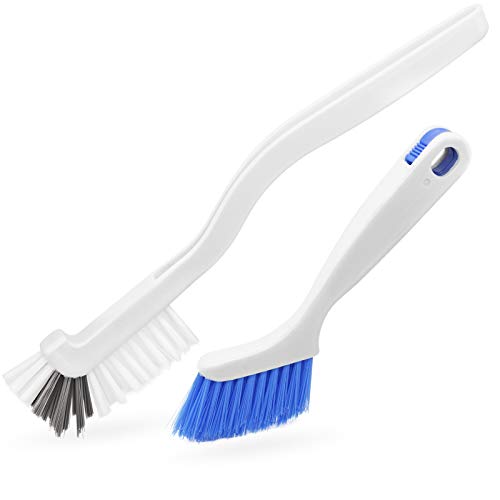
- Long-handled cleaning brush for door frames
- Angled scrub brush for door crevices and hinges
- Mild dish soap or a gentle all-purpose cleaner
- Warm water in a bucket or spray bottle
- Dry lint-free cloths or towels


Before You Start
Assess the door type and finish to avoid damage. Plain painted or sealed wood doors respond well to gentle cleansers; heavy solvents or abrasive pads may scratch or strip finishes. Work in a well-ventilated area if using cleaners with fragrance or solvents. Plan a cleaning session when doors are dry or near dry to prevent moisture from seeping into joints. A typical interior door cleaning session takes 15–30 minutes per door, depending on condition. Important cautions include avoiding soaking doors and protecting nearby hardware from moisture.
Step-By-Step: How To Clean Interior Doors
- Remove surface dust with a dry microfiber cloth before applying any liquid cleaners.
- Dip a microfiber cloth into a mild cleaning solution, wring out excess moisture, and wipe a vertical section from top to bottom.
- For stubborn smudges, use the angled scrub brush for door crevices and hinges to reach corners, edges, and hinge areas without rubbing too hard.
- Use the long-handled cleaning brush for door frames to sweep debris from frame corners and top rails without leaning or stretching.
- Wipe the door surface again with a clean, damp microfiber cloth to remove any soap residue.
- Dry the surface with a fresh cloth to prevent streaks and water marks, focusing on edges and corners where moisture can collect.
- Inspect the door for remaining smudges; repeat targeted cleaning only on problem spots, avoiding over-wetting the surface.
- Polish with a dry microfiber cloth to restore the finish and reduce drying time.
Troubleshooting
| Symptom | Likely Cause | Fix | Prevention |
|---|---|---|---|
| Streaks or watermarks | Excess moisture | Wipe with a dry cloth; re-wipe with a barely damp cloth and dry again | Use well-wrung cloths; avoid soaking surfaces |
| Faded finish after cleaning | Harsh cleaner or abrasive rubbing | Switch to mild soap; use gentle motions | Test cleaner on a hidden area first |
| Residue around hinges | Cleaner reaching crevices | Clean with angled brush; wipe with microfiber afterward | Contain cleaner to door face and frame |
| Water marks on painted doors | Excess moisture at edges | Dry thoroughly; avoid leaving damp spots | Wipe with a damp cloth, then dry immediately |
Common Mistakes
- Using abrasive pads or harsh solvents on painted or stained doors
- Soaking doors or frames with water or cleaners
- Skipping drying steps, leading to warping or finish damage
- Neglecting the edges and hinges, which collect dust and grime
Tips For Best Results
- Schedule routine touch-ups monthly to prevent buildup and minimize intensive cleaning.
- Rotate the door’s cleaning focus between face, edges, and hinge areas to maintain uniform appearance.
- Use microfiber cloths exclusively for lint-free, streak-free results.
- For unfinished wood doors, apply a compatible conditioner after cleaning if recommended by the manufacturer.
- Label cleaning supplies to prevent cross-contamination and keep cleaners away from pets and children.
Call A Professional
Call a professional if a door shows deep gouges, peeling veneer, or finish damage that cleaning cannot repair. Signs to seek help include persistent staining after multiple cleanings, water damage around the frame, or doors that warp or rub against frames after cleaning. If you notice them, a pro can assess finish integrity and recommend refinishing or replacement options.
FAQ
Can I clean interior doors with water alone?
Water can remove surface dust but is often insufficient for smudges. A mild soap solution improves cleaning without risking finish damage.
Are microfiber cloths necessary?
Microfiber cloths reduce lint and streaking, making them especially effective on doors with glossy or painted finishes.
How often should interior doors be cleaned?
Light cleaning weekly or monthly is sufficient for most homes; deep clean every few months or as needed for heavy buildup.
What if my door has a delicate finish?
Use the mildest cleaners and test on a hidden area first; avoid solvents and abrasive tools that can dull or scratch the surface.
Buying Guide
Choosing the right products and approach for interior door cleaning depends on several factors. Consider size and type of doors, finish, and usage patterns. A good routine balances effectiveness with finish safety, using soft tools and gentle cleaners. Understanding noise levels and energy efficiency is less relevant for cleaning but helps in selecting maintenance gear like vacuums or handheld steamers if used nearby. Placement considerations relate to storing supplies so they are accessible but away from heat or moisture. For most households, a compact kit with microfiber cloths, a long-handled brush for frames, and an angled brush for crevices covers typical needs while remaining affordable and easy to use.
When comparing kits or replacements, look for microfiber that is lint-free, durable, and machine washable. Confirm that brushes have soft bristles and ergonomic handles to minimize strain during cleaning. If the door surfaces include sensitive finishes, check manufacturer guidelines for approved cleaners and methods. A well-chosen set of tools enhances efficiency and helps maintain a neat, uniformly clean interior environment.
Leave a Reply