How to Keep Water Tank Clean
Maintaining clean water storage is essential for safe drinking water, irrigation, and household use. This guide walks through practical steps to prevent buildup, remove sediments, and keep storage tanks sanitary with common tools and simple routines.
Quick Answer
Regular inspection, basic cleaning with a dedicated brush kit, and occasional rinse with a hose wand can dramatically improve water quality. For stubborn stagnation, a portable cleaning pump helps flush debris. Schedule maintenance at least every 3–6 months, or more often in warm climates or with high sediment loads.
What You’ll Need
Gather the following tools to clean and maintain water storage tanks efficiently:
- Water storage tank cleaning brush kit for scrubbing interior surfaces and hard-to-reach corners
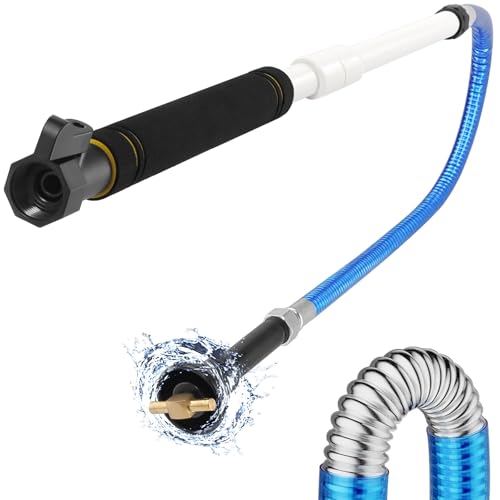
- Tank cleaning wand with flexible hose for water storage tanks to reach all areas and rinse effectively
- Portable water tank cleaning pump siphon with nozzle to flush out sediments and circulate water


Before You Start
Prepare the area and equipment to minimize mess and risk. Empty and rinse the tank if possible, then remove any lids or vents to inspect the interior. Check for cracks, leaks, or signs of contamination. Wear protective gloves and eye protection. Ensure the water source used for flushing is safe and that draining water does not contaminate surrounding soil or groundwater. Time for a typical cleaning session ranges from 30 minutes for a light rinse to 2 hours for a thorough scrub and sanitizing. Critical cautions: never mix cleaning chemicals that could react with stored water, and never use metal brushes on plastic tanks to avoid scratches that harbor bacteria.
Step-By-Step: How To Keep Water Tank Clean
- Turn off all supply lines and drain the tank completely. If the tank is large, set up a controlled drain to avoid splashing.
- Inspect the interior for sediment, slime, or biofilm. Note any cracks, fittings, or lids that require replacement or resealing.
- Use the water storage tank cleaning brush kit to scrub interior surfaces, paying attention to corners, baffles, and intake areas.
- Rinse the interior with a tank cleaning wand with flexible hose, starting from the top and working downward to remove loosened debris.
- When necessary, connect the portable water tank cleaning pump siphon with nozzle to flush and circulate water, helping to remove stubborn sediments and odors.
- Clean any screens, vents, or intake filters outside the tank to prevent recontamination. Reinstall after drying.
- Fill the tank with clean water and run taps or outlets to ensure thorough rinsing of the system.
- Optionally apply a recommended sanitizing method appropriate for the tank material and water use. Follow label directions and rinse completely before reuse.
- Dry and reseal the tank lid and vents. Store tools in a clean, dry area to prevent contamination buildup.
- Schedule the next cleaning based on usage and sediment levels. For water storage in hot climates, aim for more frequent maintenance.
- Document findings, replacements, and next cleaning date to maintain a consistent maintenance cycle.
- Educate household members or facility staff about routine checks, especially in buildings with multiple users or seasonal use.
Troubleshooting
| Symptom | Likely Cause | Fix | Prevention |
|---|---|---|---|
| Bad odor after cleaning | Insufficient rinse or lingering biofilm | Rinse again thoroughly; consider a sanitizing step per guidelines | Regular maintenance and proper drying after cleaning |
| Sediment returns after flushing | Heavy sediment in source or inlet lines | Install sediment filter and improve input water quality | Inspect inlet areas and clean screens monthly |
| Cracks or leaks detected | Tank material wear or impact damage | Repair or replace compromised sections with compatible components | Handle tanks carefully; perform routine inspections |
| Persistent algae growth | Sun exposure or warm temperatures | Shade tank; increase cleaning frequency; sanitize as needed | Keep lids closed and secure; use opaque tanks if possible |
Common Mistakes
- Using abrasive metal brushes on plastic tanks, which can scratch surfaces and harbor microbes
- Rinsing with dirty water or reintroducing sediments during cleaning
- Overlooking screen and vent maintenance, leading to recontamination
- Skipping safety precautions or using incompatible sanitizers with tank materials
Tips For Best Results
- Schedule cleanings before peak usage seasons to avoid service interruptions
- Label and separate cleaning tools from regular garden gear to prevent cross-contamination
- Use a dedicated brush kit for tanks and a separate wand for rinsing to minimize residue transfer
- Keep a maintenance log with dates, observations, and parts replaced
- Consider a light sanitizing regimen with approvals for potable use if the tank stores drinking water
Call A Professional
Seek professional help if the tank shows persistent leaks, cracks, or if contamination is suspected beyond routine cleaning. Stop using the system and contact a licensed plumber or water treatment specialist if you notice cloudy water, unusual tastes or persistent odors that do not improve after cleaning and sanitizing. Do not attempt major repairs without proper training or the correct replacement parts.
FAQ
How often should I clean a water storage tank?
Most households benefit from cleaning every 3–6 months, with more frequent cleanings in hot or sediment-prone environments.
Can I use household bleach to sanitize my tank?
Yes, but only with approved concentrations and materials compatibility. Follow manufacturer guidelines and ensure thorough rinsing before reuse.
What tools are essential for tank cleaning?
A dedicated water storage tank cleaning brush kit, a tank cleaning wand with a flexible hose, and a portable cleaning pump siphon with nozzle cover most regular needs.
Is it necessary to drain the tank before cleaning?
Yes, draining helps remove loose sediment and makes interior scrubbing more effective.
Should I seal the tank after cleaning?
Sealing or resealing helps prevent contamination; ensure lids, vents, and gaskets are intact and properly secured.
Is a professional cleaning worth it for large commercial tanks?
For large or complex systems, professional service can ensure proper sanitization, compliance with regulations, and safe operation.
What maintenance can prevent future buildup?
Regular inspections, prompt screen cleaning, and controlled intake water practices reduce sediment and biofilm formation.
Buying Guide
When choosing tools to keep a water tank clean, consider size, compatibility, and ease of use. The right set of tools should fit the tank material (plastic, resin, steel), tank dimensions, and the mounting or access points. Look for kits that include a long, flexible wand, a sturdy brush head, and a siphon pump designed for potable water systems. Noise, portability, and storage convenience matter for home use or smaller facilities. Energy-efficient, low-maintenance options reduce ongoing costs. Ensure the tools are compatible with your tank’s inlet and outlet fittings and come with clear usage instructions. Do you need portable cleaning for multiple tanks or a single, fixed installation? Balance budget with durability and ease of maintenance to select the best combination for long-term reliability. Consider warranty coverage and replacement parts availability to extend the life of your cleaning kit.
Leave a Reply