How to Remove Scratches From Glass: A Practical Guide
Glass surfaces can accumulate fine scratches from everyday use, cleaning routines, and car ownership. While deep gouges often require professional repair, many light scratches can be noticeably reduced or eliminated at home with the right materials and technique. This guide walks through a practical, step-by-step method using consumer-grade polishing tools designed for clear, safe results on glass surfaces.
Quick Answer
For light surface scratches, use a cerium oxide polishing method with a dedicated glass polishing kit, followed by a high-quality microfiber cloth. For broader or deeper scratches, repeat with a polishing pad and ensure you work slowly and evenly. If scratches persist or are on a critical surface like a windshield, consider professional evaluation.
What You’ll Need
- cerium oxide glass polishing powder kit or equivalent cerium oxide paste kit
- glass scratch repair kit with polishing pads and microfiber cloth
- windshield and glass scratch remover kit cerium oxide paste

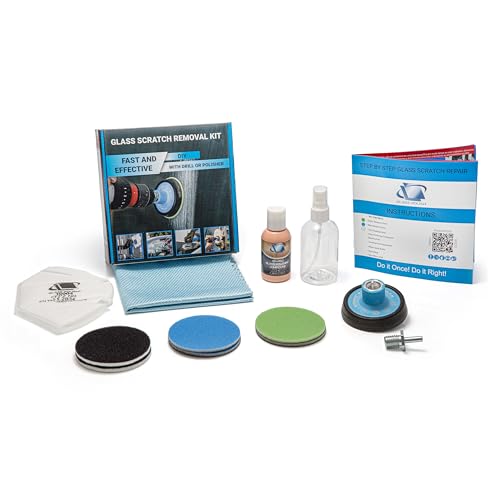

Before You Start
Clear a clean, well-lit workspace and protect nearby surfaces with a soft cloth. Use a running spray bottle of water to dampen the area and prevent dry friction. Time estimates: 20–60 minutes for light scratches; deeper work may take longer. Safety note: avoid abrasive pads on coated or privacy-tinted glass where the coating could be damaged. Always test on an inconspicuous area first.
Step-By-Step: How To Remove Scratches From Glass
- Prepare the glass by cleaning it with a mild glass cleaner and a microfiber cloth to remove dust and oils.
- Apply a small amount of cerium oxide paste or powder on a damp polishing pad or felt wheel designed for glass.
- Gently rub the scratched area in a circular motion, applying consistent pressure and moving across the entire scratch to blend the edge.
- Periodically wipe away residue with a clean microfiber cloth to inspect progress and keep the surface clear.
- Continue polishing with light to moderate pressure for 1–3 minutes, then wipe clean and recheck the scratch depth.
- If the scratch remains visible, reapply the polishing compound and repeat the circular motion for another short interval.
- For stubborn scratches, switch to a finer polishing pad and repeat the process to refine the surface.
- Once the scratch is minimized, finish with a thorough wipe-down and apply a light coating of glass protectant if desired.
- Inspect under different lighting to ensure uniform clarity and no haze remains.
- Clean the polishing tools and store them according to manufacturer instructions to prevent residue buildup.
- Perform a final test on a small area after 24 hours to confirm lasting results and absence of etching or haze.
Troubleshooting
| Symptom | Likely Cause | Fix | Prevention |
|---|---|---|---|
| Haze or milky film | Residue left on glass | Wipe with microfiber cloth and clean with glass cleaner | Remove residue promptly during polishing |
| Scratch remains visible | Scratch too deep or polishing insufficient | Increase gentle pressure slightly and continue; consider professional assessment | Test small area first; avoid over-polishing |
| Surface feels rough after polish | Rough residue or over-aggressive polishing | Re-wet area and polish with a finer pad | Choose appropriate pad for the glaze level |
| Glass coating or tint damaged | Aggressive or inappropriate material | Stop immediately; do not continue with the same method | Check product compatibility for coated glass |
Common Mistakes
- Using excessive pressure which can engrave the glass or worsen the scratch
- Polishing dry or without a damp surface, causing heat buildup
- Skipping a test on an inconspicuous area before treating the visible scratch
- Rushing steps or skipping cleaning between passes
Tips For Best Results
- Work slowly and consistently; patience yields better clarity
- Keep the polishing pad or cloth moist to reduce heat and friction
- Use a quality microfiber cloth to avoid introducing new scratches
- Limit polishing to the scratch area to prevent hazing on surrounding glass
Call A Professional
Seek professional help if the scratch is deep, if the surface is a critical viewing area (such as a windshield with structural implications), or if visibility remains impaired after at-home polishing. Stop immediately if the glass appears to crack or chip further during processing.
FAQ
Can cerium oxide effectively remove all scratches from glass?
Cerium oxide can reduce or remove many light to moderate scratches, but very deep gouges may require professional repair or replacement.
Is polishing safe on a windshield with automotive coatings?
Polishing is generally safe on untreated glass but may affect certain coatings; test a hidden spot and follow product guidelines.
How long does a typical scratch removal session take?
Light scratches may take 20–40 minutes; deeper work can take 60 minutes or more, with drying intervals between passes.
Will polishing restore complete clarity?
Many users see significant improvement, but some scratches may leave a faint mark or haze that cannot be fully eliminated at home.
Buying Guide
Choosing the right kit depends on scratch severity, glass type, and user comfort with DIY repairs. Consider the following factors to compare options and select a suitable kit:
- <bScratch severity: Light surface scratches respond best to polishing; deeper gouges may require professional service.
- <bAbrasive medium: Cerium oxide is commonly recommended for clear glass; verify compatibility with coated surfaces.
- <bInclusion of pads and cloths: Look for a kit that includes soft polishing pads and microfiber cloths for even texture and minimal hazing.
- <bPaste vs. powder formulation: Some kits use a liquid paste; others use a dry powder that activates with water—choose your preference.
- <bEase of use: Step-by-step instructions and safety notes help reduce user error and risk of damage.
- <bArea coverage: Consider the size of the area to be treated and whether the kit is suitable for spot fixes or larger sections.
- <bSafety: Ensure the product is non-toxic and safe for indoor use, with clear removal instructions for residue.
- <bStorage and cleanup: Check how easy it is to clean tools and store materials after use.
With the right approach and tools, light scratches on glass can often be minimized effectively at home, preserving clarity and extending the life of screens, tabletops, or vehicle glass. Always follow manufacturer instructions and consider professional help for challenging cases.
Leave a Reply