How to Get Rid of Scratches on a Car
Car owners often notice fine scratches that mar the finish. With the right steps and proper products, light surface scratches can be reduced or removed without professional help. This guide explains a practical, step-by-step approach using common automotive polishes and tools available in the US market.
Quick Answer
Assess the scratch depth—clear coat scratches respond to polishing, while deeper gouges may need filler or paint touch-up. Use a dedicated car scratch remover kit with a rubbing compound and microfiber towels for best results. For best efficiency, pair polishing with a dual action orbital car polisher to apply even, controlled pressure.
What You’ll Need
- Car scratch remover kit with rubbing compound and microfiber towels
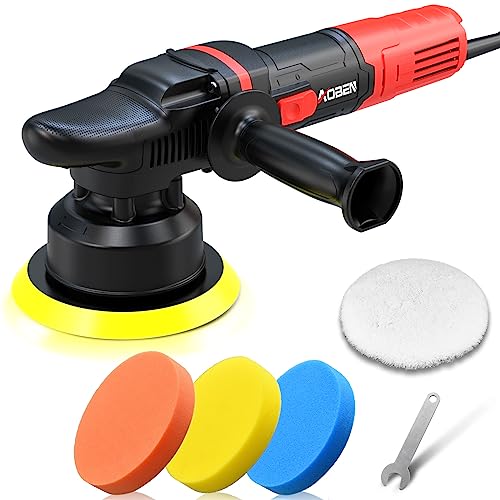
- Dual action orbital car polisher 6 inch pad kit
- Fine cut automotive polish 8 oz with microfiber applicators
- Clean, lint-free microfiber towels for buffing
- Painter’s tape or edge guards to protect adjacent trim


Before You Start
Begin with a clean surface. Wash and dry the area around the scratch to remove dirt that could cause further abrasion. Inspect the scratch with good lighting to determine depth. If the scratch penetrates the clear coat but not the base paint, polishing may suffice. If the scratch is deep enough to feel with a fingernail, professional repair or repaint might be needed. Always test a small, inconspicuous area first to ensure the chosen product does not dull the paint.
Time estimate: 30–60 minutes for a single scratch on a typical vehicle. Avoid applying heat or direct sunlight during the procedure. Use a clean workspace and wear protective gloves if desired.
Step-By-Step: How To Get Rid Of Scratches On A Car
- Prepare the work area and protect adjacent surfaces with painter’s tape to prevent accidental exposure.
- Apply a small amount of fine cut automotive polish to a microfiber applicator. Work in a small section at a time.
- Using the dual action orbital car polisher, set to a low speed and gently spread the polish in overlapping passes. Maintain light to moderate pressure and keep the pad flat against the surface.
- Switch to a clean microfiber towel and buff the area to remove excess polish. Wipe in a consistent, circular motion until the area shines evenly.
- If the scratch remains visible, apply a touch more polish to the area and re-polish using short, back-and-forth motions with the polisher for enhanced leveling.
- For stubborn marks, repeat the polishing cycle with a car scratch remover kit with rubbing compound, focusing on the immediate vicinity of the scratch. Do not overwork the paint.
- Inspect under bright light, then wipe away any residue. If the surface looks uniform, move to a final step with a clean microfiber towel.
- Follow with a light coat of protective wax or sealant to restore gloss and improve future scratch resistance.
- Document results and avoid aggressive compounds on softer paints. If the scratch still stands out, consider the professional option listed in the guide.
Troubleshooting
| Symptom | Likely Cause | Fix | Prevention |
|---|---|---|---|
| Scratch still visible after polishing | Depth exceeds clear coat; compound couldn’t level | Proceed with professional evaluation or paint touch-up | Use a protective coating after repair |
| Hazy or cloudy area | Over-polishing or residue left behind | Re-wipe with a clean microfiber and re-buff | Clean pads regularly; avoid excessive product buildup |
| Streaks after buffing | Improper technique or dirty towels | Switch to fresh towels and polish with even pressure | Use dedicated polishing towels and follow pad color guidelines |
| Paint transfer on towels | Excessive product or aggressive pad | Work within recommended product amount and pad hardness | Practice with scrap panels before working on the car |
Common Mistakes
- Over-pressing the polisher, which can heat and burn the paint
- Using a low-quality or dirty microfiber cloth that leaves fibers behind
- Skipping surface prep or protective steps, leading to uneven results
- Applying heavy compounds on soft paints without testing first
Tips For Best Results
- Always work in shaded areas or indoors to prevent rapid drying and uneven results
- Test products on a hidden area first to check for color changes or hazing
- Use a color-matched, narrow-angle light to reveal micro-scratches you may miss
- Keep pads clean and replace them when they wear to avoid swirling or micro-marring
- Finish with a high-quality wax or sealant for added protection against future scratches
Call A Professional
Some scratches are too deep for DIY repair. If you notice metal showing through, you see primer, or the clear coat is chipped extensively, stop the process. Do not attempt paint touch-ups yourself if you lack experience. Seek a certified body shop or auto detailing professional for a precise color match and durable repair.
FAQ
Can scratches be completely removed by polishing?
Light surface scratches can often be reduced or eliminated with polishing and the right tool set, but deeper scratches may require professional repair or repaint.
What is the best order of products to use?
Start with cleaning, then a fine cut polish, followed by the rubbing compound if needed, and finish with wax or sealant.
Do I need a dual action polisher for scratches?
A dual action polisher helps apply even pressure and reduces risk of heat damage; it is recommended for consistent results.
How long do results last?
With proper polishing and a protective top coat, results can last months, depending on exposure to elements and maintenance routine.
Buying Guide
When choosing products to remove car scratches, consider size, noise, energy efficiency, controls, and placement. For most DIY enthusiasts, a dual action orbital car polisher 6 inch pad kit balances power and safety, while a car scratch remover kit with rubbing compound and microfiber towels and fine cut automotive polish 8 oz with microfiber applicators cover essential steps. Look for all-in-one kits that include multiple pads and a variety of finishing compounds to handle different levels of abrasion. Noise levels vary by motor design; choose a model with comfortable operation at your preferred range. Consider storage space, cord length, and ease of access for regular maintenance. For placement, ensure a dry, ventilated workspace and a stable work surface. If you value quick results, target a kit that emphasizes clear coat restoration and protective coatings to guard against future scratches. Finally, review customer feedback for real-world performance and compatibility with your car’s paint type and color.
Leave a Reply