How to Get Rid of Cracked Heels
Cracked heels are a common concern for many, especially during dry seasons or after frequent exposure to water. A routine with the right tools can smooth rough skin, relieve discomfort, and restore the natural look of the feet. This guide walks through practical steps to safely reduce cracks and keep heels healthy.
Quick Answer
Use a combination of a dedicated foot care tool, regular filing, and moisturization to gradually remove dead skin and seal in hydration. Start with a gentle approach and increase wearness as the skin improves. For persistent cracks, consider a professional-grade tool to accelerate results, and always follow up with a rich foot cream or oil.
What You’ll Need
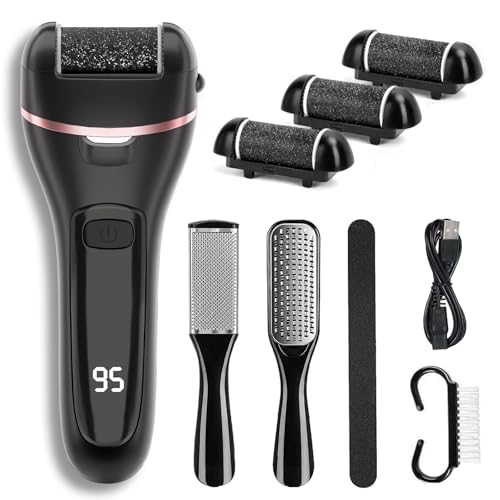
- Electric foot callus remover for cracked heels
- Stainless steel foot rasp callus remover professional grade
- Foot file callus remover with replaceable roller heads for cracked heels
- Moisturizing cream or oil for daily hydration
- Softening bath or foot soak (optional)


Before You Start
Begin with clean, dry feet. Soaking for 5–10 minutes can soften the skin and make the removal process easier, but avoid soaking if you have open cracks or painful fissures. Test tools on a small area first to ensure the skin tolerates the abrasion. Set realistic expectations; results occur over several sessions, not in a single treatment. Time estimate: 20–40 minutes per session, depending on skin condition.
Safety note: If you notice severe redness, bleeding, or sharp pain, stop and seek medical advice. Do not aggressively remove skin near cracks, as this can worsen the condition and delay healing.
Step-By-Step: How To Get Rid Of Cracked Heels Naturally And Safely
- Prepare the feet by washing with warm water and drying thoroughly. A light soak can be beneficial but should be followed by gentle drying to prevent slipperiness during tool use.
- Choose the appropriate tool. Start with a mild approach using the foot file or roller-head remover before escalating to a more abrasive rasp if needed.
- Gently work on the heel’s surface in short, controlled strokes. Focus on the thick, dry areas but avoid pressing hard on intact, healthy skin.
- Switch between tool heads as the skin becomes smoother. Replaceable roller heads allow you to tailor the intensity to your comfort level.
- Rinse the feet to remove debris and dead skin. Pat dry with a clean towel to prepare for moisturizing.
- Apply a thick moisturizer, barrier cream, or natural oil while the skin is still slightly damp to lock in moisture.
- Revisit the cracking areas a couple of times per week, gradually increasing the frequency as the skin improves.
- Wear breathable socks after treatments to reduce moisture loss overnight and enhance hydration.
- Keep nails trimmed and cuticles clear to prevent trapping moisture and bacteria around the heel area.
- Update your routine seasonally: dry climates may require more frequent smoothing and hydration, while summer activities may demand regular upkeep.
- If cracks persist or worsen, consult a podiatrist for a professional assessment and treatment plan.
- Consider pairing tools with routine pedicure habits to maintain results between sessions.
Troubleshooting
| Symptom | Likely Cause | Fix | Prevention |
|---|---|---|---|
| Persistent cracking after several sessions | Deep fissures or underlying skin conditions | Limit self-treatment and seek professional guidance | Regular professional checkups, maintain moisture daily |
| Skin becomes red or irritated | Over-aggressive filing or sensitive skin | Pause tools, apply calm ointment, and reintroduce gradually | Use lighter pressure, switch to milder heads |
| Rough feel returns quickly | Inadequate moisture or environmental dryness | Boost hydration routine and consider overnight socks | Consistent moisture, humidifier in dry spaces |
| Tool head clogs with skin debris | Thick debris buildup | Rinse tools frequently during use | Clean tools after each session |
Common Mistakes
- Over-sanding or aggressive filing that damages healthy skin
- Using tools on cracked or bleeding areas
- Skipping moisture after treatment, leading to quick re-drying
- Expecting immediate results from a single session
- Ignoring signs of infection or persistent pain
Tips For Best Results
- Hydration is key: apply thick creams or natural oils daily, especially after bathing
- Consistency beats intensity: regular, gentle resurfacing preserves skin integrity
- Choose replaceable roller heads to maintain effective results and hygiene
- Keep nails and surrounding skin clean to prevent new roughness around the heels
- Use breathable socks after each treatment to maximize moisture retention
Call A Professional
Consult a professional if cracks are severe, recurrent, or show signs of infection (redness, warmth, pus, or fever). Seek immediate care for any open wounds, persistent pain, or if you have diabetes or circulatory issues, as foot health requires careful management in these conditions.
FAQ
How often should I use a foot file for cracked heels?
Most routines work well with 2–3 sessions per week, depending on skin thickness and comfort level.
Can I use a metal rasp on cracked heels?
Yes, but use light pressure and a gentle approach to avoid skin damage; switch to milder heads if irritation occurs.
What moisturizers are best after treatment?
Look for thick creams containing glycerin, urea, or petrolatum to seal in moisture; natural oils are helpful too.
Is soaking necessary before using tools?
Soaking helps soften skin but is optional; if you soak, limit time and dry feet completely before filing.
Do I need to wear socks after treatment?
Wearing breathable socks helps lock in moisture and supports healing, especially overnight.
Buying Guide
When choosing devices to combat cracked heels, consider factors like device type, head options, and ease of cleaning. A combination approach—an electric foot callus remover for daily maintenance, paired with a stainless steel foot rasp for heavier removal, and a foot file with replaceable roller heads for customization—offers flexibility and efficiency. Look for models with multiple speed settings to control abrasion, replaceable heads for hygiene, and ergonomic handles for comfortable use. Quiet operation and compact designs ease daily routines at home. Remember to check for safety features such as automatic shutoff when excessive pressure is detected and protective guards to prevent over-sanding.
Size matters: larger discs cover more surface and speed up sessions, while compact tools fit easily into a dorm or travel kit. Noise level can influence how often you’ll use the device, especially around family members or in shared spaces. Energy efficiency is often tied to battery life; consider rechargeable options for convenience. Placement is simple: keep tools dry and clean in a dedicated cabinet or drawer, away from children. With the right combination of tools and a consistent routine, cracked heels can improve gradually without harsh methods.
Leave a Reply