How to Clean Wallpaper Glue: Practical Methods and Tools
Cleaning wallpaper glue requires careful technique to avoid damaging the wallpaper while removing the adhesive residue. This guide provides practical methods using common tools, along with safety tips and step‑by‑step instructions suitable for American homes.
By understanding the right approach, homeowners can refresh walls without costly refinishes. The focus is on safe products and efficient methods that work with standard wallpaper materials found in most U.S. households.
Quick Answer
Choose a method based on wallpaper type. For vinyl or sturdy papers, start with a damp sponge and gentle scraper. For delicate finishes, use a scoring tool to loosen glue before applying a mild solution. For stubborn residues, a steam remover kit can help, but test first to avoid damage.
What You’ll Need
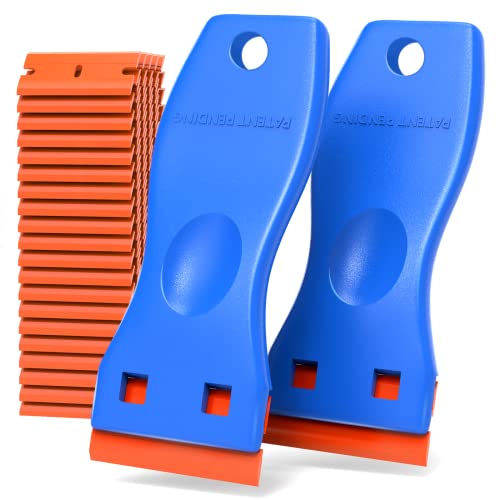
- Wallpaper scraper with plastic blade
- Wallpaper scoring tool for removal
- Wallpaper steam remover kit


Before You Start
Inspect the wallpaper for wear, peeling edges, or soaked areas. Perform a patch test in a small, inconspicuous area to ensure the finish isn’t affected by moisture or steam. Protect nearby trim and floors with drop cloths. Plan for a multi‑step process if large sections require treatment. Always unplug electrical outlets and ensure good ventilation.
Step-By-Step: How To Clean Wallpaper Glue
- Gather tools and materials from the list above to keep a steady workflow.
- Clear furniture and lay a drop cloth to catch drips and debris.
- Moisten a clean sponge with warm water and gently wipe the surface to loosen the glue.
- For stubborn spots, use the wallpaper scraper with plastic blade at a shallow angle to lift adhesive without scratching the wallpaper.
- Use the wallpaper scoring tool for removal to create tiny perforations in the glue layer, allowing moisture to penetrate.
- Reapply warm water and continue gentle scrubbing in small sections until glue loosens.
- If glue remains stubborn, employ the wallpaper steam remover kit in accordance with manufacturer instructions, keeping steam away from seams and edges.
- Wipe the area with a clean, damp cloth to remove residue, then dry with a towel and let fully dry before any repaint or refinishing.
Troubleshooting
| Symptom | Likely Cause | Fix | Prevention |
|---|---|---|---|
| Excess moisture or wallpaper warping | Over-saturation | Use lighter dampening and shorter contact time | Test areas first; apply moisture gradually |
| Glue still feels tacky after cleaning | Glue bound into fibers | Repeat dampening and light scrubbing; avoid harsh chemicals | Work in small sections and finish promptly |
| Scratches or nicks on wallpaper | Rough scraping | Switch to plastic blade; use soft strokes | Choose appropriate tool for wallpaper type |
| Wallpaper edges peel after moisture | Adhesive failure or over-wetting | Allow time to dry fully; re-glue edges if needed | Limit moisture near edges; use sealant if advised |
Common Mistakes
- Over-wetting the wall, leading to swelling or loosening of the paper
- Using metal scrapers on delicate textures
- Rushing the process in large areas without testing first
- Ignoring safety: insufficient ventilation or electrical hazards near moisture
Being mindful of these pitfalls can save time and preserve wallpaper integrity during glue removal.
Tips For Best Results
- Work in small sections to maintain control over moisture and glue removal.
- Keep a damp cloth handy to wipe away loosened glue as you go.
- Use a steady, shallow angle when scraping to avoid gouging the surface.
- Allow ample drying time between steps to prevent mold or peeling later on.
- Test any steam application on an inconspicuous area first to gauge responsiveness.
Call A Professional
Consider hiring a pro if the wallpaper is heavily textured, painted, or if moisture affects large wall areas. Stop to contact a specialist if you notice bubbling, paint lifting, or wallpaper detaching beyond repair limits. Seek professional help for high‑risk surfaces or obligations beyond DIY comfort level.
FAQ
Can I remove glue from wallpaper without removing the paper?
Yes, by gently applying moisture and using soft tools to lift the adhesive, but proceed in small areas to avoid damage.
Is steam safe for all wallpapers?
Steam is effective but can damage certain wallpapers. Always test first and follow the steam remover kit guidelines.
What should I do if the wallpaper starts to peel after cleaning?
Stop and let it dry completely, then assess whether to reattach with appropriate adhesive or call a pro.
What are the best tools for glue removal?
A plastic‑blade scraper, a scoring tool, and a steam remover kit are commonly effective when used correctly.
How long does it typically take to clean glue from a standard room?
Average time varies by room size and wallpaper type; plan for several hours for larger areas and multiple passes.
Buying Guide
Key buying factors help select the right tools and approach for cleaning wallpaper glue. Consider size and room coverage, noise level of tools, energy efficiency of steam devices, control options, and placement feasibility.
- <bSize and reach: For large rooms, choose tools with broader heads or longer handles to reduce bending and fatigue.
- <bNoise level: Steam devices and scrapers vary in sound. Look for models with lower decibel ratings if the space is near bedrooms or offices.
- <bEnergy efficiency: Opt for energy‑efficient steam kits and battery‑powered tools to save power during extended jobs.
- <bControls and ease of use: Preference for adjustable steam settings, ergonomic handles, and simple operation.
- <bPlacement and compatibility: Ensure tools work with your wall finish, whether vinyl, fabric, or painted wallpaper; test in a hidden spot first.
When comparing options, assess how each tool aligns with the project’s scope, your comfort level with moisture, and the wallpaper type. A balanced kit often yields the best results without damaging surfaces.
Leave a Reply