How to Clean a 3D Printer Nozzle Safely and Effectively
Keeping a 3D printer nozzle clean is essential for print quality and consistent extrusion. Debris, burnt filament, or oxidation can lead to under-extrusion, jagged surfaces, or clogs. This guide provides a clear, step-by-step method using common tools designed for American makers and hobbyists.
Whether you are preparing for a new print or performing routine maintenance, following a safe cleaning ritual helps extend nozzle life and improve overall performance.
Quick Answer
Detach the nozzle only when the printer is cool, heat the hotend to filament temperature to soften residues, gently push out lodged material with a cleaning needle, scrub with a dedicated nozzle brush, and finish with a cold pull to ensure internal cleanliness. Use a 3D printer nozzle cleaning kit to simplify the process and minimize damage.
What You’ll Need
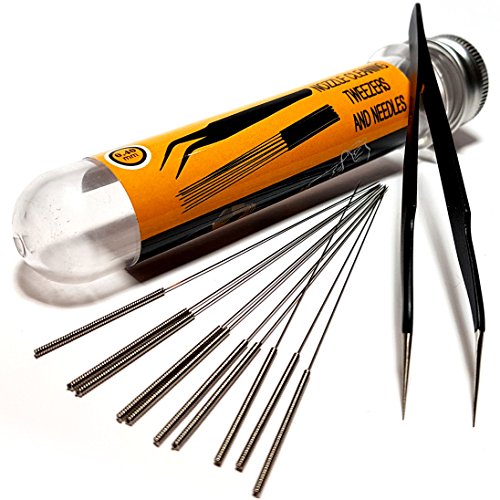
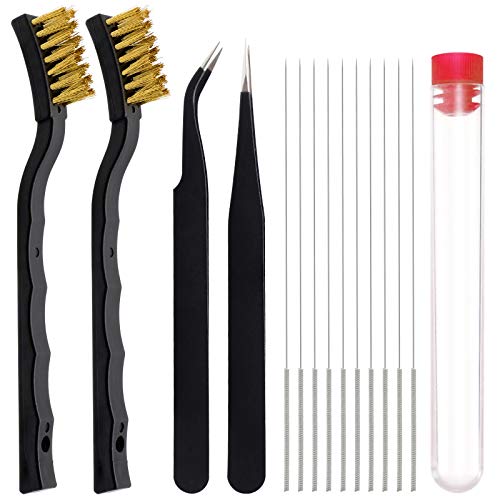
- 3D printer nozzle cleaning kit
- 3D printer nozzle cleaning needle set
- 3D printer hotend nozzle cleaning brush
Before You Start
Prerequisites include a cool, powered-off machine and a stable work surface. Have a small container for filaments and a magnifier if you work with fine debris. Safety first: avoid touching hot components and wear eye protection when working with metal needles or brushes. Plan for a 15–45 minute maintenance window depending on clog severity. If you notice persistent jams, consider replacing the nozzle or inspecting the hotend for heat creep.
Step-By-Step: How To Clean A 3D Printer Nozzle
- Power off the printer and unplug it to ensure safety, then allow the hotend to cool completely.
- Remove the nozzle carefully using the appropriate tool, ensuring you do not strip the nozzle threads.
- Preheat the hotend to the filament’s typical working temperature to soften stuck material.
- Insert a cleaning needle from the cleaning kit into the nozzle’s opening and gently push through to dislodge deposits.
- Use the hotend nozzle cleaning brush to scrub the exterior threads and the throat area, removing carbonized residue.
- For stubborn clogs, perform a cold pull with a flexible filament substitute (e.g., nylon) to pull debris out of the melt zone.
- Rinse the nozzle with isopropyl alcohol on a lint-free wipe and reassemble the hotend, ensuring a snug fit without overtightening.
- Heat the hotend to print temperature and extrude a small amount of filament to confirm smooth flow.
- Inspect for uniform extrusion across multiple lines and watch for any under-extrusion or artifacts.
- Document the cleaning date and note any recurring blockages to adjust filament type or print settings.
- If jams recur, consider replacing the nozzle with the appropriate size and material for your printer and filament.
- Store cleaning tools in a dedicated container to keep them organized and ready for the next maintenance.
Troubleshooting
| Symptom | Likely Cause | Fix | Prevention |
|---|---|---|---|
| Under-extrusion after cleaning | Partial clog or improper reassembly | Revisit cleaning steps, reassemble correctly, and re-test extrusion | Inspect filament path regularly |
| Clog persists after cleaning | Deep internal blockage or damaged nozzle | Replace nozzle; verify heater block integrity | Use high-quality filament and proper storage |
| Filament grind or teeth marks | Incompatible nozzle size or worn nozzle | Match nozzle size to filament, replace worn nozzle | Calibrate extrusion after changes |
| No extrusion at all | Hotend not reaching temperature or filament jam | Check thermistor and heater, clear jam | Keep hotend clean, use correct temperature |
| Messy prints around nozzle | Leaking or loose nozzle | Tighten or reseat the nozzle, check heat set | Routine torque check during maintenance |
Common Mistakes
- Forcing cleaning tools into the nozzle without softening material first
- Using excessive force with needles, risking thread damage
- Over-tightening the nozzle during reassembly, causing leaks
- Skipping the cold pull or using inappropriate filament substitutes
- Neglecting to inspect the hotend after cleaning, missing hidden jams
Careful handling and a methodical approach minimize damage and extend nozzle life.
Tips For Best Results
- Regular maintenance reduces the frequency of major clogs; schedule a quick clean after every few prints.
- Keep a clean workspace and organize tools for quick access during maintenance.
- Use high-quality filaments and dry storage to minimize residue buildup inside the nozzle.
- Document nozzle size and material compatibility for future prints to avoid mismatches.
- Wear eye protection when handling metal needles; work in a well-ventilated area.
Call A Professional
Stop and seek professional help if you notice:
- Persistent clogging after multiple cleanings or replacement attempts
- Visible damage to the heater block, thermistor, or cartridge
- Inability to reach stable temperatures or consistent extrusion
- Signs of burning filament or unusual smells during operation
Professionals can diagnose heater block or thermistor issues and perform safe disassembly beyond routine maintenance.
FAQ
Can I clean the nozzle without removing it?
Yes, but removing the nozzle allows deeper cleaning with dedicated tools; ensure safe handling and cool-down before attempting removal.
What is a cold pull and when should I use it?
A cold pull helps extract residual material from the melt zone by pulling filament after cooling; use it for stubborn residues.
What cleaning tools are essential for beginners?
A basic kit includes a cleaning needle set and a soft nozzle brush; add a cleaning kit for convenience and varied filaments.
How often should I clean the nozzle?
Clean after signs of poor extrusion or before switching filament types, and perform routine maintenance based on printing frequency.
Buying Guide
When selecting nozzle-cleaning tools, consider size, material compatibility, and ease of use. Look for a kit that includes multiple needles and a dedicated hotend brush for versatility across common 3D printing filaments like PLA and PETG. A compact, organized case helps keep tools accessible during maintenance and minimizes tool loss. For frequent users, a reputable brand with replacement parts ensures long-term value. Noise and power consumption are typically not a concern for hand-cleaning tasks, but ensure your printer’s firmware supports safe hotend handling during maintenance.
Buying Guide: Key Factors To Consider
- Size and compatibility with your nozzle types (e.g., standard, hardened steel)
- Quality of cleaning needles and brushes to avoid scratching or damaging threads
- Availability of replacement parts and tool variety in the kit
- Storage and portability of the cleaning set for on-site maintenance
- Ease of use for beginners vs. advanced users
- Brand reputation and customer support
Leave a Reply