How to Clean Nail Drill Bits Safely and Effectively
Maintaining clean nail drill bits is essential for safe manicures and long-lasting tool life. Regular cleaning helps prevent bacterial growth, resin buildup, and dulling that can affect performance. This guide provides practical steps using common salon tools and safe solvents to keep bits in top condition.
Readers will find a clear, step-by-step process, safety notes, and troubleshooting tips to handle different bit materials without damage. The focus stays on practical, at-home or salon-use methods that align with professional standards.
Quick Answer
What to do at a glance: Remove debris with a cleaning brush, soak in a dedicated solvent, rinse, dry thoroughly, and finish with an ultrasonic cleaning cycle for deep sanitation. Regular checks and proper storage prevent cross-contamination and extend bit life.
What You’ll Need
- Nail drill bit cleaning brush
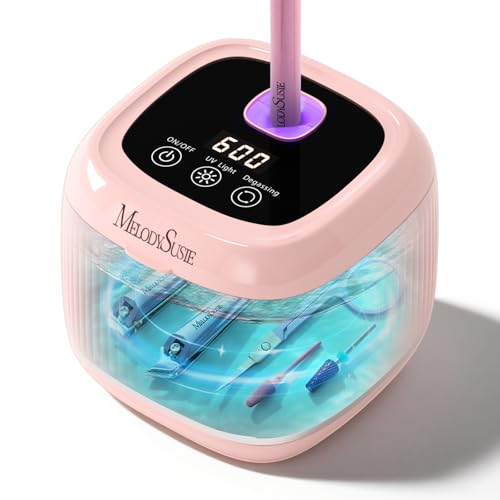
- Ultrasonic cleaner for nail drill bits
- Nail drill bit cleaning solvent
- Optional: lint-free cloth, small container, tweezers

Before You Start
Prepare a clean, well-ventilated work surface and wear minimal protective gear, such as gloves and eye protection if splashes may occur. Inspect each bit for signs of wear or damage before cleaning. Allow extra time for thorough drying to prevent rust or corrosion. Avoid soaking metal bits too long in harsh solvents, which can degrade coatings or shanks. Plan for a total cleaning session of 15–30 minutes per batch.
Step-By-Step: How To Clean Nail Drill Bits
- Unload the drill and disconnect power to ensure safety before handling bits.
- Use the nail drill bit cleaning brush to remove visible debris from the flutes and shaft.
- Place bits in a shallow tray and prepare a solution with the nail drill bit cleaning solvent following manufacturer instructions.
- Soak the bits for a recommended duration to loosen resin and dust; avoid overly long exposure to protect bit coatings.
- Gently agitate the tray or use tweezers to move bits, enhancing debris release without bending delicate edges.
- Rinse each bit under running lukewarm water to remove solvent residues and loosened debris.
- Optionally, run the bits through an ultrasonic cleaner for nail drill bits for deeper cleaning, following device instructions.
- Dry each bit completely with a lint-free cloth; allow air-drying in a clean area for 10–15 minutes.
- Inspect for remaining buildup; if present, repeat the soak-and-rinse steps on affected bits only.
- Store clean, dry bits in a closed container or on a rack to prevent contamination.
- Regularly replace cleaning solvents as recommended by the solvent manufacturer and monitor the cleaning brush for wear.
- Document a cleaning schedule to maintain consistent hygiene and performance across all bits.
Troubleshooting
| Symptom | Likely Cause | Fix | Prevention |
|---|---|---|---|
| Residual resin after cleaning | Insufficient soaking or brushing | Extend soak time slightly and re-brush | Adopt a regular cleaning cadence |
| Bits look rusty or corroded | Overexposure to moisture or harsh solvents | Rinse thoroughly and dry completely; replace if corrosion is visible | Store in a dry, sealed container |
| Coatings appear dull or damaged | Excessive mechanical brushing or strong solvents | Use gentler cleaning cycles and milder solvents | Follow manufacturer guidelines for each bit type |
| Ultrasonic cleaner not cleaning effectively | Improper solvent concentration or overloading | Reduce batch size; adjust cleaning solution per manual | Use fresh solvent and maintain cleaner as directed |
Common Mistakes
- Using metal tools to scrape bits, which can scratch coatings
- Soaking bits too long, especially carbide or titanium-coated types
- Skipping thorough drying, leading to rust or mold growth
- Neglecting to clean the cleaning brush and tray, causing recontamination
- Ignoring manufacturer guidelines for solvents and ultrasonic devices
Tips For Best Results
- Establish a routine where each shift ends with a quick brush-off and a soak for all used bits.
- Label solvents by type and ensure containers are properly sealed to avoid evaporation.
- Use the ultrasonic cleaner in a well-ventilated area and monitor temperature to protect bit integrity.
- Rotate storage to keep frequently used bits easily accessible and properly organized.
- Regularly inspect bits for wear; dull bits require replacement to maintain hygiene and performance.
Call A Professional
If signs of cracking, chipping, or coating failure appear on any drill bit, stop using it and consult a professional tool technician. Seek expert advice if unusual odors, heat buildup, or persistent cleaning challenges occur, which may indicate internal damage or safety risks.
FAQ
Is it safe to soak all nail drill bits in the same solvent?
Most bits can be soaked in a dedicated solvent according to the manufacturer’s guidelines; always verify compatibility with the bit material.
How often should I clean my nail drill bits?
Clean after every use, with a deeper soak weekly or as needed based on resin buildup and usage level.
Can I use household cleaners to sanitize drill bits?
Household cleaners are not recommended. Use purpose-built cleaner solvents and follow safety instructions.
What’s the best way to dry bits after cleaning?
Use a lint-free cloth and air-dry in a clean area until completely dry before storage.
Do all drill bits require the same cleaning method?
Most high-quality bits can follow a similar process, but verify material-specific guidance for carbide, titanium, or ceramic coatings.
Should I sanitize drill bits between clients?
Yes. Thorough cleaning between clients reduces cross-contamination and maintains hygiene standards.
Buying Guide
When selecting tools for cleaning nail drill bits, consider size and material compatibility, noise and energy use of any ultrasonic cleaners, and storage solutions. Look for a nail drill bit cleaning brush that fits comfortably in your hand and has durable bristles. For deep cleaning, an ultrasonic cleaner for nail drill bits with adjustable temperature and cycle options helps remove stubborn residue without damaging bits. A reliable nail drill bit cleaning solvent should be proven to be safe for your bit materials and easy to rinse away. Evaluate whether a combined kit offers convenience or if separate, high-quality components better fit your workflow. Assess noise levels if you work in a shared space and ensure the cleaner can be stored safely away from clients and flammable materials. Placement should keep solvents-, brush-, and ultrasonic equipment away from direct contact with skin and nails, with clear labeling and easy access for quick cleaning between sessions.
Leave a Reply