How to Clean Mister Nozzles for Peak Mist Performance
Mist systems and decorative mister setups rely on clean nozzles to deliver even, consistent spray. This guide explains practical steps to clean mister nozzles and maintain optimal spray quality. It covers common tools, safe procedures, and troubleshooting tips to keep cooling, humidifying, or ambiance effects reliable.
Quick Answer
Disconnect power, remove visible debris, soak nozzles in a mild cleaning solution, scrub with a misting nozzle cleaning brush set, and rinse thoroughly. Use a spray bottle nozzle cleaning tool to clear small passages and reassemble carefully. Run a quick test to confirm uniform spray before reusing the system.
What You’ll Need
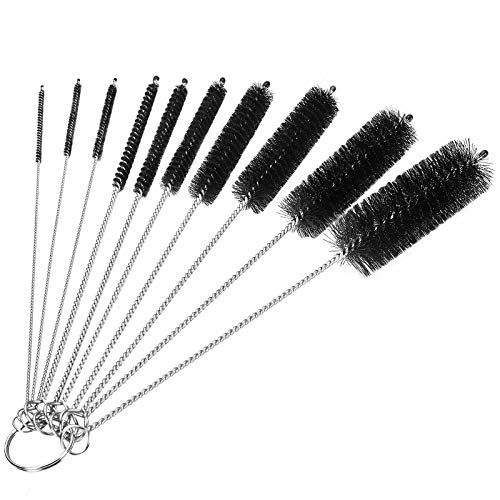
- Misting nozzle cleaning brush set
- Spray bottle nozzle cleaning tool
- Misting system cleaning kit
- Soft cloths or microfiber towels
- Warm water and a mild, non-abrasive detergent
- A small container or cup for soaking


Before You Start
Power off the misting system and disconnect from any electrical source. Protect surfaces from water splashes and avoid harsh solvents near electronics. If your setup has color-coded lines, maintain labeling when reassembling. Time estimate: 20–45 minutes depending on the number of nozzles.
Safety cautions: Do not soak electrical components. Use lukewarm water only to prevent thermal shock. Wear eye protection if splashing is possible. If you notice corrosion or damaged seals, stop and consult a professional.
Step-By-Step: How To Clean Mister Nozzles
- Power down and unplug the system, then relieve pressure by triggering a brief spray in a safe area.
- Remove the affected nozzles from the rail or tubing; keep track of which nozzle came from where for proper reinstallation.
- Rinse each nozzle under lukewarm water to wash away loose dust and mineral deposits.
- Prepare a mild cleaning solution in a container. Submerge the nozzles and agitate gently to loosen buildup.
- Use a misting nozzle cleaning brush set to scrub the exterior threads and relief channels without bending components.
- For stubborn deposits, soak the nozzles in the solution for 5–10 minutes, then rinse thoroughly with clean water.
- Use the spray bottle nozzle cleaning tool to probe interior vents and align channels. Gently twist and pull to clear blockages.
- Dry the nozzles with a microfiber cloth, then inspect for any visible wear or cracks before reassembly.
- Reinstall nozzles in their original positions and tighten by hand only to avoid thread damage.
- Reconnect power and run a slow test spray, observing for even mist across all nozzles. If inconsistencies appear, redo steps for affected units.
- When the system runs smoothly, perform a final rinse by spraying water through all nozzles to remove any residual cleaners.
- Document any recurring issues (e.g., mineral buildup, reduced pressure) to guide future maintenance.
Troubleshooting
| Symptom | Likely Cause | Fix | Prevention |
|---|---|---|---|
| Uneven spray among nozzles | Debris or partial clog | Clean affected nozzles with brush set and tool | Regular quick cleans after use |
| No spray or very weak mist | Blocked passages or dried residue | Soak, scrub, and probe channels with tool | Flush system with clean water weekly |
| Streaks or dripping after cleaning | Improper reseating or worn seals | Re-seat with proper torque; inspect seals | Inspect seals during each maintenance |
| Visible mineral crust on nozzles | Hard water deposits | Soak in descaling solution if compatible, then rinse | Use softened water when possible |
Common Mistakes
- Using harsh solvents that can damage metal or plastic components
- Disregarding safety by leaving power connected during cleaning
- Forcing brushes or tools into tight passages, causing fractures
- Over-tightening nozzles during reassembly, leading to leaks
Keeping a routine plan helps prevent these mistakes and extends the life of the misting system.
Tips For Best Results
- Schedule maintenance after seasons of heavy use or irrigation cycles to prevent mineral buildup.
- Prefer distilled or deionized water in misting systems to reduce mineral deposits.
- Label nozzle positions to ease reinstallation and maintain spray balance.
- Store cleaning tools in a dedicated container to keep bristles intact and ready for use.
- Test spray at low pressure first to minimize splashing during cleaning.
Call A Professional
Stop and seek professional help if nozzles are cracked, threads are stripped, or the system fails to hold a seal after multiple cleanings. If there is persistent leakage at fittings or recurring clogs despite routine maintenance, a pro can inspect the entire line for hidden issues and recommend a replacement strategy.
FAQ
Can I use bleach to clean mister nozzles?
No. Bleach can corrode seals and degrade plastics. Use mild detergents and descaling methods suited for your materials.
How often should I clean misting nozzles?
In typical outdoor use, a monthly quick clean and a deeper clean every 3–6 months is a practical cadence, depending on water quality and climate.
Will mineral buildup affect spray distance?
Yes. Mineral deposits narrow passages, reducing flow and mist quality. Regular cleaning helps maintain spray reach.
What if I still see clogs after cleaning?
Inspect for damaged seals or cracked nozzles. Replace faulty parts and re-test. If needed, flush the entire line and check for pressure issues.
Buying Guide
Choosing the right cleaning tools and maintenance kit for mister nozzles depends on several factors. Consider the following to ensure you pick effective supplies and support your misting system over time.
Size and compatibility
Ensure the misting system cleaning kit and brushes fit your nozzle sizes and configuration. Some kits include adjustable brushes suitable for different nozzle models, while others are designed for specific brands.
Noise, energy, and efficiency considerations
While cleaning tools don’t directly affect system noise or energy use, a well-maintained nozzle array keeps the system operating efficiently, potentially reducing stray leaks and inconsistent sprays that can cause extra run-time and wear.
Controls and ease of use
Look for cleaning tools that are easy to handle with minimal disassembly. A compact spray bottle nozzle cleaning tool that reaches tight passages is especially valuable for complex layouts.
Placement and environmental considerations
Outdoor setups require rust-resistant materials and protective storage solutions for cleaning kits. Indoor installations should prioritize compatible detergents and tools that won’t damage nearby surfaces.
Multi-tool value
A combined misting nozzle cleaning brush set plus a spray bottle nozzle cleaning tool and a misting system cleaning kit offers broad coverage for most nozzle geometries and maintenance scenarios. Compare kit contents to ensure many common nozzle types are supported.
Maintenance routine and budget balance
Regular, simple maintenance with the right tools can prevent expensive repairs. Prioritize kits that include multiple brush sizes, a flexible probe tool, and easy-to-clean containers.
Leave a Reply