How to Clean Leather and Suede Safely
Leather and suede fabrics offer a distinct look and feel, but they require careful cleaning to preserve their texture and color. This guide explains practical, at-home steps using common tools to refresh leather and suede without causing damage. Readers will learn how to choose the right tools, prepare the area, perform the cleaning process, and prevent future stains.
By following these steps, American shoppers can maintain the appearance of leather and suede items such as jackets, shoes, bags, and furniture. The methods emphasize gentle, surface-safe techniques and easy-to-find supplies that work well for most everyday stains.
Quick Answer
Best quick methods: For suede, use a soft brush to lift nap and a suede cleaning block eraser for fresh marks. For leather, apply a microfiber cloth with a light cleaner and condition after to restore suppleness. Always test on a hidden area first and dry thoroughly.
What You’ll Need
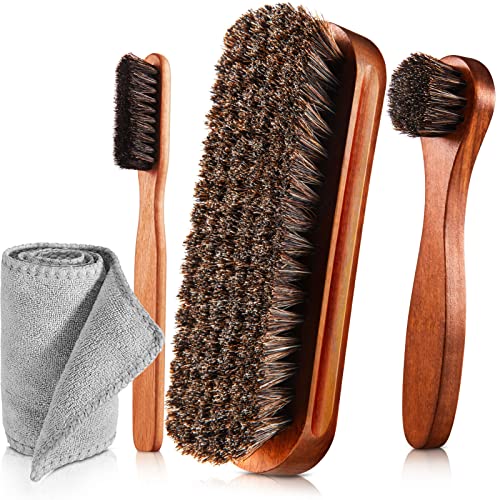
Gather these tools and materials to clean leather and suede effectively. The list prioritizes items that support both surfaces when possible.
- Horsehair suede brush
- Suede cleaning block eraser
- Leather and suede cleaning kit with brush microfiber cloth

Before You Start
Assess the item’s finish and any care labels. For most leather and suede, start with dry cleaning to remove loose dirt, then move to spot cleaning. Do not use harsh household cleaners or water directly on suede, as this can alter texture. Work in a well-lit area and test a small, inconspicuous spot before broad application. Allow the surface to dry completely between steps, and avoid heat exposures that could warp or set stains.
Step-By-Step: How To Clean Leather And Suede
- Inspect the item for stains, colorfastness, and any wear. Identify leather vs. suede areas to tailor the approach.
- Dust off loose dirt with a clean, dry microfiber cloth. Wipe in the direction of the grain for leather and in circular motions for suede nap.
- For suede, gently brush with a horsehair suede brush to lift the nap and remove surface dirt. Avoid pressing hard to prevent nap flattening.
- Address scuffs and marks with a suede cleaning block eraser. Lightly rub the affected area in short, straight motions.
- For leather, mix a small amount of a recommended leather and suede cleaning kit with brush microfiber cloth cleaner on a cloth. Dab (don’t rub) the stained area and wipe away gently.
- If stains persist, apply a slightly dampened cloth with a minimal cleaner and work in small circular motions, then wipe away any residue with a dry cloth.
- Let the item air-dry away from direct heat. Once dry, use the suede brush again to restore nap and the microfiber cloth to buff leather for shine.
- Finish with a leather conditioner (when appropriate) to restore suppleness and protect against future stains, following product instructions.
- Store items in a cool, dry place and consider protective sprays appropriate for leather or suede as a preventive measure.
- Regular maintenance intervals are recommended: light cleaning monthly for high-use items and quarterly for occasional pieces.
- For mixed fabrics or delicate items, consider seeking professional cleaning guidance if uncertain about outcomes.
Troubleshooting
| Symptom | Likely Cause | Fix | Prevention |
|---|---|---|---|
| Nap looks flat after cleaning | Over-brushing or damp cleaning | Gently re-brush with a suede brush in the nap direction | Use minimal moisture; brush dry |
| Stain transfers to cloth | Ink or dye bleeding | Spot-test a leather-safe conditioner; avoid aggressive scrubbing | Test cleaners on hidden area first |
| Leather feels stiff after cleaning | Over-drying or lack of conditioning | Apply a suitable leather conditioner per label | Condition after cleaning when appropriate |
| Suede repels water | Scuffed surface reveals protective breakdown | Re-nap and condition suited for suede after cleaning | Apply protective suede spray, test first |
Common Mistakes
- Using water directly on suede or leather sections that are not sealed
- Rubbing aggressively, which can damage nap or leather surface
- Ignoring test patches, leading to color change or texture distortion
- Over-cleaning, which can strip natural oils and reduce flexibility
Tips For Best Results
Consistency matters. Clean suede and leather with gentle, surface-focused motions and avoid soaking the fabric. Regular light maintenance often yields better results than heavy, infrequent cleaning. For suede, protect the nap by brushing after any cleaning and storing with adequate airflow. For leather, condition periodically to maintain suppleness and prevent cracking. When in doubt, consult care labels or a professional cleaner specializing in leather and suede.
Call A Professional
Seek professional help if there are deep, extensive stains, color bleeding, or leather cracks that cleaning alone cannot resolve. Stop cleaning and contact a pro if the material shows signs of dye transfer, staining that worsens after attempts, or if the item is valuable or heirloom quality. Severe heat exposure or improper conditioning are indicators to escalate to a specialist.
FAQ
Can I use water to clean suede?
Water can damage suede by stiffening nap or causing watermarks; avoid saturating suede and use dry or lightly damp methods only as advised by product guidelines.
Is a suede brush enough to clean suede shoes?
A suede brush is essential, but for tougher marks a suede cleaning block eraser helps lift stains without abrasive rubbing.
Should I condition leather after cleaning?
Yes, conditioning helps restore suppleness after cleaning, but follow the product directions to avoid over-conditioning.
How often should I clean suede or leather items?
High-use items may benefit from monthly light cleaning; less frequent items can do with quarterly care, or as needed after spills.
What if my item has mixed leather and suede areas?
Treat each material with its appropriate method, using designated cleaners and tools for leather and for suede.
Buying Guide
Choosing the right care tools depends on the item type and personal cleaning habits. Consider the following factors to pick the best options for leather and suede maintenance:
- Size and coverage: Larger items may benefit from a comprehensive kit with multiple brushes and cloths, while small accessories can use individual brushes and erasers.
- Noise level: A quiet brush or cleaner is preferable for home use, especially around living spaces or bedrooms.
- Energy efficiency: Manual tools require no power, but any motorized cleaners should be energy-efficient and compact.
- Controls and ergonomics: Ergonomic handles and easy-to-clean components reduce fatigue during maintenance sessions.
- Placement and storage: Store kits in a dry cabinet or closet where humidity is controlled to prevent mold or odor buildup.
- Compatibility: Ensure tools are suitable for both leather and suede or come with material-specific brushes and blocks.
- Maintenance supplies: Include a microfiber cloth, a soft brush, an eraser, and a dedicated cleaner that is safe for both materials.
- Brand and reliability: Choose reputable brands with clear care instructions and return options if needed.
With the right kit and routine, cleaning leather and suede becomes a simple, repeatable task that preserves texture and color. Think of care as protecting your investment—regular, gentle maintenance keeps items looking new longer. If you’re unsure which products match your specific item, start with a small test patch and follow the manufacturers’ guidelines for best results.
Leave a Reply