How to Clean Leather Dashboard
The leather dashboard adds a refined look to any car interior, but it requires gentle care to maintain its texture and color. This guide offers a practical, step-by-step approach using common car cleaning supplies and the specified product options.
Quick Answer
Use a dedicated leather dashboard cleaner spray to lift dust and oils, followed by a pH-balanced leather conditioner to restore moisture. Finish with a microfiber cloth for a streak-free sheen. For best results, avoid household cleaners that can dry or discolor leather.
What You’ll Need
- Leather dashboard cleaner spray with microfiber cloths kit
- Leather car interior cleaner kit with microfiber cloths and brush
- pH-balanced leather conditioner for car dashboards 8oz spray bottle
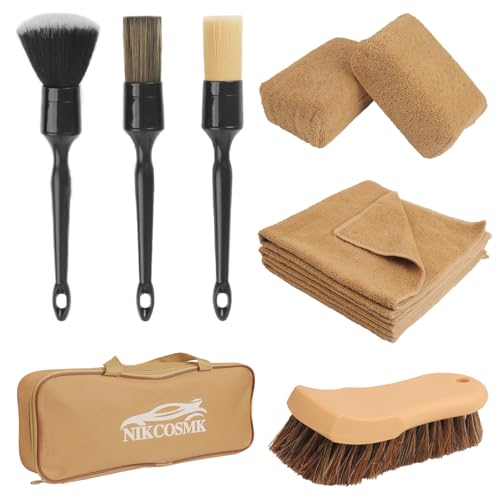


Before You Start
Park in a shaded area and cool the dashboard before cleaning. Test a small, inconspicuous area first to check for color transfer or staining. Avoid ammonia-based cleaners and avoid soaking the surface. Plan for a 20–40 minute cleaning session to allow for proper drying. Wear gloves if you have sensitive skin and keep cleaners away from heat sources.
Step-By-Step: How To Clean Leather Dashboard
- Remove loose dust with a dry microfiber cloth, sweeping in the direction of the grain.
- If using a kit with brush, lightly brush to lift embedded particles from seams and crevices.
- Apply a small amount of leather dashboard cleaner spray to a clean cloth, not directly on the surface.
- Gently wipe the dashboard in sections, focusing on high-traffic areas and scratches.
- Wipe away residue with a dry cloth and inspect for missed spots; repeat if needed.
- Lightly spray a damp cloth with the conditioner and apply sparingly to the surface in a circular motion.
- Buff with a dry microfiber cloth to enhance the shine and remove excess conditioner.
- Allow the surface to air-dry completely before using the vehicle interior.
- Revisit any seams or crevices with a clean cloth to remove leftover moisture.
- For stubborn stains, repeat steps with a targeted cleaner on a small area only.
- Regular maintenance: dust weekly and condition every 1–3 months depending on climate.
Troubleshooting
| Symptom | Likely Cause | Fix | Prevention |
|---|---|---|---|
| Dull or sticky surface after cleaning | Residual cleaner or over-application | Wipe with a clean, dry cloth and reapply conditioner sparingly | Use minimal cleaner and follow product directions |
| Color transfer or staining | Cleaner not compatible with leather finish | Test first; switch to a pH-balanced formula | Always test on an inconspicuous area |
| Cracking after cleaning | Leather too dry or harsh chemicals | Condition with a proper leather conditioner | Avoid harsh cleaners; moisturize regularly |
| Persistent odor | Accumulated oils or cleaners | Clean again with fresh cloths, increase ventilation | Clean in a well-ventilated area |
Common Mistakes
- Using household cleaners not formulated for leather
- Over-wetting the surface, causing saturation in seams
- Skipping a test patch before full application
- Ignoring high-traffic areas where wear shows fastest
Tips For Best Results
- Choose a pH-balanced leather cleaner and conditioner to preserve finish
- Work in small sections to prevent drying while polishing
- Use microfiber cloths to prevent micro-scratches
- Condition every few months or as needed, depending on climate and sun exposure
- Avoid direct sunlight during cleaning to prevent rapid drying or staining
Call A Professional
If you notice cracking, deep discoloration, or leather peeling, contact a professional automotive detailer. Seek help if stains penetrate seams or if you suspect dye transfer that basic products cannot fix. Consider professional services for restoring color and suppleness in severely worn dashboards.
FAQ
Is a dedicated leather cleaner necessary for dashboards?
Yes, leather-specific cleaners are formulated to remove oils and grime without drying or staining the leather.
How often should I clean and condition a leather dashboard?
Clean every 1–2 months and condition every 3–6 months, depending on climate and usage.
Can I use a spray conditioner directly on the dashboard?
Apply conditioner to a cloth first; avoid spraying directly to prevent oversaturation.
What should I do if the color looks uneven after cleaning?
Test a small area and reapply with a consistent amount of conditioner, using light, even strokes.
Buying Guide
When selecting products for leather dashboard care, consider size, compatibility, and ease of use. For many Americans, an all-in-one kit with microfiber cloths and a brush simplifies maintenance and reduces guesswork. Look for a pH-balanced formula to protect color and suppleness, and verify that the kit includes a conditioner suitable for car dashboards. Consider the noise level of any automated sprayers or brushes if you prefer a quiet routine. Placement of products near the driver’s seat often makes quick touch-ups more convenient, but store cleaners away from heat and direct sunlight to maintain shelf life. For best results, compare cleaning kits and conditioning sprays to ensure a complete care routine that fits your car’s interior needs.
Leave a Reply