How to Clean a Keurig With Vinegar for Best Tasting Coffee
Regular maintenance helps extend the life of a Keurig brewer and keeps coffee tasting fresh. Using household vinegar for descaling is a common, budget-friendly method that removes mineral buildup and improves water flow. This guide walks through safe, step-by-step practices to clean a Keurig using vinegar, complemented by practical tools designed to support the process.
Readers will find a concise quick answer, a complete list of needed tools, safety notes, and a structured steps plan. The approach emphasizes caution with hot water and vinegar acidity, plus how to avoid lingering flavors and ensure a thorough rinse.
Quick Answer
Fill the reservoir with a 1:1 mix of white vinegar and water, run several cleansing cycles without a coffee pod, then rinse with clean water cycles until the vinegar scent is gone. Deep-clean the needle and internal parts as needed, and finish with a few plain water cycles before brewing again.
What You’ll Need
- Keurig descaling solution for coffee makers (as an optional alternative to vinegar)
- Keurig cleaning brush set
- Keurig needle cleaning tool
- White distilled vinegar
- Clean water for rinsing
- Soft cloth or sponge for exterior cleaning


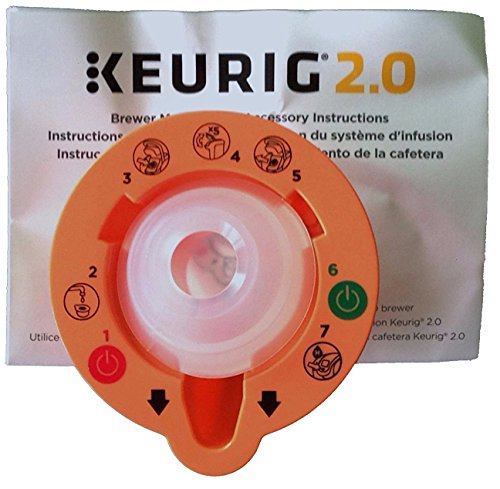
Before You Start
Unplug the brewer before disassembly, if applicable. Empty the reservoir and remove any remaining water or coffee pods. Descale cycles require warm but not boiling water; never use harsh chemicals beyond vinegar or descaling solutions. Place the brewer on a towel or tray to catch spills, and allow time for the machine to cool slightly between steps. This process typically takes 60–90 minutes, depending on the model and cleanliness level.
Step-By-Step: How To Clean A Keurig With Vinegar
- Preparation: Unplug the brewer, remove any used parts, and pour a 1:1 vinegar-to-water solution into the reservoir. This creates the descaling liquid for mineral buildup removal.
- Run a cleansing cycle: With no pod in place, start a brew cycle to push the vinegar solution through the system. Place a large mug to catch the liquid. Repeat until the reservoir is nearly empty.
- Pause for contact time: Allow the vinegar solution to sit in the internal passages for 15–20 minutes, particularly if the brewer has visible mineral buildup or slower flow.
- Rinse the reservoir: Empty, rinse, and refill with fresh water. This step helps prevent vinegar flavor from lingering in the next cycles.
- Run several water cycles: Operate 3–4 rounds of pure water through the machine to flush out residual vinegar. Use a clean mug for each cycle and smell for any vinegar traces.
- Clean the external surfaces: Wipe the housing, drip tray, and any exposed areas with a damp cloth. Avoid abrasive cleaners that could scratch the surface.
- Address the needle: If the brewer uses a needle assembly, detach as directed by the manual and use the needle cleaning tool to remove any mineral deposits or coffee grounds.
- Deep clean internal components: If your model provides removable parts (water lines, filter baskets), wash them in warm, soapy water, rinse thoroughly, and dry before reassembly.
- Reassemble and test: Reattach all parts, fill the reservoir with clean water, and run 2–3 brew cycles with no coffee to ensure the system is clean and free of vinegar.
- Final taste test: Brew a cup using your favorite coffee to confirm the aroma and flavor are back to normal. If a residual vinegar taste remains, repeat additional water-only cycles.
- Long-term maintenance: Set a quarterly or semi-annual descaling schedule to keep buildup at bay, and consider using a Keurig-approved descaling product between vinegar cleanings for sensitive brewers.
Troubleshooting
| Symptom | Likely Cause | Fix | Prevention |
|---|---|---|---|
| Weak coffee or slow flow | Mineral buildup in passages | Run a vinegar descaling cycle, then rinse thoroughly | Descale regularly; use filtered water |
| Vinegar smell in coffee | Insufficient rinsing | Run 4–6 additional water-only cycles | Rinse until odor-free after each descaling |
| Leakage around reservoir | Misaligned parts or seals | Re-seat reservoir, inspect gaskets, replace if worn | Handle parts gently during cleaning |
| Brewer not powering on | Electrical issue or reset needed | Unplug, wait 60 seconds, plug back in; perform a reset per manual | Avoid exposure to moisture around electrical components |
| Needle clogged | Old coffee grounds | Clean with provided needle tool until clear | Clean after use if brewing grounds frequently |
Common Mistakes
- Using straight vinegar in extremely high concentrations without adequate rinsing can leave strong flavors.
- Skipping the rinse cycles after descaling may cause taste issues in future brews.
- Forgetting to clean the needle and compatibility parts can lead to clogged passages.
- Using hot water only instead of warm water may fail to fully dissolve mineral buildup.
Tips For Best Results
- Use a high-quality water source (filtered or bottled) to minimize mineral buildup between cleanings.
- Follow the model-specific guidelines for descaling frequency; smaller models may require more frequent cleaning.
- Label the reservoir with a cleaning date to track when the next descaling is due.
- Combine vinegar cleansing with the appropriate Keurig descaling solutions if you notice persistent buildup or flavor issues.
Call A Professional
Seek professional help if the brewer exhibits persistent leaks, electrical issues, unusual noises, or fails to power on after multiple resets and cleanings. Urgent service is advised if there is visible damage or a strong chemical smell that does not dissipate after thorough rinsing.
FAQ
Can I use white vinegar to descale every Keurig model?
Vinegar is widely used for descaling many Keurig models, but always check your model’s manual for compatibility and recommended methods.
How long should I let vinegar sit in the machine?
Allow 15–20 minutes of contact time in the passages to help dissolve mineral buildup.
How many rinse cycles are needed after descaling?
Typically 4–6 cycles of plain water are sufficient to remove vinegar aroma and taste.
Is it safe to use the included cleaning tools during descaling?
Yes, use the needle cleaning tool and brush set as directed to avoid damaging internal parts while removing buildup.
How often should I descale my Keurig?
Frequency depends on usage and water hardness; many users descale every 1–3 months or when a slow brew becomes evident.
What if vinegar leaves a flavor after descaling?
Extend the rinse cycles and run a few pots of plain water to fully flush the system.
Buying Guide
When selecting accessories and products to support Keurig cleaning, consider these factors:
- Size and compatibility: Ensure the cleaning tools and any descaling solutions fit your specific Keurig model and removable parts.
- Noise level: Some descaling processes can be quieter with specific cleaning methods or settings; consider models designed for minimal noise if you brew late at night.
- Energy efficiency: While cleaning, energy use is minimal, but choose energy-conscious models to save on electricity over time.
- Controls and indicators: Look for intuitive controls that indicate when to descale, rinse, or run a cleaning cycle.
- Placement and fit: Ensure adequate clearance around the machine for safe operation and easy access to the water reservoir.
- Reliability and maintenance service: Prefer brands with solid support and readily available replacement parts, like brushes, needles, and descaling kits.
- Maintenance frequency: If minerals are high in your water, factor in more frequent descaling and tool usage to maintain performance.
Leave a Reply