How to Clean Jolie Shower Head for Peak Performance
Cleaning a Jolie shower head helps maintain steady water flow, improve spray patterns, and extend the life of your fixture. This guide walks American homeowners through a practical, step-by-step method using common tools and a Jolie-specific descaling option to remove mineral buildup effectively.
Whether you’re dealing with hard water, low pressure, or uneven spray, the right approach makes a noticeable difference without damaging the finish of your Jolie shower head.
Quick Answer
To refresh a Jolie shower head, remove it from the arm if needed, soak in a descaling solution or white vinegar, scrub mineral deposits with a nylon-bristle brush, reassemble, and run warm water to rinse. For stubborn buildup, use a universal shower head wrench and gasket kit to safely detach the head and inspect the internal flow passages.
What You’ll Need
- Jolie shower head descaling kit or a simple white vinegar solution (water:vinegar 1:1)
- Shower head cleaning brush nylon bristles for gentle scrubbing
- Universal shower head wrench and gasket kit to safely loosen and reseal
- Soft cloth for drying and polishing
- Optional gloves to protect hands during cleaning


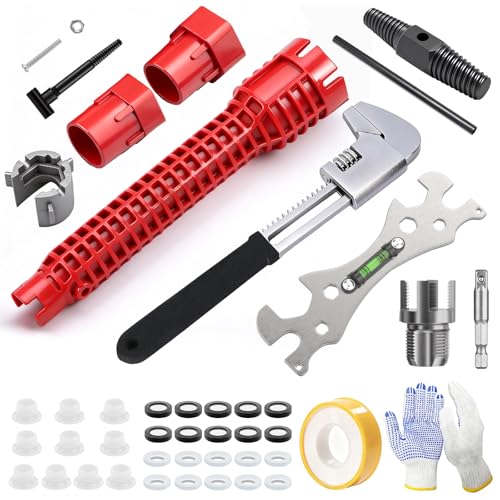
Before You Start
Safety first: turn off the water supply to the bathroom or area, and protect the floor with a towel to catch drips. If your Jolie shower head is mounted on a fixed arm, you may not need to remove it, but removing can help access mineral buildup.
Time estimate: 20–40 minutes for initial cleaning and reassembly. Important cautions include avoiding harsh abrasives that can scratch finishes and never use high-pressure tools on delicate shower heads.
Check compatibility: some Jolie models may include plastic, brass, or chrome finishes. Test a small, inconspicuous area with any cleaner first to ensure no discoloration occurs.
Step-By-Step: How To Clean Jolie Shower Head
- Shut off water and detach the shower head from the arm if accessible. Place a towel under the area to catch drips.
- Prepare the Jolie shower head descaling kit or mix a vinegar solution in a bowl large enough to submerge the head.
- Soak the shower head in the solution for 30–60 minutes, ensuring all mineral buildup is submerged. For stubborn deposits, extend soak time in 10-minute increments.
- Remove the head and use the shower head cleaning brush nylon bristles to scrub the faceplate, nozzles, and threads gently. Focus on clogged nozzles while avoiding metal gouges.
- If you encounter tight spots, use the universal shower head wrench and gasket kit to gently loosen the head. Don’t overtighten on reassembly to prevent leaks.
- Rinse thoroughly with warm water. Reattach the head to the arm and briefly run water to clear loosened debris.
- Pad dry with a soft cloth, then inspect for any remaining mineral clusters. Repeat soak and scrub if necessary.
- For spray pattern restoration, rotate the head to verify even nozzle distribution. If some nozzles remain clogged, a light brush with a dent-free tool may help.
- Recheck fittings for leaks after reassembly. If a leak appears, reseal the gasket and tighten just enough to stop drips without pinching the seal.
- Finish with a quick wipe of the outer finish to restore shine and prevent water spots.
- Periodic maintenance: repeat cleaning every 1–3 months depending on water hardness and usage.
Troubleshooting
| Symptom | Likely Cause | Fix | Prevention |
|---|---|---|---|
| Sparse spray pattern | Clogged nozzles | Soak and scrub with nylon bristles | Regular cleaning schedule |
| No water flow after reassembly | Improper seal or gasket misplacement | Inspect gasket, reseat, and tighten to snug fit | Keep gasket clean, replace worn parts |
| Leaking at connection | Loose connection or damaged washer | Tighten connection or replace gasket/washer | Use the appropriate wrench and avoid over-tightening |
| Finish discoloration | Harsh cleaners or mineral deposits | Switch to non-abrasive cleaners, rinse well | Cleaner selection aligned with finish |
Common Mistakes
- Using strong solvents that could corrode finishes
- Over-tightening when reinstalling the shower head
- Skipping the soak step and relying only on brushing
- Not testing for leaks after reassembly
Tips For Best Results
- Choose a descaling kit that explicitly mentions Jolie compatibility to optimize results.
- For very hard water, consider a longer soak with periodic agitators to prevent re-settling of minerals.
- Keep nozzle tips flexible by rotating and cleaning them individually during the scrub.
- Document the model number before cleaning; some Jolie heads have specific nozzle layouts that benefit from tailored methods.
Call A Professional
Stop and call a pro if you notice persistent leaks after resealing, if the head shows visible cracks, or if you cannot safely detach it due to corrosion or stuck components. Do not force tools into tight spaces, as this can cause irreparable damage.
FAQ
How often should I clean my Jolie shower head?
Depends on water hardness and usage; generally every 1–3 months helps maintain optimal spray.
Can I use the Jolie descaling kit on other brands?
Descaling kits are often designed for Jolie but may be compatible with similar fixtures. Check product guidelines before use.
What if nozzles remain clogged after cleaning?
Consider a deeper soak or using a fine needle or pin to gently clear mineral buildup, taking care not to damage the nozzle faces.
Is it safe to detach the head for cleaning?
Yes, with proper tools and a stable surface. Use a wrench and gasket kit as needed to protect threads and seals.
What finishes require special cleaners?
Chrome, brushed nickel, and matte finishes may react to harsh chemicals; use pH-balanced cleaners and test a small area first.
Should I replace the gasket after cleaning?
If the gasket shows wear or deformation, replace it to maintain a leak-free connection.
How can I improve water pressure after cleaning?
Regular descaling and ensuring no blockages in the arm or lines help restore flow; if pressure remains low, consider hardware checks for upstream issues.
Buying Guide
When selecting shower head cleaning tools and replacement components, consider size, compatibility, and maintenance needs. A complete Jolie-focused care kit is convenient, but combining individual items like a nylon-bristle brush and a universal wrench can also work well. Think about your water hardness, bathroom layout, and how often you plan to perform maintenance. A compact descaling kit that travels well and includes clear instructions will simplify routine cleaning. For households with multiple heads, scalable cleaning solutions help keep all fixtures performing at peak levels. If you’re unsure about compatibility with your Jolie model, consult product documentation or contact customer support for guidance.
Leave a Reply