How to Clean HVLP Spray Gun
HVLP spray guns offer efficient material transfer and smooth finishes, but proper cleaning is essential to maintain performance and extend lifespan. This guide walks American users through a practical cleaning routine, using common tools and safe practices to keep HVLP equipment ready for the next job.
Quick Answer
After each use, promptly flush the gun with appropriate solvent, disassemble the nozzle and fluid passages, and clean all parts with a brush or ultrasonic cleaner. Dry components thoroughly before reassembly, then test with a small amount of water or compatible solvent to ensure no clogs remain.
What You’ll Need
- HVLP spray gun cleaning solvent kit 1 quart
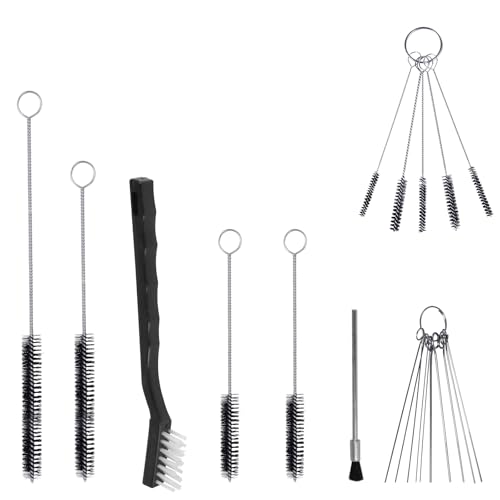
- HVLP spray gun nozzle cleaning brush set
- ultrasonic cleaner for spray gun parts HVLP 1L
- Protective gloves and eye protection
- Rags or lint-free towels
- Small container for soaking parts
- Compressed air or air hose (optional but helpful)

Before You Start
Ensure the workspace is well-ventilated and free of ignition sources. Wear protective gloves and eye protection. Disconnect the spray gun from power and air lines before disassembly. Work on a clean, flat surface and organize parts to avoid losing small seals or o-rings. Typical cleaning time ranges from 15 to 45 minutes, depending on buildup.
Caution: Use only compatible solvents as recommended by the gun manufacturer. Some finishes or cleaners can degrade seals or cause damage if left soaking too long.
Step-By-Step: How To Clean HVLP Spray Gun
- Relieve pressure and disconnect the air supply; remove the cup or reservoir and empty leftover material.
- Rinse the gun with the recommended solvent to loosen paint, moving the trigger to spray during flushing but keeping the nozzle pointed away from you.
- Disassemble the spray gun per the user manual: detach the nozzle, needle, and any seals cautiously. Place parts in a container.
- Soak metal components briefly in the HVLP spray gun cleaning solvent kit 1 quart or appropriate solvent, following the manufacturer’s soaking recommendations.
- Use the HVLP spray gun nozzle cleaning brush set to scrub the needle seat, nozzle apertures, and interior passages; avoid bending delicate parts.
- Run the ultrasonic cleaner for spray gun parts HVLP 1L as directed, placing components in a dedicated tray to prevent loss. Allow a full cycle to loosen dried residue.
- Rinse all parts with clean solvent or water (if compatible) and dry thoroughly with a lint-free wipe. Use compressed air to blow out passages if available.
- Reassemble the spray gun carefully, ensuring seals sit properly and no solvent remains in the cup area. Prime and perform a test spray on a disposable surface to verify consistent spray pattern.
- Inspect the nozzle and needle for wear or damage; replace any worn parts before the next use to prevent poor atomization.
- Clean the exterior of the gun and cup, wipe down the workspace, and store components in a dry area away from solvents.
Troubleshooting
| Symptom | Likely Cause | Fix | Prevention |
|---|---|---|---|
| Spitting or splattering spray | Clogged nozzle or worn needle | Thoroughly clean and replace worn parts | Clean after each use; store with nozzle cap on |
| Uneven spray pattern | Improper nozzle alignment or dried residue | Check alignment; clean all passages | Flush before long pauses in work |
| No spray or weak flow | Seal leaks or clogged passages | Inspect seals; clear passages with brush and solvent | Regular maintenance schedule |
| Paint peeling from cup | Contaminated solvent or incompatible cleanup fluid | Use recommended cleaners only and rinse thoroughly | Use fresh solvent for each cleaning session |
Common Mistakes
- Not disconnecting power or air lines before cleaning
- Ignoring manufacturer’s solvent recommendations
- Rushing cleaning after a long job and leaving residue
- Using abrasive brushes on sensitive nozzle components
- Forgetting to dry parts completely before reassembly
Tips For Best Results
- Keep a dedicated cleaning station to reduce cross-contamination with finishes.
- Label and organize small parts to speed reassembly.
- Prefer ultrasonic cleaning for stubborn buildup, but alternate with manual brushing for precision areas.
- Test spray with water at the end of the session to confirm smooth flow before resuming work.
- Store cleaner solutions in closed containers away from sunlight to preserve efficacy.
Call A Professional
Contact a professional if the spray pattern remains inconsistent after thorough cleaning, or if the gun leaks fluid from seals despite replacement parts. Stop using the tool if a crack, severe corrosion, or damaged trigger mechanism is observed. For professional maintenance, schedule a service with a qualified technician or the manufacturer’s authorized service center.
FAQ
How often should I clean an HVLP spray gun?
Clean after each use and perform a deeper clean after completing a project, especially with stubborn coatings.
Can I use hot water to clean an HVLP spray gun?
Only if the manufacturer approves it for the specific materials; generally, use the recommended solvents to avoid damage.
Is an ultrasonic cleaner necessary?
Not strictly, but an ultrasonic cleaner speeds up removal of dried residues and improves overall cleanliness.
What should I replace during regular maintenance?
Replace worn seals, o-rings, and the nozzle/needle if wear is evident or spray quality declines.
Can I clean the gun without disassembly?
Minimal cleaning is possible by flushing, but complete disassembly ensures thorough removal of residue.
Should I dry parts before reassembly?
Yes, ensure all components are completely dry to prevent solvent dilution and poor adhesion.
What if the spray gun leaks after cleaning?
Check seals and threads for damage; replace faulty parts and reassemble carefully.
Buying Guide
When choosing tools for cleaning an HVLP spray gun, consider size, compatibility, and maintenance needs. Key buying factors include:
- <bSize and capacity: Opt for a cleaning solvent kit and ultrasonic cleaner that fit your typical spray gun models and work volume.
- <bNoise level: Ultrasonic cleaners vary in noise; look for models rated for home or workshop use if quiet operation matters.
- <bEnergy efficiency: Smaller ultrasonic units use less energy; consider energy usage for regular cleaning sessions.
- <bControls and features: Timed cleaning cycles, adjustable frequency, and safety shutoffs improve usability.
- <bPlacement: Choose a compact setup that fits your workspace, with stable surfaces and proper ventilation.
For a balanced cleaning routine, pair a HVLP spray gun cleaning solvent kit 1 quart with a HVLP spray gun nozzle cleaning brush set and, when needed, an ultrasonic cleaner for spray gun parts HVLP 1L. This combination covers routine flushing, precise nozzle work, and deep residue removal. Considering build quality, warranty, and manufacturer recommendations helps ensure long-term reliability and consistent results.
Leave a Reply