How to Clean Grout Between Tiles: A Practical Guide for Homeowners
Grout lines can trap dirt, mildew, and soap scum, making tiled areas look dull. This guide provides practical, step-by-step methods to clean grout between tiles using common tools and safe techniques for American homes. From quick spot cleaning to deep-restoration, readers will learn how to restore bright, uniform grout without damaging surrounding tiles.
Whether you’re refreshing a kitchen backsplash, bathroom shower, or entryway floor, the following steps emphasize effectiveness, safety, and long-term upkeep. The goal is to make grout look nearly new with minimal effort and without specialized equipment.
Quick Answer
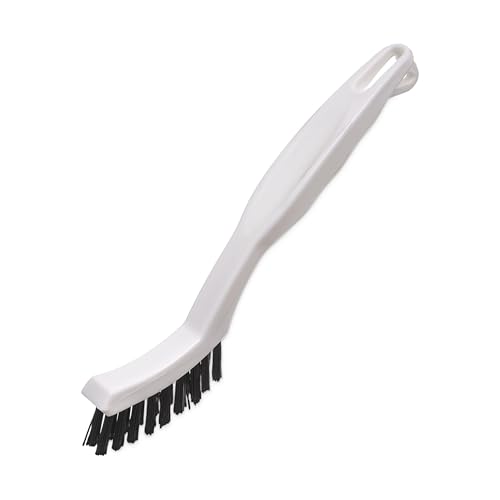
Start with a grout cleaning brush with angled head nylon bristles for scrubbing gentle lines. If grime is stubborn, use an electric handheld grout cleaner tool for deeper cleaning, or attach a steam cleaner tile grout cleaning attachment to loosen and lift stains. For routine maintenance, wipe with a mild cleaner and seal grout every 6–12 months.
What You’ll Need
- Grout cleaning brush with angled head nylon bristles
- Electric handheld grout cleaner tool
- Steam cleaner tile grout cleaning attachment
- Mild household cleaner or baking soda paste
- Vinegar (optional for natural sanitation, never on natural stone)
- Soft cloths or microfiber towels
- Grout sealer (for after cleaning)


Before You Start
Assess the area: determine if grout is sealed or damaged. Poorly sealed grout may require resealing after cleaning. Protect surrounding surfaces with a cloth or plastic sheet and ensure good ventilation. Time estimates vary by area: a small bathroom may take 20–40 minutes, while a larger kitchen or shower could require 1–2 hours including drying time. Wear gloves and eye protection if using stronger cleaners or steam equipment.
Important cautions: avoid acidic cleaners on marble, limestone, or cementitious grout that might be damaged by acids. Do a spot test in an inconspicuous corner before full-scale cleaning. Ensure grout is not loose or crumbling; if it is, focus on repair or replacement of affected sections first.
Step-By-Step: How To Clean Grout Between Tiles
- Clear the area and remove any loose debris from grout lines with a dry cloth or vacuum.
- Mix a mild cleaning solution: a few drops of mild dish soap in warm water or a baking soda paste for stubborn stains.
- Dip the grout cleaning brush with angled head nylon bristles into the solution and scrub along the grout lines using firm, short strokes.
- If grime persists, apply a small amount of vinegar solution to the grout and let it sit for 5–10 minutes, then scrub again. Rinse with clean water.
- For heavy staining, use an electric handheld grout cleaner tool with a brush attachment. Work in small sections, keeping the grout damp to prevent dust.
- Alternative: attach the steam cleaner tile grout cleaning attachment and run over grout lines following the manufacturer’s instructions. Steam can loosen mineral deposits and mildew without harsh chemicals.
- Rinse thoroughly with clean water to remove residues. Dry with a microfiber cloth to prevent water spots.
- Inspect grout for remaining stains. Repeat cleaning on stubborn areas as needed.
- Once dry, evaluate grout for sealing. If sealed previously or if color is uniform, apply a grout sealer per product directions to protect against future staining.
- Keep up maintenance by regular wipe-downs and re-sealing every 6–12 months, depending on traffic and cleaning frequency.
- Document any area that requires ongoing attention; consider spot repairs for high-traffic zones.
Troubleshooting
| Symptom | Likely Cause | Fix | Prevention |
|---|---|---|---|
| Grout stays discolored after cleaning | Stubborn mineral deposits or mildew | Apply steam cleaning or a stronger baking soda paste, then reseal | Regular cleaning and timely sealing |
| Grout crumbles or chips | Worn or damaged grout | Remove and replace damaged grout sections | Seal and maintain integrity to protect |
| Sticky residue after cleaning | Soap or cleaner left on grout | Rinse thoroughly with clean water and dry | Use minimal cleaner and rinse well |
| Discoloration around tiles | Water intrusion or improper sealing | Check sealant and reseal if needed | Ensure proper ventilation and drying after cleaning |
Common Mistakes
- Using acidic cleaners on sensitive grout or natural stone
- Over-wetting grout, which can lead to mold growth behind the tiles
- Scrubbing too aggressively, causing grout to wear away
- Skipping the sealing step after cleaning
- Neglecting to dry grout thoroughly, which promotes mildew
Steady, patient scrubbing with appropriate tools yields the best results. Avoid shortcuts that involve harsh chemicals or aggressive scrubbing that can damage the grout.
Tips For Best Results
- Focus on high-traffic zones more frequently; grout in showers and backsplashes benefits most from maintenance.
- Work in small sections to keep grout moist and prevent new staining from settling.
- Use a grout sealer after drying to extend cleanliness and resist future staining.
- Test a hidden area before applying new cleaners to verify compatibility.
- Store cleaning tools dry to prevent mildew growth on brushes.
Call A Professional
Consider a professional if grout is heavily stained, crumbling, or if there is persistent mold behind sealed grout. Stop signs include persistent dampness, strong odors, or tiles that loosen or crack after cleaning. Seek a licensed professional for structural concerns, extensive tile work, or mold remediation that goes beyond routine cleaning.
FAQ
What is the best tool for cleaning grout between tiles?
The grout cleaning brush with angled head nylon bristles is ideal for manual scrubbing, while an electric handheld grout cleaner tool offers deeper cleaning; a steam cleaner tile grout cleaning attachment can loosen tough deposits.
Can I use household vinegar to clean grout?
Yes for most surfaces, but avoid vinegar on natural stone and always rinse thoroughly after use.
Is sealing grout necessary after cleaning?
Sealing helps protect grout from stains and moisture; it is recommended after a thorough cleaning and drying period.
How often should grout be cleaned and resealed?
Clean regularly; reseal every 6–12 months for high-use areas or every 1–2 years for low-traffic zones.
Buying Guide
Key buying factors help choose the right tools and methods for cleaning grout between tiles. Consider these perspectives to compare options and tailor to your space.
- Size and scale: For small bathrooms, a compact handheld tool may suffice. For larger kitchens or floors, a more powerful tool or steam attachment can save time.
- Noise level: Electric handheld cleaners vary in noise. If quiet operation matters, look for models with lower decibel ratings or consider steam cleaning with a low-noise footprint.
- Effectiveness: For deep grout stains, choose tools with durable nylon bristles and compatible attachment heads designed for grout lines.
- Energy efficiency: Manual scrubbing uses no electricity, while electric tools and steamers consume power. Balance energy use with cleaning effectiveness.
- Controls and ergonomics: Ergonomic handles and variable speed settings reduce fatigue during longer sessions.
- Surface compatibility: Ensure cleaners and attachments are safe for the tile type (ceramic, porcelain, or natural stone) and grout formula in your home.
- Maintenance and durability: Look for corrosion-resistant components and readily available replacement brushes or heads.
- Placement and storage: Consider whether tools fit in your cleaning closet and how easy they are to reach for routine maintenance.
In practice, many homeowners start with a manual brush and progress to an electric cleaner or steam attachment for tougher grout. Combining tools can provide both quick spot cleaning and deep restoration when needed.
Leave a Reply