How to Clean an Electric Hair Brush Straightener
Electric hair brush straighteners combine heating elements with a brushing action, which can trap product buildup, oils, and hair residues. Regular cleaning helps maintain performance, prevent residue transfer to hair, and extend the life of the tool. This guide walks through a safe, effective method using common accessories and dedicated cleaners.
Quick Answer
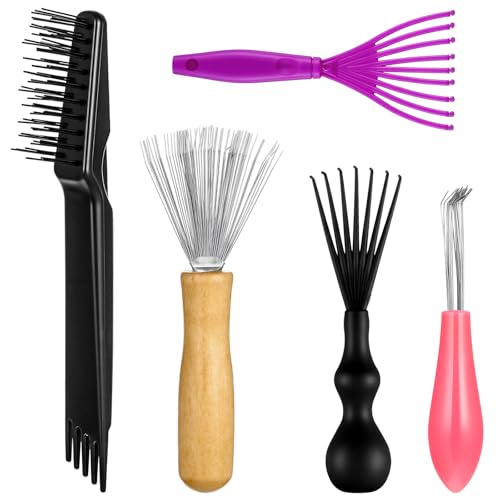
Detach any removable components, unplug the device, and allow it to cool. Use a electric hair straightener cleaning brush kit or heated hairbrush cleaner tool set to scrub away residue from plates and bristles. Finish with microfiber cleaning wipes for electric hair straighteners to wipe surfaces dry and shine-free. Do not submerge the device in water.
What You’ll Need
- electric hair straightener cleaning brush kit or a compatible cleaning brush
- heated hairbrush cleaner tool set for precise bristle cleaning
- microfiber cleaning wipes for electric hair straighteners for final wipe-down
- Optional isopropyl alcohol (70% or higher) for stubborn buildup
- Soft cloth or lint-free towel for drying

Before You Start
Safety first: unplug the device and ensure it is completely cool before touching the plates. Work in a well-lit area on a heat-resistant surface. Avoid using aggressive solvents that could degrade plastic or coating. If the warranty requires, check the manufacturer’s cleaning recommendations to prevent voiding coverage. Time estimate: 5–15 minutes, depending on buildup and tool model. Do not immerse any part of the device in water.
Step-By-Step: How To Clean An Electric Hair Brush Straightener
- Unplug the device and remove any detachable brush head or plates if your model permits.
- Wipe the exterior housing with a dry microfiber wipe to remove loose dust and hair.
- Use a electric hair straightener cleaning brush kit to gently scrub between bristles and along plate edges to loosen residue.
- Dip a microfiber wipe in a small amount of isopropyl alcohol or cleaning solution, then wipe the plates and brush-head surfaces. Avoid dripping liquid into the hinge or electrical components.
- For stubborn buildup, apply a tiny amount of alcohol on the cleaning brush and scrub in circular motions until clean. Avoid abrasive tools that could scratch coatings.
- Rinse or wipe away any remaining cleaner with a dry microfiber wipe. Ensure all moisture is removed from crevices.
- Reassemble the brush head or plates, if applicable, and run the device on a low heat for a brief test to ensure nothing interferes with operation.
- Finish with a final pass using microfiber cleaning wipes for electric hair straighteners to remove fingerprints and leave a polished surface.
Troubleshooting
| Symptom | Likely Cause | Fix | Prevention |
|---|---|---|---|
| Residue remains after cleaning | Inadequate scrubbing between bristles | Re-scrub with brush kit; focus on tight gaps | Clean after every few uses |
| Streaks or white film on plates | Cleaning solution residue | Wipe with a dry microfiber wipe until dry | Use minimal liquid and wipe promptly |
| Excess heat cycling stops working | Moisture in hinges or sensors | Dry thoroughly before reassembly | Air-dry longer in a warm room |
| Color transfer to hair | Overheating or buildup on plates | Clean more frequently and avoid using accessories that rub coating | Clean after heavy product use |
Common Mistakes
- Using excessive liquid or submerging parts in water
- Scrubbing with abrasive tools that scratch coatings
- Forgetting to unplug and wait for cool-down before cleaning
- Neglecting to wipe dry and leaving moisture in crevices
Tips For Best Results
- Clean on a cool, stable surface to prevent slips or damage.
- Perform a light maintenance wipe weekly if you use styling products daily.
- Store the device in a dry area and away from heat sources after cleaning.
- Keep your cleaning kit together with your hair tools for convenience and consistency.
Call A Professional
Seek professional service if you notice abnormal heat, malfunctioning electrical components, or persistent residue that won’t clean without disassembly. Do not attempt internal repairs yourself if you are unsure about the model’s safety and warranty terms. If liquid has entered the device’s interior or you hear unusual noises, stop use and contact a pro.
FAQ
Can I use household cleaners on my electric hair brush straightener?
Avoid harsh household cleaners that could damage coatings; use mild, isopropyl-alcohol-based wipes or dedicated cleaning kits.
How often should I clean the tool?
Clean after every few uses if you regularly apply styling products, or at least once a week with light maintenance.
Is it safe to clean while still warm?
Allow the device to cool completely before cleaning to prevent burns and electrical issues.
What should I do if residue returns quickly after cleaning?
Increase cleaning frequency and check for product buildup; consider using higher-quality cleaning wipes or brushes designed for electrical components.
Buying Guide
When choosing cleaning accessories for an electric hair brush straightener, consider size and compatibility with your model, ease of use, and material quality. A dedicated electric hair straightener cleaning brush kit should reach between bristles and around plates without scratching surfaces. A heated hairbrush cleaner tool set offers targeted scrubbing tools that minimize contact with electrical parts. For after-cleaning care, microfiber cleaning wipes for electric hair straighteners provide streak-free drying and surface protection. Look for kits that include soft brushes, non-abrasive pads, and compatible cleaning solutions. Ensure the tools are designed for your device’s plate type and hinge design to avoid damage. If you share the tool among family members, consider a compact kit for easy storage in a bathroom or laundry area.
Size matters: choose compact, portable kits for travel or casual use, and full-featured sets for frequent styling. Noise level is typically not a concern with cleaning tools, but select materials that produce minimal lint or residue. Energy efficiency is not a direct factor for cleaning gear, but durable, high-quality brushes last longer and reduce the need for replacements. Controls should be straightforward, with clear brushes, pads, and wipe surfaces. Place cleaning supplies near the power outlet but away from water to prevent accidents. Finally, verify compatibility with your device’s model and plate design to ensure safe, effective cleaning without voiding warranties.
Leave a Reply