How to Clean a Delta Faucet Head
Delta faucets are a common focal point in kitchens and bathrooms. Over time, mineral buildup, debris, and reduced water flow can affect spray patterns and overall performance. This guide provides a practical, step-by-step method to restore a Delta faucet head to peak efficiency, using common tools and Delta-specific accessories.
Quick Answer
Turn off the water supply, remove the aerator with a Delta faucet aerator removal wrench or similar tool, clean the internal components, rinse, and reassemble. For stubborn deposits, soak the aerator in descaling solution and scrub with a faucet cleaning brush set.
What You’ll Need
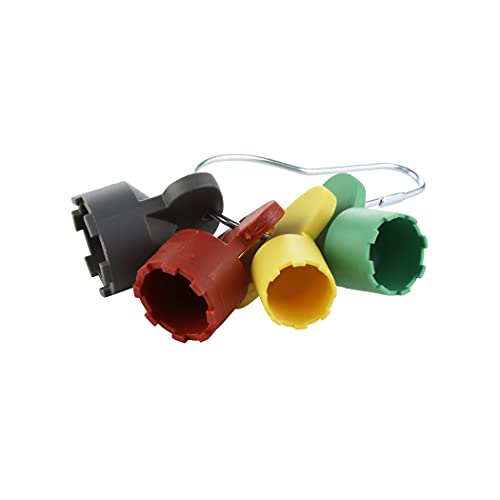
- Delta faucet aerator removal wrench or compatible wrench
- faucet cleaning brush set
- aerator cleaning tool for Delta faucet
- White vinegar or descaling solution
- Small bowls or containers for soaking
- Soft cloths or towels for drying
- Gloves (optional) for hand protection


Before You Start
All work should begin with the main water supply shut off to prevent leaks. Protect the sink area with towels to catch drips. If your faucet has removable covers or cartridges, leave them in place unless you are confident in disassembly. Avoid harsh chemicals near rubber seals and finish surfaces. Time estimate: 15–30 minutes for most faucets, longer for extra buildup.
Step-By-Step: How To Clean Delta Faucet Head
- Place a towel under the faucet and shut off the water supply to the faucet to prevent accidental sprays.
- Use the Delta faucet aerator removal wrench to unscrew and remove the aerator from the faucet head.
- Inspect the aerator parts for clogs. Separate cap, screen, and valve pieces if needed.
- Rinse components under warm water, then soak them in white vinegar or a descaling solution for 15–20 minutes.
- While soaking, wipe the faucet head with a faucet cleaning brush set to loosen mineral deposits around the exterior.
- After soaking, scrub gently with the brush to remove stubborn buildup, paying attention to mesh screens and passages.
- Rinse all parts thoroughly, then reassemble the aerator and thread it back onto the faucet head with a snug, not overtight, fit.
- Turn the water back on and operate the faucet to confirm proper flow. If flow is weak, repeat soaking or use a small brush to clear remaining deposits.
- Wipe the exterior dry with a soft cloth to prevent water spots and ensure a clean finish.
- For persistent buildup, repeat the soaking step or consider using an aerator cleaning tool for Delta faucet to access tight spaces.
- Check the aerator periodically and repeat the cleaning routine about every few months to maintain optimal performance.
Troubleshooting
| Symptom | Likely Cause | Fix | Prevention |
|---|---|---|---|
| Weak spray after cleaning | Deposits remain in the aerator or head passages | Re-soak and scrub with the faucet cleaning brush set | Clean regularly to prevent buildup |
| Leaks around aerator | Loose aerator connection or damaged washers | Re-seat or replace washers; ensure tight connection | Inspect connection each time you clean |
| Discolored or corroded finish | Harsh cleaners or mineral deposits | Use mild cleaners and a soft cloth; avoid abrasive tools | Regular light cleaning with proper tools |
| Continual dripping after reassembly | O-ring or seal damage | Replace faulty seals or seals kit | Handle components gently during disassembly |
Common Mistakes
- Using metal tools that scratch the faucet head or aerator
- Over-tightening the aerator, causing thread damage
- Skipping the soak step for mineral-heavy water
- Using vinegar on soft finishes too aggressively
Replacing worn seals or gaskets is often overlooked but can prevent leaks after cleaning.
Tips For Best Results
- Schedule routine cleans every 2–3 months in areas with hard water chemistry.
- Keep a small maintenance kit with the Delta faucet aerator removal wrench and cleaning brushes handy.
- For hard-to-reach Delta heads, use the aerator cleaning tool for Delta faucet to access internal passages.
- Warm water and mild cleaners preserve finishes while removing mineral buildup effectively.
- Document the aerator model if you plan to replace parts in the future.
Call A Professional
Consider a professional plumber if you notice persistent leaks after reassembly, corrosion, or if the faucet head remains blocked despite repeated cleaning. Stop signs include sudden loss of water pressure, unusual noises during operation, or visible damage to the faucet body.
FAQ
Can I clean a Delta faucet head without removing the aerator?
Yes, a light exterior wipe and exterior mineral buildup removal can improve appearance; deeper cleaning benefits from aerator removal.
What tools are essential for Delta faucet cleaning?
A Delta faucet aerator removal wrench, a faucet cleaning brush set, and an aerator cleaning tool for Delta faucet are highly recommended.
Is vinegar safe for Delta finish?
Yes, in small amounts and with brief exposure; avoid prolonged soaking on delicate finishes.
How often should I clean my Delta faucet head?
Every 2–3 months in areas with hard water; adjust frequency based on mineral buildup observed.
What if cleaning doesn’t restore spray?
Inspect seals and o-rings for wear; consider replacing the aerator or consulting a pro if flow remains poor.
Are there any safety precautions?
Shut off water supply before disassembly, wear gloves if desired, and protect the sink area from liquids.
Buying Guide
When selecting accessories for cleaning Delta faucet heads, consider factors like compatibility, build quality, and ease of use. A well-rounded kit can simplify maintenance and extend faucet life.
- <bSize and compatibility: Ensure the aerator removal tool fits your Delta model and any other faucet brands in the household.
- <bNoise level and comfort: Tools should be easy to handle with a comfortable grip and minimal slippage.
- <bEnergy and water efficiency: Regular cleaning preserves efficient water flow, reducing energy use for pumping and heating water.
- <bControls and accessibility: Simple, intuitive tools enable quick maintenance without disassembly beyond the aerator.
- <bPlacement considerations: Keep tools in a designated cleaning kit near the sink for quick access.
If you compare products, prioritize those designed specifically for Delta, while recognizing that many universal cleaning tools work across faucet brands. A compact, durable kit with a dedicated aerator wrench and brushes typically yields the best long-term results.
Leave a Reply