How to Clean Cloudy Solar Light Panels Safely and Effectively
Solar light panels can lose efficiency if dust, pollen, or build-up creates a cloudy layer on the surface. Regular cleaning helps maintain maximum light absorption and performance. This guide focuses on practical, safe methods tailored for residential solar lighting and small panel arrays, using common tools and a gentle touch to protect coatings and seals.
Quick Answer
Best practice: use a soft-bristle brush or a microfiber cloth with a gentle cleaning solution, rinse with clean water, and dry with a lint-free cloth. Clean early in the morning or late afternoon to avoid rapid evaporation and water spots. Always avoid harsh chemicals and high-pressure streams that can damage panels.
What You’ll Need
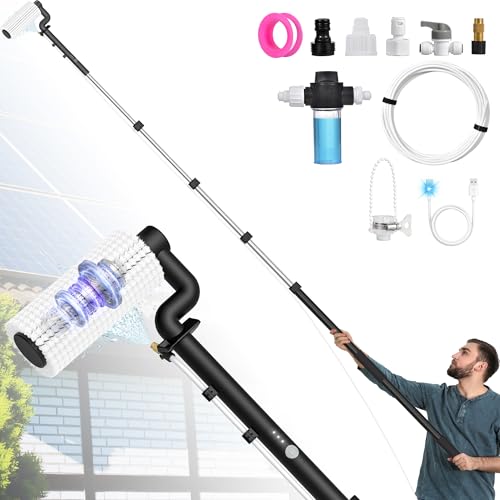
- Solar panel cleaning kit with soft brush microfiber cloth
- Soft-bristle solar panel cleaning brush
- Solar panel cleaning squeegee kit outdoor


Before You Start
Inspect the panels for loose connections, cracks, or exposed wiring before cleaning. If panels are tilted, take care on ladders or elevated positions and use fall protection. Work on overcast days or early morning to reduce rapid drying and streaks. Do not spray high-pressure water directly onto panels as it can seep under seals. Use gentle, broad strokes to minimize micro-scratches and preserve anti-reflective coatings.
Estimate time: 20–45 minutes for a typical residential setup. Safety first: wear gloves, eye protection if splashes are possible, and ensure power to any connected systems is off when required by manufacturer guidelines.
Step-By-Step: How To Clean Cloudy Solar Light Panels
- Shut down the solar lighting system if recommended by the manufacturer and disconnect any low-voltage wiring as a precaution.
- Brush loose debris with a dry, soft-bristle solar panel cleaning brush to avoid grinding dust into the surface.
- Wet a microfiber cloth or the supplied tool pad with clean water or a mild cleaning solution recommended by the kit, ensuring it is well diluted and residue-free.
- Gently wipe the panel surface in broad, overlapping strokes from top to bottom to lift grime without applying excessive pressure.
- For stubborn spots, apply a light touch of the cleaning solution and hold the brush at a slight angle to lift dirt without scratching coatings.
- Rinse the panel with a spray bottle or low-flow hose, using a wide arc to avoid concentrated streams. Ensure the entire surface is rinsed clean.
- Use the squeegee kit to remove excess water and prevent streaks, starting at the top edge and moving downward in smooth motions.
- Dry the surface with a lint-free microfiber cloth to minimize water spots and preserve clarity of the panels.
- Inspect for any remaining residue; repeat cleaning on problem areas if necessary, taking care not to oversaturate seals or joints.
- Reconnect power or wiring if it was turned off, and perform a quick operational test once panels are dry.
- Schedule regular cleanings every 6–12 months or after heavy pollen seasons, depending on local conditions and panel exposure.
- Store or secure cleaning tools properly after use to prevent damage and ensure readiness for the next cleaning cycle.
Troubleshooting
| Symptom | Likely Cause | Fix | Prevention |
|---|---|---|---|
| Cloudy glare or streaks after cleaning | Water spots or leftover residue | Re-wipe with a clean, damp microfiber cloth and dry thoroughly | Rinse with distilled water if hard water is a recurring issue |
| Reduced light output after cleaning | Scratches or coating wear | Inspect for scratches; avoid abrasive tools; consult a pro if coating appears damaged | Use soft brushes and gentle pressure; follow manufacturer guidelines |
| Water leaks around panel edges | Damaged seals or improper cleaning | Stop cleaning; inspect seals and consult professional if needed | Regularly inspect seals; avoid high-pressure water |
| Panel feels unusually hot after cleaning | Residual moisture or improper venting | Ensure panels are completely dry before reactivation | Clean in cooler, shaded conditions when possible |
Common Mistakes
- Using harsh chemicals or ammonia-based cleaners that can damage coatings
- Cleaning under direct sun, which causes rapid drying and streaks
- Using high-pressure water or stiff brushes that scratch surfaces
- Neglecting to dry the panel completely, leading to mineral deposits
Keeping the surface clean with the right tools helps sustain efficiency and prolongs panel life.
Tips For Best Results
- Choose a cloudy day or early morning for cleaning to minimize evaporation and water spotting.
- Apply a light, even rinse before wiping to loosen grime rather than rubbing it in.
- Test any cleaning solution on a small area first to ensure compatibility with coatings.
- Use the microfiber cloths and soft brushes included in the kit to reduce abrasion risk.
- Document the cleaning date and any observed issues to track panel health over time.
Call A Professional
Hire a professional if you notice cracked glass, corrosion around metal frames, or loose mounting hardware. Seek expert help if the system is hardwired, if panels are inaccessible from ground level, or if you require seal replacement or electrical work. Do not attempt repairs beyond basic cleaning if safety risks are present.
FAQ
How often should I clean solar light panels?
Typically every 6–12 months, or more often in dusty, pollen-heavy, or coastal environments where build-up occurs quickly.
Can I use tap water to clean panels?
Yes, but if your water is hard, consider distilled water to reduce mineral spots and residue.
What cleaning tools are essential for cloudy panels?
A soft-bristle brush, a microfiber cloth, and a gentle cleaning solution, plus a squeegee for drying.
Are there signs of coating damage after cleaning?
Look for persistent streaks, color changes, or scratched surfaces. If you notice any, consult a professional.
Is it safe to clean panels in the winter?
Yes, as long as surfaces are not icy and cleaning tools won’t slip on wet or frozen edges.
Should I remove panels from mounts for cleaning?
Typically unnecessary for residential setups; use extendable tools to reach panels safely. If mounting hardware is loose, contact a pro.
What if the panels get wet after cleaning?
Dry thoroughly with a microfiber cloth to prevent mineral deposits or streaking.
Buying Guide
When selecting cleaning tools for solar light panels, consider size, material softness, and ease of use. Look for a soft-bristle solar panel cleaning brush that reaches into panel gaps without scratching. A solar panel cleaning kit with soft brush microfiber cloth should include multiple cloths for different cleaning stages and a gentle cleaning solution compatible with coatings. A solar panel cleaning squeegee kit outdoor helps remove water efficiently and prevents streaks. For multi-panel setups, longer handles or telescoping options improve reach without leaning onto ladders. Assess compatibility with your panel size and frame type to avoid tool damage or gaps during cleaning.
Size and panel area dictate tool reach and water use. Choose tools that comfortably cover your largest panel without overextending.
Noise level isn’t typically a factor in cleaning, but manual tools keep noise minimal and prevent disturbances in quiet neighborhoods or near living areas.
Energy efficiency relates to your panels, not the cleaning tools. Clean panels regularly to maintain efficiency but avoid using heat or power-hungry devices during cleaning that could impact performance.
Controls on cleaning kits are straightforward: simple brushes, soft pads, and basic spray bottles. Look for non-slip grips and ergonomic handles for comfortable operation.
Placement consider access points. For rooftop panels, use extendable tools and non-slip footwear. Ground-level installations are easier to clean but still require careful handling of water and tools.
Overall, choose a kit that emphasizes gentle cleaning, surface protection, and compatibility with your specific solar light panels. Regular, methodical cleaning helps preserve performance and extend the life of the system.
Leave a Reply