How to Clean Clogged Gas Stove Burners for Safer Cooking
Clogged gas stove burners can lead to uneven flames, poor heat distribution, or a yellow-tipped flame indicating incomplete combustion. Regular, careful cleaning helps restore performance, improve efficiency, and reduce the risk of flare-ups. This guide explains practical steps, the right tools, and safety tips to clean clogged gas stove burners effectively in a typical American kitchen.
Quick Answer
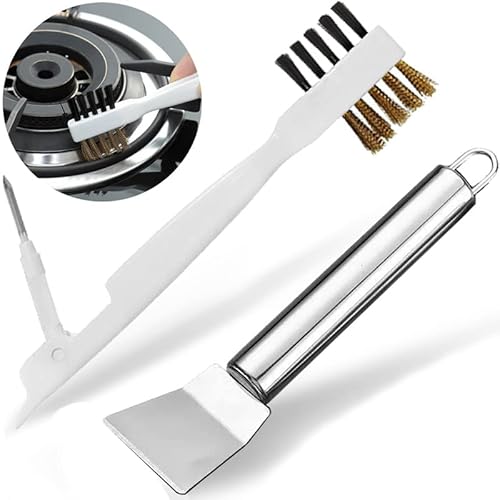
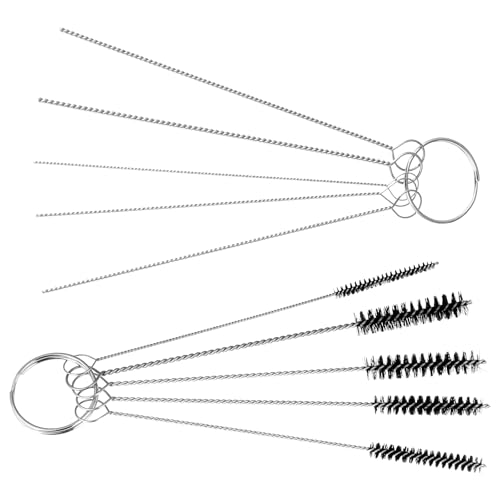
Turn off the stove and cool completely. Remove burner caps and grates, then use a gas stove burner cleaning brush with stainless steel bristles to scrub the ports. For stubborn clogs, employ a gas stove burner cleaning kit with a needle tool or a specialized orifice cleaning brush kit. Reassemble and test on low heat to ensure an even flame.
What You’ll Need
- Gas stove burner cleaning brush stainless steel bristles
- Gas stove burner cleaning kit with needle tool
- Gas range burner orifice cleaning brush kit
- Warm soapy water or mild degreaser
- Soft cloths or sponges
- Toothpicks or pipe cleaners (optional for fine debris)

Before You Start
Ensure the cooktop is completely off and cool before handling parts. If you smell gas or suspect a leak, do not use the stove—ventilate, then contact a professional. Disconnect the power if your range has an electric ignition. Work over a clean workspace and protect grout or countertops from cleaners. Typical cleaning time is 20–45 minutes depending on clog severity. Never soak burner heads or leave water in the burner base.
Step-By-Step: How To Clean Clogged Gas Stove Burners
- Remove the grates and burner caps; note their positions for correct reassembly.
- Wipe loose residue with a damp cloth; set caps aside to soak in warm, soapy water if heavily soiled.
- Inspect the burner heads for obvious blockages and gently tilt to remove debris with a brush.
- Use the gas stove burner cleaning brush stainless steel bristles to scrub all ports on the burner head in a circular motion.
- If flames are uneven, use the gas stove burner cleaning kit with needle tool to gently probe clogged ports—do not force a blockage.
- For fine debris near orifice lines, run a gas range burner orifice cleaning brush kit along the small channels; wipe away loosened particles.
- Rinse the burner heads and caps with warm water; dry thoroughly before reassembling.
- Reattach caps and grates; lightly test the range’s ignition and flame at low heat to confirm even distribution.
- If flame color remains yellow or inconsistent, repeat the cleaning steps or consider deeper servicing for the affected burner.
- Store brushes and tools after complete drying; wipe the area to remove any remaining residue.
Troubleshooting
| Symptom | Likely Cause | Fix | Prevention |
|---|---|---|---|
| Uneven flame or idle flame | Clogged burner ports | Clean with brush and needle tool as needed | Regular maintenance and gentle cleaning after heavy spills |
| Yellow flame | incomplete combustion or dirty orifice | Clean orifice with appropriate kit | Avoid over-greasing; clean after cooking |
| Flame that won’t ignite | Electrical ignition trouble or debris | Clear debris around ignition area; replace if needed | Keep ignition area dry and clean |
| Gas odor after cleaning | Gas line leak or improper reassembly | Turn off supply, recheck connections, call a pro | Work with proper tools and double-check seals |
Common Mistakes
- Using metal tools that scratch or damage burner heads
- Soaking burner components for too long
- Neglecting to dry parts fully before reassembly
- Forcing through stubborn clogs without using the right tools
These mistakes can worsen clogging or damage the burners. Following the recommended tools and steps minimizes risk and preserves performance.
Tips For Best Results
- Clean burners after heavy cooking spills to prevent resin and grease buildup.
- Perform a light, routine cleaning weekly, and a deeper clean monthly depending on usage.
- Keep a dedicated cleaning kit for the stove area to avoid cross-contamination with other kitchen tools.
- Lubricate or adjust gaskets only if the manufacturer recommends it; otherwise, rely on cleaning alone.
Call A Professional
Stop and call a pro if you notice gas odor, a persistent ignition failure, or if the burner shows physical damage such as warped components. Also seek help if cleaning does not restore even flame or if you sense gas leaks after reassembly. In these cases, do not continue troubleshooting and contact a licensed technician.
FAQ
How often should I clean gas stove burners?
Clean burners monthly for typical use, with a deeper clean every 1–3 months depending on spill frequency and cooking styles.
Can I use household cleaners on burners?
Use mild soap and water or a degreaser. Avoid harsh chemicals that could corrode metal parts or affect igniters.
Is it safe to use metal tools to clean the ports?
Avoid aggressive scraping; use approved brushes and tools to prevent damage.
What should I do if the flame goes out after cleaning?
Turn off the burner, wait a minute, then relight. If it continues to fail, inspect the igniter and gas supply or call a professional.
Buying Guide
Choosing the right cleaning tools for gas stove burners involves considering material quality, compatibility, and ease of use. The right brush set and needle tool can make quick work of clogged ports, while a dedicated orifice cleaning brush kit provides precision for tight channels. Look for tools with durable stainless steel bristles, non-scratch holders, and protective caps for safe storage.
Key buying factors include size and fit for your burner models, noise level during brushing, and the availability of replacement heads. Consider whether you prefer a single multi-tool kit or separate items for routine cleaning and more thorough maintenance. For households with frequent grease buildup, a kit that includes a needle or wire cleaning tip can be particularly helpful.
Placement matters as well: store tools near the range for quick access yet away from children. If you have a gas range with multiple burner sizes, choose kits with adaptable brushes that work across different port patterns. Finally, check product warranties and customer reviews to gauge real-world effectiveness and long-term durability.
Leave a Reply