How to Clean a Bissell Carpet Cleaner Safely and Effectively
Regular maintenance of a Bissell carpet cleaner helps extend its life and keeps cleaning results consistently strong. This guide provides a clear, step-by-step approach to cleaning the machine, addressing common problem areas, and choosing the right replacement parts to keep performance at its peak.
Quick Answer
Detach hoses and cups, rinse the brushes and nozzle, clean the tank and filters, and thoroughly dry all parts before reassembly. Use manufacturer-approved cleaning brushes and tool kits for replacements when needed to avoid damage and preserve suction power.
What You’ll Need
The following tools and materials are recommended to complete a thorough cleaning of a Bissell carpet cleaner. The list includes items that align with common replacement needs and maintenance tasks.
- Bissell ProHeat 2X carpet cleaner hose replacement
- Bissell carpet cleaner cleaning brush replacement kit
- Bissell carpet cleaner nozzle and tool cleaning toolkit
- Original detergent and water mix compatible with your model (as recommended in the user manual)
- Soft-bristle brush for scrubbing
- Microfiber cloths for drying and detailing
- Warm water and a mild cleaning solution (if manual permits)
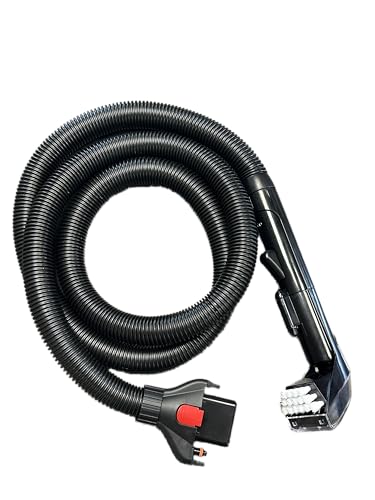


Before You Start
Prepare a well-ventilated workspace and ensure the machine is unplugged before beginning any maintenance. Empty the water tanks and disconnect hoses to avoid accidental spraying. Safety note: never immerse the power switch housing or motor housing in water. Allow all parts to dry completely before reassembling to prevent mold and electrical issues. Time estimate: 20–40 minutes for a basic cleaning; longer for deep cleaning or multiple components.
Step-By-Step: How To Clean A Bissell Carpet Cleaner
- Unplug and disassemble: Detach hoses, nozzle attachment, and any cleaning tools. Remove the water tanks and set aside for washing.
- Rinse the tanks: Rinse both fresh water and dirty water tanks with warm water. Use a soft brush to remove any residue. Dry thoroughly before reattaching.
- Clean the brush and nozzle: Remove the brush roller (if your model permits) and rinse under running water. Use the cleaning toolkit to scrub nozzles, spray jets, and surrounding areas to remove buildup.
- Address the suction path: Inspect the suction pathway for clogs. Use a long, flexible brush or a tool from the cleaning toolkit to clear any debris from intake grates and hoses.
- Clean the exterior housing: Wipe with a damp cloth, then dry. Pay attention to crevices around switches and handles to keep dirt from accumulating.
- Inspect and replace parts: If you notice degraded hoses, worn nozzle seals, or a dull brush, replace them using the provided or compatible replacement parts. Replacements should be installed according to the user manual.
- Rinse with a gentle cycle: Reassemble the machine, fill the tanks with clean water, and run a brief rinse cycle to flush out any cleaning residues from the system.
- Dry thoroughly: Let all components air-dry completely before next use. Store with hoses loosely coiled to prevent kinks.
- Test run: After drying, conduct a test cleaning on a small carpet section to confirm there are no leaks and that suction and spray are functioning as expected.
- Apply maintenance routine: Establish a routine that includes monthly checks of hoses, nozzles, and brushes to catch wear before it causes performance loss.
- Document replacement needs: Note when parts like the hose or brush kit were last replaced to keep maintenance predictable and timely.
Troubleshooting
| Symptom | Likely Cause | Fix | Prevention |
|---|---|---|---|
| Weak suction or uneven spray | Clogged nozzle or filters | Clean nozzle, remove debris, rinse filters | Perform regular filter cleaning after each use |
| Water leaks from body | Worn hose seals or loose fittings | Inspect and replace hoses or seals; tighten fittings | Use manufacturer-approved parts |
| Brush not spinning | Brush obstruction or jam | Remove brush and clean; replace if worn | Clean after each use; avoid hair buildup |
| Unpleasant odor during operation | Dirty tanks or stagnant solution | Thorough tank cleaning; run a rinse cycle | Empty tanks promptly after use; clean regularly |
| Spray hose kinked or collapsed | Improper coil or obstruction | Uncoil hose gently and clear any blockage | Store hoses loosely and without tight bends |
Common Mistakes
- Using harsh cleaners that are not compatible with the carpet cleaner’s materials
- Forgetting to dry hoses and tanks completely, leading to mold growth
- Ignoring wear indicators on brushes or nozzles and delaying replacements
- Running the machine with a damaged seal or loose fittings
Tips For Best Results
- Follow the manufacturer’s guidelines for cleaning agents to protect internal components.
- Regularly replace worn parts using compatible components from the kit closest to your model.
- Schedule maintenance every 1–3 months based on usage intensity to prevent buildup.
- Store the cleaner in a dry area to minimize moisture-related issues.
- Use a pre-treatment for tough spots to minimize heavy scrubbing and protect brushes.
Call A Professional
Consider professional service if you notice persistent leaks, motor overheating, or a loss of suction despite cleaning and part replacement. Stop use if there are exposed electrical issues, unusual noises, or a burning odor, and contact an authorized repair technician or the manufacturer’s service center.
FAQ
How often should I clean the Bissell carpet cleaner?
Clean after heavy use and perform light maintenance weekly, with a deeper clean every 1–3 months depending on usage.
Can I use household cleaners in my Bissell?
Only use cleaners approved by the manufacturer to avoid damage to seals, pumps, and the nozzle.
What should I do with brushes and hoses during storage?
Rinse and dry thoroughly, then store coiled hoses and detached brushes in a dry place.
If parts are worn, where can I buy replacements?
Look for OEM replacement parts or compatible kits from reputable retailers and verify compatibility with your model.
Is it safe to use the carpet cleaner on stairs or upholstery?
Yes, but follow the manual’s guidance on attachments and avoid saturating delicate fabrics.
Buying Guide
When selecting replacement parts or an accessory kit for a Bissell carpet cleaner, consider several factors. Size and compatibility matter: ensure any hose, nozzle, or brush kit fits your specific model. Noise level and energy efficiency relate to the motor and pump design, influencing long-term operating costs and comfort. Look for easy-to-install components and clear instructions for maintenance. Controls should be intuitive, and replacements should come with proper seals and fittings to prevent leaks. Placement in storage should be accessible yet protected from dust and humidity. Finally, compare bundle options to balance price with the range of included tools, ensuring you have what you need for regular maintenance and unexpected repairs.
Leave a Reply