Repairing Damaged Hardwood Floors: A Practical Cleaning and Repair Guide
Damaged hardwood floors can interrupt the look and feel of a room. This guide combines practical cleaning steps with effective repair methods to restore beauty and durability. Readers will learn how to assess damage, clean safely, and apply repairs that blend with existing wood.
Quick Answer
For minor surface damage, clean the area, sand lightly, fill cracks or gouges with epoxy wood filler, and refinish. For deeper gouges or warped boards, use a hardwood floor repair kit, followed by sanding and sealing. Always test finishes on a hidden area first and work in a well ventilated space.
What You’ll Need
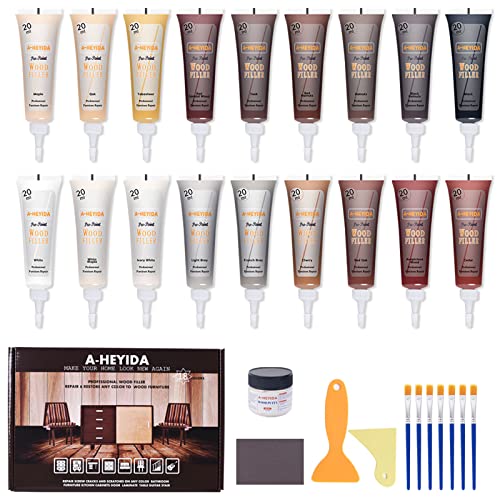
- hardwood floor repair kit epoxy wood filler for cracks and gouges
- random orbital sander for hardwood floors
- wood floor refinishing kit polyurethane stain roller system


Before You Start
Prepare the room by removing furniture and masking vents. Protect adjacent floors with drop cloths. Ensure the area is well ventilated and wear a dust mask during sanding. Time estimates vary; expect a multi hour process for a small repair and a longer project for larger areas. Important cautions include avoiding water exposure on unfinished wood and following all manufacturer instructions for epoxy fillers and finishes.
Step-By-Step: How To Repair And Clean Damaged Hardwood Floors
- Assess the damage to determine if minor repairs are sufficient or if replacement is needed.
- Clean the floor surface with a broom, vacuum, and a damp microfiber cloth to remove dust and debris.
- Lightly sand around the damaged area using the random orbital sander to create a smooth transition.
- Wipe away sanding dust and inspect the area for any remaining cracks or gouges.
- Prepare the epoxy wood filler according to the product instructions and apply it into cracks or gouges with a putty knife or plastic spreader.
- Allow the filler to cure completely as directed by the manufacturer, then sand the repaired spot flush with the surrounding floor.
- Apply a wood floor refinishing kit polyurethane stain roller system to match the existing color if needed, using even, thin coats.
- Sand lightly between coats to achieve a level finish and minimize brush or roller marks.
- Recoat with the polyurethane finish after the final sanding, following dry time recommendations.
- Inspect the repaired area after curing, and perform a final cleaning before reinstalling furniture.
- Place furniture pads and maintain humidity levels to protect the refinished surface over time.
- Document the repair process with notes for future maintenance and touch up if necessary.
Troubleshooting
| Symptom | Likely Cause | Fix | Prevention |
|---|---|---|---|
| Rings or color mismatch after refinishing | Uneven prep or incompatible stain | Re sand lightly and apply compatible stain in thin coats | Test stain on a hidden area first |
| Epoxy filler peels after curing | Moisture or improper mixing | Reapply after thorough drying and correct mix ratio | Follow product guidelines and acclimate materials |
| Rough sanded surface feels sticky | Residual dust or tacky finish | Clean thoroughly and re sand with fine grit | Use a clean vacuum and tack cloth solution |
| Finish wears unevenly | Inadequate surface prep or incompatible finish | Re scrub the surface and apply recommended two coat finish | Match finish type to existing floor |
Common Mistakes
- Skipping test patches for color matching
- Over applying epoxy filler leading to raised spots
- Expecting quick cures without proper ventilation
- Neglecting humidity control during and after refinishing
Tips For Best Results
- Work in a well ventilated area and wear protective gear during chemistry based repairs
- Choose a filler and finish that closely matches your wood species and existing stain
- Use thin coats of polyurethane to reduce bubbling and dry times
- Maintain consistent temperature and humidity to prevent finish issues
Call A Professional
Consider a professional if the damage covers a large area, planks are cupped or warped, or the floor shows signs of structural compromise. Seek urgent help if there are visible soft spots, pronounced hollow sounds when walking, or ongoing moisture exposure from leaks.
FAQ
Can I repair scratches myself without refinishing the whole floor?
Yes, light scratches can be filled or buffed out with appropriate products. Deeper damage may require more extensive repairs.
How long should the floor cure after applying epoxy filler?
Follow the manufacturers guidance, typically 24 to 72 hours for epoxy fillers before sanding or finishing.
Is it necessary to refinish after epoxy repairs?
Often yes to ensure color uniformity and a durable surface. If the existing finish is damaged, refinishing is recommended.
What maintenance helps prevent future damage?
Maintain humidity, clean with proper wood floor cleaners, and protect the surface with furniture pads and area rugs in high traffic zones.
How do I match color when refinishing?
Test multiple stain shades on a concealed area and choose the closest match before full application.
Will water damage wood repairs?
Water exposure can worsen damage. Wipe spills promptly and avoid soaking the floor during cleaning.
Buying Guide
When evaluating products for repairing and refinishing damaged hardwood floors, consider size, noise level, energy efficiency, controls, and placement. For kits, look for complete epoxy filler options that address cracks and gouges, a reliable random orbital sander for smoothing, and a polyurethane stain roller system that provides even coverage. Compare kit contents, drying times, and compatibility with your wood species. For large or complex projects, assess whether a professional installation or refinishing service is advisable and how the selected tools integrate with existing floor type and room layout.
Leave a Reply