How to Clean a Faucet Screen: Quick Guide and DIY Steps
Faucet screens, or aerators, help regulate water flow and improve efficiency. Over time, mineral buildup and debris can reduce water pressure and cause uneven spray. This guide provides a practical, step-by-step approach to clean faucet screens effectively, using common tools and safe methods for American households.
Quick Answer
Turn off the water, remove the aerator, soak in vinegar, scrub with a brush, rinse, reassemble, and test. If flow remains weak after cleaning, repeat the process or check the faucet for leaks and mineral buildup beyond the aerator.
What You’ll Need
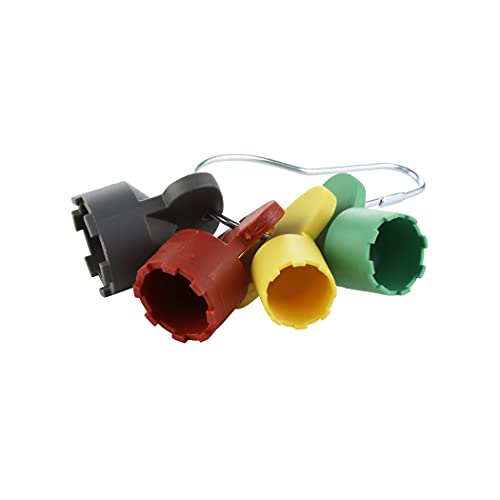
- Faucet aerator removal wrench
- Faucet aerator cleaning brush
- Faucet aerator cleaning kit


Before You Start
Ensure the water supply is turned off to prevent accidental sprays. Place a towel under the sink to catch drips and protect the area. Use gloves if you have sensitive skin or if you’re working with cleaning liquids. Time estimate: about 20 to 40 minutes, depending on buildup. Do not overtighten the aerator when reassembling, as this can damage threads or crack the housing.
Step-By-Step: How To Clean A Faucet Screen
- Protect the work area by placing a basin under the faucet to catch loose debris.
- Use the faucet aerator removal wrench to loosen and unscrew the aerator from the faucet spout.
- Inspect the aerator screen for mineral deposits, sediment, or damaged components.
- Prepare a cleaning solution by soaking the aerator in distilled white vinegar for 15–30 minutes to dissolve hard water buildup.
- Remove the aerator from the vinegar and use the faucet aerator cleaning brush to scrub both the screen and housing corners.
- If stubborn deposits remain, gently scrub with a soft brush or a worn toothbrush, focusing on the screen mesh.
- Rinse the aerator thoroughly under running water to remove loosened debris before reassembling.
- Reinstall the aerator by hand, then snug with the removal wrench without over-tightening.
- Turn the water back on and run the faucet to flush out any remaining debris and verify normal flow.
- Inspect for leaks around the aerator. If leaks occur, reseat the aerator and tighten slightly, then retest.
Troubleshooting
| Symptom | Likely Cause | Fix | Prevention |
|---|---|---|---|
| Poor water flow after cleaning | Partial clog remains in the aerator | Disassemble and clean again; soak longer in vinegar | Regularly clean every 6–12 months |
| Water leaks around aerator | Aerator not seating properly or threads damaged | Reseat, or replace aerator/auxiliary parts | Use proper wrench and avoid overtightening |
| Unstable water spray | Damaged or warped screen | Replace aerator kit | Handle gently during cleaning |
| Corrosion on aerator | Prolonged mineral exposure | Replace with a newer model | Rinse after each use and dry |
Common Mistakes
- Using harsh cleaners that can corrode metal components
- Forcing the aerator apart if threads are damaged
- Not soaking long enough for mineral buildup to loosen
- Skipping the test run after reassembly
Taking a methodical approach helps avoid these common pitfalls and ensures a clean, efficient faucet aerator.
Tips For Best Results
- Regular maintenance reduces mineral buildup; plan a yearly cleaning schedule.
- Use distilled water for soaking to avoid introducing additional minerals from tap water.
- Keep spare gaskets or o-rings handy if your aerator design includes them.
- Label the aerator orientation before disassembly if it has directional flow features.
Call A Professional
Consider a pro if you notice persistent leaks after reassembly, if the faucet body shows corrosion, or if you cannot access the aerator due to space constraints beneath the sink. Seek help if you’re uncomfortable using tools or handling plumbing components, especially under pressure-bearing fixtures.
FAQ
Can I use vinegar to clean all faucet aerators?
Vinegar works well for mineral buildup on many aerators; avoid vinegar on delicate finishes or certain metallic coatings.
How often should I clean a faucet aerator?
Clean annually as part of routine maintenance, or sooner if water pressure drops noticeably.
What if the aerator is stuck?
Gently apply penetrating oil and wait before attempting removal again; avoid forcing.
Do I need to replace the aerator completely?
Only if cleaning fails to restore function or if damage is visible to the mesh or threads.
Buying Guide
When selecting replacement components or a cleaning kit, consider size compatibility with your faucet, material durability, and ease of disassembly. Look for reusable faucet aerator cleaning kit sets that include multiple brush sizes and a simple wrench. If your faucet has a particularly tight space, a compact faucet aerator removal wrench may be essential. For ongoing maintenance, a dedicated faucet aerator cleaning brush helps keep the screen clear without scratching the surface.
Key Buying Factors
- <bSize and fit: Ensure the aerator is compatible with your faucet model and thread size.
- <bMaterial quality: Stainless steel or brass bodies resist corrosion and mineral buildup.
- <bNoise and water flow: Choose aerators that balance pressure and spray patterns for your sink.
- <bEase of disassembly: Tools that simplify removal reduce the risk of damage.
- <bReplacement parts availability: A kit with spare screens and gaskets extends product life.
- <bPlacement considerations: Some kitchen and bathroom faucets have limited access; compact tools help.
With the right tools and a careful approach, cleaning faucet screens becomes a straightforward maintenance task that helps conserve water and maintain steady, efficient flow. Want to refresh more fixtures in the home? Explore related maintenance kits and keep your faucets performing at their best.
Leave a Reply