How to Remove Micro Scratches From a Car
Micro scratches are a common cosmetic concern for many car owners. With the right approach and proper tools, these tiny imperfections can be subdued or removed, restoring a smoother, glossier finish. This guide outlines practical steps, safe techniques, and product recommendations tailored for American vehicles and DIY enthusiasts.
Quick Answer
Use a dedicated car scratch remover kit with polishing compound to address micro scratches, followed by a dual action polisher kit for even results. Finish with microfiber polishing cloths to buff and seal the repair. For best results, work in shaded conditions and test on a small area first.
What You’ll Need
- Car scratch remover kit with polishing compound
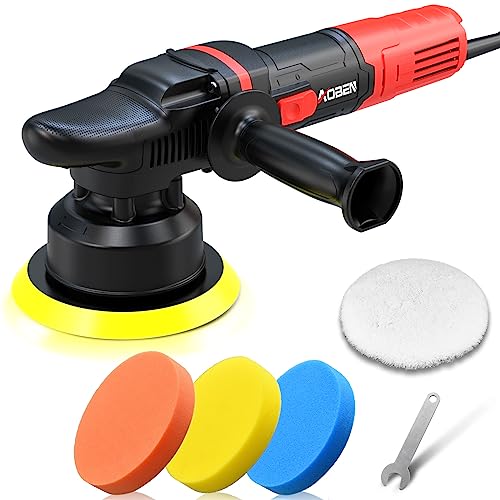
- Dual action polisher kit 6 inch car detailing
- Microfiber polishing cloths for car detailing
- Soft microfiber applicator pads (optional but helpful)


Before You Start
Assess the scratch depth. Micro scratches are typically shallow and only affect the clear coat. If you can catch a fingernail in the scratch, deeper repair may require professional services. Work in a shaded, dust-free area and wash the panel thoroughly to remove grit. Wear eye protection and gloves if needed. Avoid using rough abrasives or high-pressure washers directly on the repair area, which can worsen the damage. Plan for a 30–90 minute session depending on the size of the area and your experience level.
Step-By-Step: How To Use The Scratch Remover System
- Prepare the surface by washing and drying the panel completely. Remove any wax or sealant with a dedicated cleaner to ensure the polish can grip the clear coat.
- Apply a small amount of polishing compound to a microfiber applicator pad. Start with a modest amount; you can add more if needed.
- Work the compound into the scratch using light to medium pressure in a small circular motion. Maintain consistent speed to avoid burning the clear coat.
- Use the dual action polisher to refine the area. Set a low to medium speed and move the pad evenly across the repair site. The DA polisher helps reduce swirl marks while leveling the finish.
- Wipe away residue with a clean microfiber cloth and inspect the area. If the scratch remains visible, repeat the polishing step with a fresh layer of compound.
- Switch to a finer polish if needed. This step helps blend the repaired area with the surrounding paint and improves gloss.
- Apply a protective sealant or wax to the repaired panel to lock in the shine and protect against future micro-scratches.
- Repeat on adjacent areas if multiple scratches exist, using clean pads and cloths to avoid cross-contamination.
- Finish with a final wipe and check for uniform brightness. The surface should look smooth and even under direct light.
- Maintain the repair by regular washing and periodic polishing. Avoid abrasive cleaners that can erode the clear coat over time.
- If deeper scratches remain or the area feels rough to the touch, consider professional assessment for potential polishing or repainting options.
Troubleshooting
| Symptom | Likely Cause | Fix | Prevention |
|---|---|---|---|
| Scratch still visible after polishing | Depth beyond clear coat | Reassess with a test area; may require professional compounding or repaint | Address scratches early; avoid aggressive washing methods |
| Swirl marks appear after work | Improper technique or dirty cloth | Use clean microfiber cloths and maintain a light touch | Use fresh pads and cloths for each section |
| Hazy or uneven finish | Inconsistent pressure or over-polishing | Light, even passes; finish with a fine polish | Test on a small area first |
| Polish residue remains in crevices | Residual wax or compound buildup | Wipe with a clean microfiber and use a dedicated cleaner | Wipe thoroughly after each step |
Common Mistakes
- Rushing the process and applying heavy pressure, which wears through the clear coat
- Using old or dirty cloths that save scratches instead of removing them
- Choosing the wrong polish grade for the scratch depth
- Neglecting surface prep, such as skipping a wash or wax removal
Tips For Best Results
- Test the method on a small, inconspicuous area before tackling more visible panels
- Work in a controlled environment with adequate lighting to reveal the true finish
- Keep the polishing pad flat against the surface to avoid creating new lines
- Use a two-step approach: compound for removal, then a fine polish for clarity and gloss
- Follow with a protective coating to minimize future micro-scratches
Call A Professional
Seek professional help if the scratch is deep, if you notice peeling clear coat, or if multiple areas are affected and the repair would require extensive color blending. Avoid delaying repairs on high-traffic or visually prominent panels, as improper fixes can lead to higher costs or mismatched finishes.
FAQ
Can micro scratches be permanent?
Most micro scratches can be improved or removed with proper polishing, especially if they are limited to the clear coat.
Is a dual action polisher necessary?
While not strictly necessary, a DA polisher helps achieve a more uniform finish with less risk of human error.
How long does a typical repair take?
Depending on the area size, plan 30–90 minutes per panel for a thorough repair.
Will polishing remove old wax?
Yes, polishing removes wax and non-active sealants, so reapply protection afterward.
Buying Guide
When choosing tools and products to address micro scratches, consider these factors:
- <bSize and comfort: A 6-inch dual action polisher offers a good balance between control and coverage for most cars.
- <bNoise level: Some polishers run louder than others; look for models with vibration damping and ergonomic design for extended use.
- <bEnergy efficiency: Opt for efficient motors and variable speed settings to fine-tune the process without overheating the paint.
- <bControls: Easy-to-read speed controls and ergonomic grips help maintain consistency during long sessions.
- <bPlacement: Use a stable work area and ensure the vehicle is parked on level ground with easy access to all panels.
- <bMaterials compatibility: Ensure the car scratch remover kit includes compatible polishing compounds for clear coats commonly used on American vehicles.
- <bMaintenance: Clean pads and cloths after each use; store products in a dry, cool place to extend their life.
Ready to tackle micro scratches at home? With the right toolkit, preparation, and patience, many minor defects can vanish from view. If a scratch persists beyond a reasonable effort, consider expert refinement to preserve the vehicle’s finish and value.
Leave a Reply