How to Remove Scratches From Stainless Steel Surfaces
Scratches on stainless steel appliances can be unsightly, but many quick and safe fixes exist for common surface marks. This article outlines practical steps and product options to restore shine without professional help, using consumer-friendly methods suitable for U.S. homes.
Whether you’re dealing with minor swirl marks, stains, or deeper surface scratches, the right technique depends on the scratch depth and finish. The following guide focuses on safe, metal-safe methods you can perform at home with readily available supplies and specialized kits designed for stainless steel repair.
Quick Answer
Use a mild scratch remover or polishing kit designed for stainless steel, then buff with a soft microfiber cloth. For light scratches, a polishing compound can often restore the finish; for deeper marks, a repair cream or a dedicated stainless steel kit may be needed.
What You’ll Need
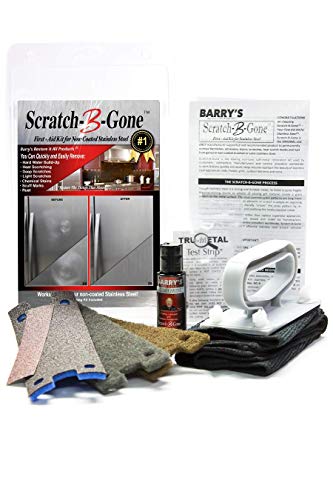
- stainless steel scratch remover kit with polishing compound
- stainless steel appliance scratch repair cream
- stainless steel polishing kit for appliances scratch removal
- Soft microfiber cloths
- Non-abrasive sponge
- Replacement towels or rags for drying
- Isopropyl alcohol or stainless steel cleaner (optional for residue removal)


Before You Start
Clear the area around the stainless steel surface and remove loose debris with a dry microfiber cloth. Work in a well-ventilated room if you use cleaners or solvents. Follow product directions for amounts and curing time. Avoid abrasive pads, steel wool, or rough cloths, which can worsen scratches or dull the finish. Test any product on an inconspicuous spot first to verify color and sheen compatibility.
Step-By-Step: How To Remove Scratches From Stainless Steel
- Clean the surface with a mild cleaner and wipe dry to remove grime that could affect polishing outcomes.
- Apply a small amount of the stainless steel scratch remover kit with polishing compound to a microfiber cloth.
- Buff the scratched area using firm, even strokes along the grain until the mark fades.
- If scratches remain, switch to the stainless steel appliance scratch repair cream and reapply with light pressure.
- Buff again with a clean, soft cloth to blend the repair into the surrounding finish.
- Assess the area under indirect light to check for uniformity; repeat steps 3–5 as needed in small increments.
- Wipe away any residue with a damp cloth, then dry thoroughly to prevent water spots.
- For stubborn marks, use the stainless steel polishing kit for appliances scratch removal following the included instructions.
- Finish with a final light buff to restore a consistent sheen across the panel.
- Consider applying a protective stainless steel conditioner to help resist future scratches.
- Document the results and avoid aggressive cleaning methods that could reintroduce marks.
Troubleshooting
| Symptom | Likely Cause | Fix | Prevention |
|---|---|---|---|
| Scratch remains after polishing | Scratch depth is beyond light repair | Use a specialized repair cream or kit per instructions | Avoid abrasive contact; use gentle cleaners |
| Finish dulls after polish | Over-polished or wrong product for finish | Switch to a product formulated for your finish and buff lightly | Test on a hidden area first |
| Streaks or residue | Product residue left on surface | Wipe with a damp cloth, then dry | Follow curing times and wipe clean |
| New scratches appear after cleaning | Harsh cleaner or abrasive pad used previously | Switch to non-abrasive cleaners and dedicated scratch products | Use soft cloths and gentle strokes |
Common Mistakes To Avoid
- Using abrasive pads or steel wool on polished surfaces
- Applying too much product at once and leaving residue
- Polishing against the grain, which can create crosshatching patterns
- Skipping a test patch on a hidden area before full application
- Ignoring manufacturer guidelines for specific products and finishes
Tips For Best Results
- Always buff with the grain of the metal to reduce visible scratching patterns.
- Work in small sections to prevent over-polishing one area relative to the rest.
- Keep your tools clean; a dirty cloth can introduce new scratches.
- Choose products labeled for stainless steel to minimize color changes or dulling.
- Maintain a routine of gentle cleaning to extend the life of the finish.
Call A Professional
If scratches are deep, cover a large area, or the surface has visible pitting, consider professional repair. Stop immediately if you notice bubbling, chipping, or a change in finish that suggests a protective coating or plating issue. In these cases, contact a licensed appliance repair technician or an experienced metal finisher.
FAQ
Can I use household toothpaste to remove scratches on stainless steel?
Toothpaste is mild and may help very light scratches, but it is generally not recommended for durable stainless steel finishes. Use products designed for metal polishing instead.
Will scratch removers affect the appliance’s warranty?
Some warranties may require approved products or professional service for cosmetic repairs. Check the warranty terms before applying any chemical products.
How long does a typical stainless steel scratch repair take?
Most light to moderate repairs take 20–40 minutes per panel, plus drying time as directed by the product.
Should I polish after repairing every scratch?
A light final polish helps even out the finish and restore shine; avoid over-polishing to prevent new micro-scratches.
Buying Guide
When choosing products to tackle stainless steel scratches, consider size and scope of the repair, ease of use, and compatibility with your finish. Key buying factors include:
- Size and scope: For small appliances or narrow panels, compact kits with polishing compounds are convenient; larger surfaces may benefit from a full stainless steel polishing kit.
- Noise level and ease of use: Some kits include buffers or applicators that reduce effort and noise during polishing.
- Energy efficiency and solvent use are not direct factors, but look for water-based formulations that are safer and emit fewer fumes.
- Controls and application methods: Choose kits with clear instructions, included microfiber cloths, and compatible applicators for consistent results.
- Placement and finishes: Ensure products are safe for vertical or horizontal surfaces and do not alter reflective finishes or coatings.
Considering these factors helps select a kit that fits your needs, from light maintenance to deeper scratch remediation. If in doubt, start with a smaller, user-friendly kit, then scale up if necessary. Are you repairing a stainless steel fridge, oven, or sink? Choose a product that aligns with the surface finish to avoid mismatched tones.
Leave a Reply