How to Clean an Oil Spill in a Car Trunk
Oil spills in a car trunk can happen from leaking containers or during refueling. Quick action helps prevent lingering odors and staining. This guide provides practical steps, the right tools, and safety tips to clean and protect trunk surfaces effectively.
Quick Answer
Act fast to contain the spill, blot excess liquid, and use dedicated absorbents to soak up oil. Clean and rinse with a degreaser, then dry completely and vent the area to prevent odors. For ongoing protection, keep an oil spill cleanup kit in your vehicle.
What You’ll Need
- Automotive oil spill cleanup kit with absorbent pads
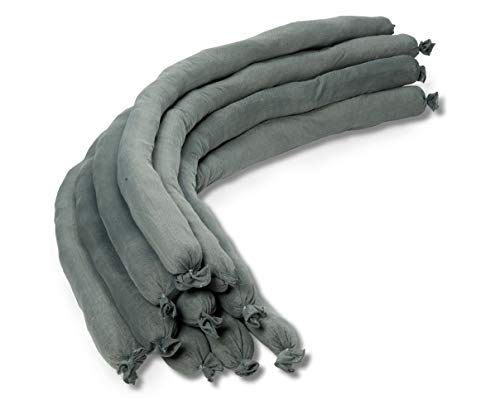
- Oil spill absorbent socks automotive car trunk
- Car trunk oil spill absorbing mat reusable


Before You Start
Before tackling the spill, ensure proper ventilation and wear gloves to protect skin. Move any loose items away from the spill area and place absorbent pads under and around the leak to prevent spread. Time is critical: aim to start within minutes of noticing the spill for the best results. Work on a shaded, cool surface to avoid rapid drying that can smear oil.
Critical cautions: Do not mix solvents or cleaners that may react with the oil. Keep children and pets away from the work area. If the trunk contains flammable materials, avoid open flames and use non-sparking tools where possible.
Step-By-Step: How To Clean An Oil Spill In A Car Trunk
- Contain the spill by surrounding it with oil spill pads and socks to prevent spread to carpet edges or trunk seals.
- Blot up as much liquid as possible with disposable towels or clean rags, pressing gently to avoid pushing oil deeper into fibers.
- Apply a full-coverage layer of absorbent material over the remaining spill and let it sit for 5–15 minutes to soak up oil.
- Carefully lift and dispose of the used absorbents in a plastic bag or container according to local guidelines for oily waste.
- Spot-clean the affected area with a degreasing cleaner or automotive soap. Use a soft brush to break up residue without damaging surfaces.
- Rinse the area with a controlled amount of water or a damp cloth to remove soap and oil residues, avoiding over-wetting any electrical components.
- Dry the trunk thoroughly with towels and allow air to circulate. If possible, run the vehicle’s ventilation system to help evaporate remaining moisture.
- Inspect for remaining odor or stains. If needed, repeat the absorbent treatment and cleaning steps until the area looks and smells clean.
- Re-seal or protect the cleaned area using a trunk liner or mat to simplify future cleanups and prevent future seepage.
- Store the cleanup kit in the trunk for quick response to any future spills.
- Record the incident in your maintenance log and consider relocating heavy containers to reduce future risk.
Troubleshooting
| Symptom | Likely Cause | Fix | Prevention |
|---|---|---|---|
| Persistent odor | Oil penetrated carpet fibers | Repeat absorbent treatment and use odor-neutralizing cleaner | Install a removable trunk mat and ensure quick cleanup |
| Stains remain after cleaning | Oil soaked into backing material | Apply specialty stain remover designed for automotive interiors | Utilize absorbent mats immediately when a spill occurs |
| Slippery surface | Residual oil on plastic or metal | Wipe with degreasing solvent, then rinse | Keep absorbents handy for fast blotting |
| Recurrent spills | Leaking container or bad seal | Replace the container and inspect seals | Securely close containers and use secondary containment |
Common Mistakes
- Waiting too long to act after a spill
- Using harsh cleaners that can damage trunk materials
- Rubbing oil deeper into fibers instead of blotting
- Failing to dispose of used absorbents properly
Tips For Best Results
- Keep a compact oil spill kit with pads, socks, and a small mat in the trunk for quick response.
- Test cleaners on a hidden area first to ensure compatibility with trunk materials.
- Place a secondary liner or tray under heavy containers to minimize future risk.
- For stubborn stains, consider professional interior cleaning if odors persist after a full cleanup.
Call A Professional
Contact a professional if: the spill covers a large area, leaks from a damaged container continue after cleanup, or strong odors persist despite multiple cleanings. If the trunk contains electrical components or complex carpeting, expert restoration may be the safest option.
FAQ
What should I do first if I discover an oil spill in my car trunk?
Contain the spill with absorbent pads and blot excess oil to prevent spreading, then begin cleaning with a degreaser and absorbents.
Can I use household products to clean an oil spill in a trunk?
It’s better to use automotive-specific absorbents and cleaners to avoid damaging materials and to ensure proper disposal.
How do I prevent future spills in the trunk?
Securely seal containers, use secondary containment, and place a trunk liner or mat to simplify cleanup.
Is it safe to drive after cleaning the trunk?
Wait until all surfaces are completely dry and free of odor before driving, to prevent fumes and ensure trunk safety.
How long should I wait before repeating the cleanup if odor remains?
Wait several hours to allow drying, then repeat the absorbent and cleaning steps if odors persist.
Buying Guide
When choosing oil spill cleanup supplies for a car trunk, consider size, absorbency, and portability. Look for compact kits with durable mats and spill socks that fit in the trunk without taking up excessive space. Noise level is not a concern for these tools, but ease of use and clear disposal instructions are important.
Key buying factors include:
- <bSize and portability: A compact kit fits under a trunk mat and is easy to grab in a hurry.
- <bAbsorbency and speed: Higher absorbency pads and socks soak up oil quickly, reducing cleanup time.
- <bMaterial compatibility: Ensure cleaners and absorbents are safe for vinyl, carpet, and plastic.
- <bControls and disposal: Clear disposal guidelines and simple steps streamline the process.
- <bPlacement and storage: Choose kits with a protective bag or case that fits under the trunk mat.
Would you like to compare specific kit configurations or see how these products perform in typical trunk scenarios? A well-chosen kit helps reduce cleanup time and keeps your vehicle’s interior protected from stains and odors.
Leave a Reply