How to Remove Scrapes From Your Car: A Practical Guide
Scrapes on paint can range from light surface scratches to deeper grooves that expose primer. With the right tools and a careful routine, most minor car scrapes can be improved significantly without professional help. This guide explains practical steps, materials, and tips to restore your car’s finish and protect it from further damage.
Readers will find a concise overview, a complete step-by-step process, common issues, and guidance on when to seek expert service. The aim is to help car owners minimize visible scrapes while preserving resale value and appearance.
Quick Answer
For light surface scratches, use a car scratch remover kit with polishing compound and a microfiber cloth, then buff to blend with the surrounding paint. For slightly deeper marks, an automotive clay bar kit scratch removing and polishing set helps lift embedded debris before polishing. For chips or deeper scratches, a touch-up paint pen kit for car chips and scratches can fill and level the surface before finishing with polishing.
What You’ll Need
- Car scratch remover kit with polishing compound microfiber cloth
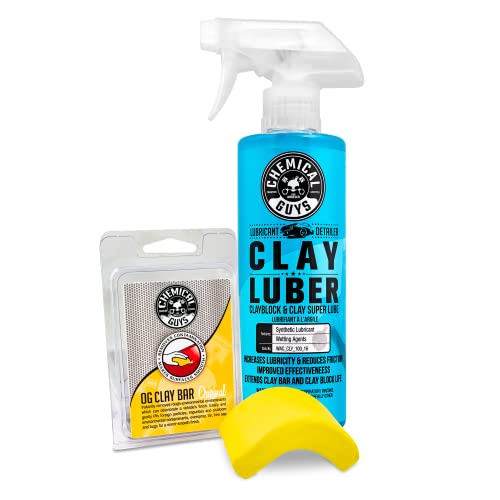
- Automotive clay bar kit scratch removing and polishing set
- Touch-up paint pen kit for car chips and scratches
- Clean, soft microfiber towels
- Isopropyl alcohol (IPA) for surface prep
- Masking tape to protect surrounding areas
- Optional polishing pad or buffer for larger areas


Before You Start
Assess the depth of the scrape by running a fingernail across the mark. If your nail catches, the damage may be deeper than a surface scratch and could require more extensive repair. Protect surrounding areas with masking tape, and work in a shaded, well-ventilated area to avoid rapid drying. Time estimate: 45 minutes to 2 hours depending on damage. Avoid using abrasive household cleaners or aggressive scrubbing, which can worsen clear coat damage or dull the finish. Always test products on an inconspicuous area first.
Step-By-Step: How To Remove Scrapes From A Car
- Clean the area around the scrape with a microfiber cloth and isopropyl alcohol to remove wax, dirt, and oils.
- Protect adjacent paint with masking tape to keep your work focused on the damaged area.
- For light scratches, apply a small amount of polishing compound from the car scratch remover kit and work it into the scratch with a soft cloth in a circular motion.
- Wipe away residue with a clean microfiber cloth and evaluate progress. Repeat if the scratch remains visible but do not over buff.
- For embedded debris or slightly deeper marks, use the automotive clay bar kit as instructed to lift contaminants from the surface, then re-polish the area.
- Apply another thin layer of polish to blend the repaired area with surrounding paint, using gentle, overlapping passes.
- If using a touch-up paint pen kit, carefully apply the paint to the scratch, allowing the color to level, then cap with a clear coat policy if included.
- Allow the paint to cure fully according to product directions, then perform a final polish to restore gloss and smoothness.
- Inspect under different lighting to confirm evenness and decide if a second pass is needed for perfection.
- Finish with a protective wax or sealant to guard against future scrapes and oxidation.
- Maintain the area with regular cleaning to keep the repaired surface looking consistent over time.
Troubleshooting
| Symptom | Likely Cause | Fix | Prevention |
|---|---|---|---|
| Scratch remains visible after polish | Insufficient depth correction | Re-apply polishing compound with lighter pressure; consider clay bar for embedded debris | Address scratches early; avoid abrasive cleaners |
| Finish looks cloudy or hazy | Over-buffing or product residue | Wipe thoroughly with clean microfiber and re-polish lightly | Test products on small area first |
| Paint chip filling uneven | Inconsistent paint pen application | Reapply in thin layers, allowing cure time between coats | Mask edges precisely; use color-matched pens |
| New scratches appear dull after repair | Uneven gloss between repaired and original paint | Finish with a final polish or glaze | Use long, consistent strokes during polishing |
Common Mistakes
- Using too much force, which can widen scratches or remove clear coat
- Skipping surface prep, leading to poor product adhesion
- Overlooking surrounding paint, causing mismatched finish
- Rushing the curing times for touch-up paints or sealants
Tips For Best Results
- Work in a shaded area to prevent fast drying and product buildup
- Always test a new product on an inconspicuous spot first
- Use a dry, clean microfiber cloth for final buffing to avoid streaks
- Follow manufacturer directions for curing times and layer thickness
- Consider combining methods: polish for light scratches, clay bar for embedded debris, and touch-up paint for chips
Call A Professional
Seek professional help if the scrape penetrates the clear coat or shows primer underneath, if the area is large, or if color matching becomes challenging. Stop and consult a body shop if:
- The damage spans multiple panels or affects structural components
- There is rust formation or moisture trapped under the finish
- DIY repairs repeatedly fail to achieve a uniform appearance
FAQ
What is the best first step for minor car scrapes?
Begin with cleaning and assessing depth, then try a car scratch remover kit with polishing compound and a microfiber cloth.
Can clay bars fix deep scratches?
Clay bars help remove contaminants and may improve the surface, but deep scratches often require polishing or touch-up paint.
How long should touch-up paint dry?
Drying times vary by product, but most touch-up paints require several hours to cure before handling or sealing.
Is it better to buff or polish after applying touch-up paint?
Buffing with a soft cloth after masking and curing helps blend the repair with surrounding paint and restore gloss.
When should I replace the whole panel vs repair?
If rust, structural damage, or extensive color mismatch is present, a professional assessment is recommended to decide on panel replacement or more extensive repair.
Buying Guide
When choosing products to address car scrapes, consider size of the area, expected finish, and compatibility with your vehicle’s paint. Size matters for how much material you’ll need, while noise level and ease of use matter for DIY comfort. Look for kits that include a polishing compound, microfiber cloths, and clear instructions. Energy efficiency isn’t a concern here, but efficiency in correcting defects is. Consider placement in your garage or driveway—ease of access can influence how often you perform minor repairs. Compare the car scratch remover kit with polishing compound microfiber cloth, automotive clay bar kit scratch removing and polishing set, and touch-up paint pen kit for car chips and scratches by color match, cure times, and included tools. A well-rounded kit reduces the number of separate purchases and streamlines repairs, especially for homeowners with multiple vehicles. If a product lacks clear directions or color-matching data, it may be worth selecting an option with better customer guidance and proven results. Aftercare products like sealants and waxes help protect repaired areas, providing longer-lasting protection between touch-ups.
Leave a Reply