How to Clean a Fridge Drain Hole
A clogged fridge drain hole can cause water buildup inside the refrigerator, leading to soggy shelves and an icy buildup on the evaporator. This guide walks through a practical, safe method to clear the drain hole and restore proper drainage. The steps use common tools and a few specialty items designed for fridge maintenance.
Quick Answer
Shut off power, locate the drain hole, remove any visible debris, and flush the line with warm water and a safe cleaning solution. Use a flexible snake or bottle brush to break up clogs, then dry and test the drain. Repeat if necessary, and keep the area clean to prevent future blockages.
What You’ll Need
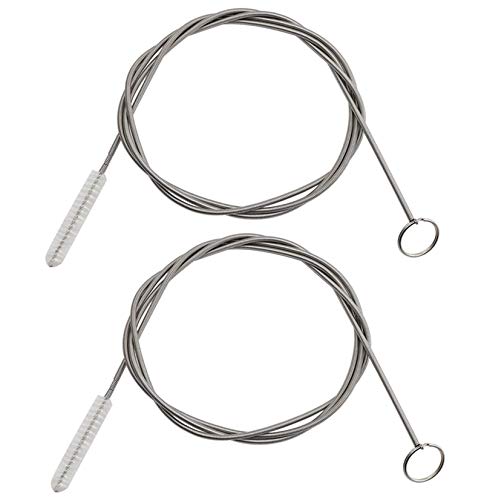
- refrigerator defrost drain cleaning kit with flexible snake
- fridge condensate drain cleaning brush flexible tube brush
- refrigerator drain line cleaning tool kit bottle brush snake

Before You Start
Power off the unit and unplug it to avoid any electrical hazards. Move food to a cooler or another fridge if needed. Place towels or a shallow tray to catch any water during the cleaning. Ensure the drain area is accessible, and work in a well-lit space. Important: never use harsh solvents or heat sources near the refrigerant system, and avoid forcing the tool into the drain to prevent damage.
Step-By-Step: How To Clean A Fridge Drain Hole
- Identify the drain path: locate the drain hole in the fridge’s interior bottom or near the crisper drawer and trace the line to the drip pan.
- Clear surface debris: remove loose ice and dried residue around the drain with a small cloth or soft brush.
- Prepare the cleaning tool: assemble the refrigerator defrost drain cleaning kit with flexible snake or the fridge condensate drain cleaning brush flexible tube brush as instructed by the manufacturer.
- Insert with care: gently feed the flexible snake into the drain opening until you feel resistance, then rotate and push forward to break the clog.
- Flush the line: pour a measured amount of warm water mixed with a mild, non-abrasive cleaner through the drain opening, allowing it to carry debris toward the drip pan.
- Brush the interior: use the refrigerator drain line cleaning tool kit bottle brush snake to scrub the interior walls of the drain pathway, especially around bends.
- Rinse and repeat: flush again with warm water to confirm clear flow. If water pockets remain, repeat steps 4–6 until the line runs freely.
- Dry the area: wipe up moisture around the drain opening and ensure the drip pan is properly seated and dry.
- Test the system: replug the fridge, set to normal temperature, and monitor for water accumulation after a cycle of defrosting.
- Prevent future clogs: keep the area around the drain clean and periodically inspect the drain path for buildup.
- Document maintenance: note the date of service so future cleanings can be scheduled before blockages occur.
Troubleshooting
| Symptom | Likely Cause | Fix | Prevention |
|---|---|---|---|
| Water under crisper after defrost | Drain is clogged or blocked | Follow Step-By-Step above to clear | Clean monthly; avoid pouring liquids directly into drain |
| Persistent odor near drain | Residual organic buildup | Clean with mild solution and rinse | Regular maintenance and fresh air exchange |
| Water leaking from drip pan | Drip pan misaligned or overfilled | Reposition and empty pan; ensure proper fit | Check pan placement during maintenance |
| Drain runs slowly after cleaning | Partial clog remains | Repeat cleaning with brush tool | Avoid introducing new obstructions |
Common Mistakes
- Using aggressive tools that can damage the drain tubing
- Pouring hot liquids that may warp plastic components
- Forcing the snake beyond resistance, causing leaks
- Skipping the drip pan check, which can reintroduce moisture issues
Careful handling and patient cleaning reduce the risk of damage and improve long-term performance.
Tips For Best Results
- Perform routine drain checks every 3–6 months, or after heavy defrost cycles
- Keep the interior dry after cleaning to prevent mildew growth
- Label the tool set used for fridge maintenance for quick future access
- If the fridge has a rear drain line, use a shorter, flexible tool to avoid bending or kinking
Call A Professional
Stop and call a professional if there is:
- Persistent leaks despite multiple cleaning attempts
- Visible damage to drain lines or frost buildup in the freezer compartment
- Electrical smells or scorched components near the control area
In these cases, a certified appliance technician can assess refrigerant integrity and perform safe, professional-grade cleaning.
FAQ
What causes fridge drain holes to clog?
Common causes include mineral buildup, mold, and small food particles that travel through the defrost drain during cycles.
Can I use regular brushes to clean the drain?
Specialized flexible tools are recommended to reach bends and prevent damage to plastic tubing.
Is a cleaning kit necessary?
While not strictly required, a purpose-made kit simplifies access and reduces the risk of damage during cleaning.
How often should I clean the fridge drain hole?
For households with heavy use or frequent defrosts, every 3–6 months is a practical interval; adjust by seasonal needs.
Will cleaning the drain affect fridge efficiency?
Yes, a clear drain prevents water pooling and helps maintain even cooling and humidity control inside the fridge.
Buying Guide
When choosing a drain-cleaning setup for a refrigerator, consider size, flexibility, and kit contents. A compact, flexible snake that can reach tight bends is essential for most models. Look for a kit that includes a bottle brush compatible with narrow channels, and ensure the tools are safe for plastic and coated metal parts. Noise and ease of cleaning are practical considerations for regular maintenance. If you own multiple fridges, a versatile, multi-tool kit may provide better value and quicker service in tight spaces.
Additional Considerations
Placement matters: keep the fridge away from walls or cabinets that can obstruct air circulation around the back of the unit. A clean, dry drip pan under the fridge can catch stray condensate and simplify future maintenance. If the drain path runs to a dedicated tray in a kitchen cabinet, verify that the tray is intact and properly routed to prevent leaks in cabinets or floors.
Leave a Reply