How to Clean Headrest on Leather Chair
Leather furniture adds elegance and comfort, but headrests can attract oils, sweat, and daily grime. With the right cleaning routine and tools, you can restore the headrest’s look without harming the leather. This guide walks American users through a practical, step-by-step process using common cleaning supplies and leather-safe products.
Following proper techniques protects the leather’s finish, keeps it supple, and extends the chair’s life. The methods below focus on safety, speed, and effectiveness, so you can refresh a headrest without removing the chair or resorting to aggressive solvents.
Quick Answer
To clean a leather chair headrest: remove loose dirt with a dry microfiber cloth, apply a leather-safe cleaner with a soft brush or sponge, wipe with a clean damp cloth, dry, then condition with a leather conditioner. Test any product on a hidden area first and avoid harsh solvents.
What You’ll Need
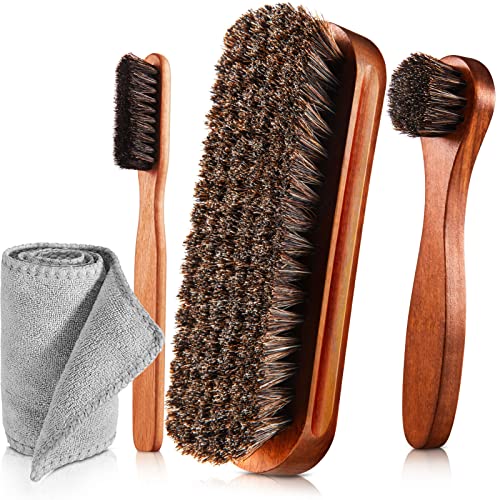
- Leather upholstery cleaning kit microfiber cloths brush
- Leather chair cleaning brush set sponge pad
- Leather furniture conditioner and cleaner kit microfiber cloth


Before You Start
Prepare a small, clean workspace and test products on an inconspicuous spot to prevent discoloration. Work in a well-ventilated area and use gentle motions to avoid abrading the leather. Avoid using household detergents, ammonia, or bleach, as these can strip oils and dry the leather. Time estimate: 20–40 minutes for a single headrest, including drying and conditioning.
Step-By-Step: How To Clean Headrest On Leather Chair
- Inspect the headrest for stains and leather finish. Note if the headrest has any dye transfer or cracks that may need special treatment.
- Remove surface dust. Use a dry microfiber cloth to wipe the headrest from top to bottom, paying attention to seams and crevices.
- Apply a leather-safe cleaner. Lightly dampen a cloth or sponge with the cleaner from your kit and work in small circular motions across the headrest. Avoid soaking the leather.
- Gently scrub stuck residues. For stubborn smudges, use a soft brush or sponge pad to lift grime without scratching the surface.
- Rinse with a clean damp cloth. Wipe away cleaner residue with a fresh, lightly damp cloth to prevent residue buildup.
- Dry the area. Use a dry microfiber cloth to thoroughly dry the headrest. Air drying for a short period helps prevent moisture penetration.
- Condition the leather. Apply a conditioner according to the kit instructions, focusing on the headrest and surrounding areas. Buff lightly to restore suppleness and shine.
- Assess uniformity. Check for even color and feel. If any spots remain, repeat the cleaning step on those areas only.
- Protect for the future. Consider regular light cleanings and monthly conditioning to maintain color and flexibility.
- Clean surrounding components. If the chair has metal or wood frames near the headrest, wipe these with appropriate cleaners to avoid transfer to the leather.
- Drying time. Allow the headrest to fully dry before use, usually 1–2 hours depending on environment.
- Reassess and store supplies. Rinse cloths and store products in a cool, dry place for next maintenance session.
Troubleshooting
| Symptom | Likely Cause | Fix | Prevention |
|---|---|---|---|
| Streaks after cleaning | Excess cleaner or improper wiping | Wipe again with a clean damp cloth and dry thoroughly | Use minimal product and follow directions |
| Leather feels sticky | Residue from cleaner or conditioner | Buff with a dry cloth until smooth | Rinse and dry completely before conditioning |
| Discoloration or color transfer | Incompatible product or dye transfer | Test first; if color changes, stop and use a leather-safe product | Patch test on hidden area and use brand-recommended products |
| Dry, cracked leather after cleaning | Over-cleansing or aggressive cleaners | Switch to milder cleaner and rehydrate with conditioner | Avoid solvents and harsh cleaners |
| Pilling or rough texture | Rough cloth or over-scrubbing | Switch to softer cloth, gentle motions | Gentle cleaning with proper tools |
Common Mistakes
- Using household detergents or alcohol-based products on leather
- Over-wetting the headrest or leather surface
- Skipping a patch test on hidden areas
- Applying conditioner too aggressively or too often
- Ignoring seams where buildup can occur
Tips For Best Results
- Clean in a cool, shaded area to prevent leather drying too quickly or unevenly
- Use microfiber cloths to avoid lint and scratches
- Work in small sections to maintain control and consistency
- Follow product instructions for dwell time and patch testing
- Keep a consistent schedule: light cleaning monthly, conditioning every 3–6 months
Call A Professional
Consider a professional upholsterer or leather care service if you notice deep cracks, significant color loss, or large stains that resist at-home cleaning. Seek expert help if the headrest area is near rivets, stitching, or padding that might be compromised. Stop cleaning and contact a pro if leather shows signs of peeling, severe discoloration, or if cleaning causes the surface to degrade.
FAQ
Can I use dish soap on leather headrests?
Avoid dish soap or other household detergents; they can strip natural oils and dry the leather.
How often should I condition leather furniture?
Condition every 3–6 months, depending on use, climate, and leather type.
Is a leather cleaning kit necessary?
A dedicated leather cleaning kit is recommended to ensure compatibility with your leather finish and to provide appropriate tools.
What if the headrest has visible dye transfer?
Test a color-safe cleaner on a hidden area first. If dye transfer persists, consult a professional for color restoration.
Can I clean leather in direct sunlight?
Clean in shade to prevent rapid drying and potential color changes.
Should I remove the headrest for deeper cleaning?
Yes, if possible, but follow manufacturer recommendations for chair disassembly and avoid voiding warranties.
What signs indicate I should stop and call a pro?
If cracking, peeling, or color loss occurs, or if stains resist multiple attempts, seek professional help.
Buying Guide
When choosing products to clean and maintain leather headrests, consider size compatibility, materials, and ease of use. Look for a leather upholstery cleaning kit that includes microfiber cloths, a soft brush, and a conditioner formulated for your leather type. Consider a kit that offers a combined cleaner and conditioner to simplify maintenance.
Size and space matter: select tools and cloths that fit comfortably in the headrest’s contours and seams. Noise level isn’t a concern with most kits, but ease of application and wipe-off is. For energy efficiency and environmental impact, choose water-based cleaners with minimal packaging and low VOCs. Consider adjustable application tools and spare cloths for quick touch-ups.
Placement and usage: apply products following the manufacturer’s directions, and test on hidden areas before full use. If the chair is placed in a bright, sunlit area, move it to shade during cleaning to avoid dye fading. Compare different kits by the included accessories and the ease of integrating a conditioning step into routine care.
Bottom line: select a leather furniture care kit that provides a balanced combination of gentle cleaners, conditioners, and cleanable cloths. A thoughtful purchase supports long-lasting leather and an enhanced headrest appearance.
Leave a Reply