How to Clean Antique Copper Safely and Effectively
Antique copper carries a unique patina that adds character to heirloom pieces and vintage décor. Cleaning should respect the metal’s finish while restoring brightness. This guide explains practical, safe methods to clean antique copper without damaging its historic look, with product suggestions that align with typical restoration needs.
Quick Answer
Light tarnish can be wiped away with a gentle polish using a soft cloth. For antique copper with deeper tarnish or green patina, use a specialized cleaner or gentle brushing to preserve the finish. Always test a small area first and avoid harsh chemicals that can strip patina or damage delicate surfaces.
What You’ll Need
- antique copper tarnish remover cream
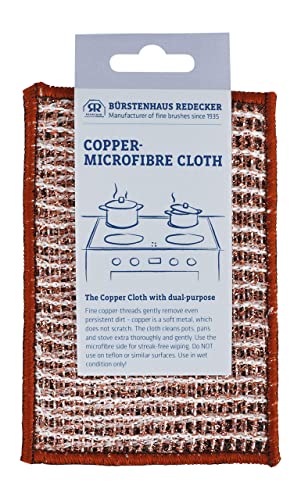
- copper cleaning polishing cloth microfiber
- copper patina brush cleaning brush


Before You Start
Clean in a well‑ventilated area, away from heat sources. Wear soft gloves to protect your hands and a gentle, non-abrasive cloth to avoid scratching. Check the manufacturer’s instructions on any cleaner before use. Test on a small, inconspicuous area first to confirm it does not remove patina or damage the finish. Plan for a few minutes per surface and ensure the item is fully dry before reassembling or displaying.
Step-By-Step: How To Clean Antique Copper
- Prepare your workspace with a soft cloth and clean, warm water.
- Dust the piece with a copper patina brush cleaning brush to remove loose dirt without scratching patina.
- Apply a small amount of antique copper tarnish remover cream to a microfiber copper cleaning polishing cloth and gently rub in circular motions.
- Avoid vigorously scrubbing especially on areas with delicate patina; focused, light pressure preserves the finish.
- Wipe away cleaner residue with a clean, damp microfiber cloth and dry immediately with another soft cloth.
- For stubborn tarnish, reapply in small sections and let it work for the directed dwell time, then wipe clean.
- Polish to a gentle luster using a fresh microfiber cloth, moving with the grain of the metal.
- Inspect for uniformity of shine; address any spots with a lighter touch and repeat as needed.
- Seal or wax the surface lightly if recommended by the cleaner’s instructions to protect the finish.
- Store the piece in a dry environment away from direct sunlight to minimize future tarnish.
Troubleshooting
| Symptom | Likely Cause | Fix | Prevention |
|---|---|---|---|
| Dull spots after cleaning | Incomplete removal of residue | Rewipe with fresh cloth and clean water | Rinse thoroughly; dry completely |
| Excessive patina removal | Overly aggressive cleaning or wrong product | Switch to milder cleaner, test first | Use gentler strokes and shorter dwell times |
| Unpleasant odor during cleaning | Cleaner reacting with oils | Ventilate area and wipe with water-dampened cloth | Follow cleaner directions and limit exposure |
| Scratches visible after polishing | Using abrasive materials | Switch to softer microfiber and lighter pressure | Keep cloth clean and free of grit |
Common Mistakes
- Not testing cleaners on a small area first, risking patina damage
- Using abrasive brushes or rough cloths that scratch metal
- Over-cleaning, which can strip natural patina and alter antique value
- Ignoring manufacturer guidelines for cleaners and finishes
Tips For Best Results
- Work in sections to prevent oxidization from returning too quickly to exposed areas.
- Maintain consistent pressure and follow the metal’s grain to avoid streaking.
- Store cleaned pieces in a dry climate to slow future tarnish buildup.
- Consider a reversible approach: choose products designed for antique finishes to preserve patina.
Call A Professional
Seek professional care if the item is highly valuable, has intricate inlays, has suffered corrosion, or if cleaning could risk fabric or lacquer finishes. Stop immediately if the surface shows unusual changes in color, flaking, or structural damage.
FAQ
Is it safe to use lemon juice on antique copper?
Lemon juice can be acidic and may etch or dull finish; use purpose-made cleaners designed for antique copper and test first.
Can I clean copper with vinegar and salt?
Mixed home remedies can work for some surfaces but may be harsh on patinas; prefer milder, product‑designed cleaning creams for antiques.
How often should antique copper be cleaned?
Clean only when tarnish or dirt affects appearance; routine dusting helps, followed by spot cleaning as needed.
Will cleaning remove patina?
Some patinas are intentional and should be preserved; use gentler products to avoid removing patina unless restoration calls for it.
Should I wax antique copper after cleaning?
Waxing can offer protection; follow product guidelines to avoid build-up that can dull the surface.
Is ultrasonic cleaning safe for antique copper?
Ultrasonic cleaning is usually not recommended for antique items with delicate patina or inlays; consult a professional first.
Can I use polish on copper with a green patina?
Polishes can remove patina; use products specifically labeled for patina-preserving cleaning.
Buying Guide
Choosing the right supplies for cleaning antique copper hinges on maintaining value and appearance. Consider size and surface area to determine how much product you need. Noise level is usually minimal with manual cleaning, but select a compact brush if working on tight spaces. Look for energy-efficient, gentle formulas that are safe for antiques and patinas. Controls should be simple, with clear instructions. For placement, work in a ventilated area away from heat and direct sun to protect the finish and prevent rapid tarnish. When comparing options, prioritize products that explicitly state suitability for antique copper and provide test areas and dwell times. If you’re unsure, consult product labels or a conservator to safeguard irreplaceable pieces.
Leave a Reply