How to Clean a Dryer Vent Screen for Better Drying
Cleaning a dryer vent screen helps improve airflow, reduce drying times, and prevent heat buildup that can lead to fires. Keeping the lint screen clear is a simple maintenance task that pays off with safer, more efficient laundry sessions.
Follow these practical steps using common tools and a basic dryer vent cleaning kit to remove trapped lint from the screen and nearby vent pathway. The process is straightforward for most homeowners and best performed regularly as part of routine laundry care.
Quick Answer
Remove the lint screen, rinse with warm water and a mild detergent, and scrub with a lint screen cleaning brush designed for dryer vents. If lint buildup remains, use a dryer vent cleaning brush kit stainless steel rods to dislodge debris in the duct. Dry completely before reassembly.
What You’ll Need
- Lint screen cleaning brush for dryer vent with flexible shaft or a similar brush
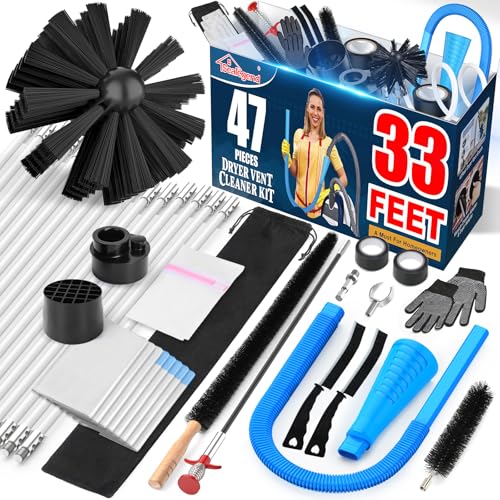
- Dryer vent cleaning brush kit stainless steel rods for deeper ducts
- Dryer vent cleaning kit with vacuum attachment and rods for debris extraction
<li Mild detergent or dish soap
<li Warm water
<li Towels or a shallow tray to catch water
<li Protective gloves (optional)


Before You Start
Before beginning, unplug the dryer and pull it away from the wall to access the vent opening. Remove the lint screen from the dryer door and place it on a dry surface. Wear gloves if handling damp lint to avoid skin irritation. Make sure the area around the vent exterior is clear and accessible for inspecting the duct for blockages. Expect the process to take about 15–30 minutes depending on vent length and accessibility.
Step-By-Step: How To Clean A Dryer Vent Screen And Duct
- Remove the lint screen from the dryer door and inspect for any damage or wear. Replace if the screen is torn or thinning to prevent lint bypass.
- Rinse the screen under warm running water to loosen lint. Apply a small amount of detergent and scrub with the lint screen cleaning brush until the screen is clear and free of residue.
- Rinse thoroughly and shake out excess water. Allow the screen to dry completely before reinserting it into the dryer.
- Attach the dryer vent cleaning brush kit stainless steel rods to the brush handle and insert the brush into the vent opening at the back of the dryer or through the exterior vent cover.
- Gently push and twist the rod brush through the duct to dislodge lint buildup. Use short, controlled motions to avoid damaging the ductwork.
- When the brush cannot reach further, attach the dryer vent cleaning kit with vacuum attachment and rods to extract dislodged lint. Vacuum the duct opening from the dryer end and, if possible, from the exterior vent opening.
- Inspect the vent exterior for lint accumulation around the vent cap. Clear any blockages formed around the exterior vent using a corresponding brush or cloth. Reassemble the vent and reinsert the lint screen once the duct is clear.
- Run the dryer on a short cycle with no laundry to confirm airflow improves and no unusual noises occur. If the dryer still takes longer to dry, consider repeating the duct brush step.
- Document maintenance in a household log to remind future cleaning intervals. Regular checks reduce fire risk and improve efficiency.
- Finish by wiping the area around the dryer and vent opening to remove residual lint and dust. Store cleaning tools in a dry place for next time.
- Reinsert the lint screen and return the dryer to its normal location. Resume normal laundry cycles with improved airflow.
- Schedule periodic professional inspections if venting runs through inaccessible spaces or if you notice persistent poor performance.
Troubleshooting
| Symptom | Likely Cause | Fix | Prevention |
|---|---|---|---|
| Dryer takes longer to dry | Lint built up in the duct | Clean duct with stainless steel rod brush and vacuum | Clean lint screen after every load; schedule quarterly checks |
| Lint around exterior vent | Blocked vent cap | Clear exterior vent; ensure cap opens freely | Keep area around vent free of debris |
| Unusual dryer heat or odor | Lint trap bypass or damaged screen | Inspect screen integrity and replace if needed | Regularly inspect and replace worn screens |
| Fire alarm triggered after drying | Lint accumulation in duct or lint screen | Perform deep cleaning; verify proper airflow | Routine maintenance and prompt lint removal |
Common Mistakes
- Using excessive force when pushing the brush, which can damage ducts.
- Forgetting to dry the lint screen completely before reinstalling it.
- Neglecting to clean the exterior vent cap and surrounding area.
- Assuming a single quick clean suffices—some ducts require multiple passes or professional help.
Keeping a consistent routine helps ensure safer operation and better energy efficiency. Regular checks reduce the risk of lint buildup and improve dryer performance.
Tips For Best Results
- Clean the lint screen after every load to prevent lint from entering the duct.
- Use a flexible brush designed for dryer vents to reach curved ducts without damage.
- Combine brushing with vacuuming to maximize lint removal.
- Check the exterior vent’s weatherproofing to prevent drafts and moisture ingress.
- Consider scheduling professional vent cleaning if you notice persistent poor airflow or if ducts are long or rerouted.
Call A Professional
Stop and call a pro if you notice any of the following: persistent poor airflow after cleaning, visible damage to ductwork, rodents or bird nests in the vent, or if the vent runs a long distance through inaccessible spaces. Also seek help if you lack the proper tools or confidence to safely disassemble parts of the dryer or vent system.
FAQ
How often should I clean the dryer vent screen?
Clean the lint screen after every load and perform a deeper vent cleaning every 6–12 months, depending on usage and vent length.
Can I use a regular brush to clean the lint screen?
A dedicated lint screen cleaning brush improves results and helps avoid damaging the screen. Use a soft-bristle option designed for dryer screens.
What tools are best for deeper duct cleaning?
A stainless steel rod brush kit and a vacuum attachment provide effective debris removal from longer or more complex ducts.
Is it safe to run the dryer during cleaning?
Yes, but avoid running for extended cycles while performing duct cleaning. Run a short test cycle after clearing the vent to verify airflow.
What if lint keeps accumulating in the duct after cleaning?
This could indicate a blockage beyond your reach or an improper vent layout. Consider professional inspection and possible vent redesign.
Buying Guide
When choosing tools to clean a dryer vent screen and duct, consider size, compatibility, and ease of use. Look for a lint screen cleaning brush that fits your lint screen and a dryer vent cleaning brush kit stainless steel rods set with flexible, corrosion-resistant rods for smooth navigation through bends. A vacuum-attached kit helps remove loosened lint efficiently. Consider the length of your vent run, the number of bends, and whether you need exterior access tools for cap cleaning. Opt for items with durable materials, good grip handles, and compatible attachments for your dryer model. User reviews can reveal real-world performance with different dryer configurations. Always verify that tools are appropriate for your vent type and that they do not void manufacturer warranties. Regular maintenance, using the right tools, extends dryer life and maintains safe operation.
Leave a Reply