How to Clean Metal: A Practical Guide for Home Projects
Metal surfaces require different approaches based on the material and its finish. This guide outlines safe, effective methods for cleaning metal—from removing rust to restoring shine—using common tools and a few specialized attachments. Readers will learn practical steps, safety tips, and how to choose the right accessories for durable results.
Quick Answer
Start with a soft brush and mild cleaners for delicate finishes. For tougher grime, use a rotary tool with a metal polishing kit or a rust removal attachment. Always test on a hidden area, work in smooth, overlapping motions, and protect surrounding surfaces.
A Quick Start: What You’ll Need
To clean metal efficiently, assemble a basic set of tools and accessories. The items below include common options used by hobbyists and professionals alike.
- 6 inch metal polishing kit buffing wheel rouge compound drill attachment
- drill brush wire brush rust removal kit for metal cleaning
- rotary tool polishing kit metal finishing grinding wheel set
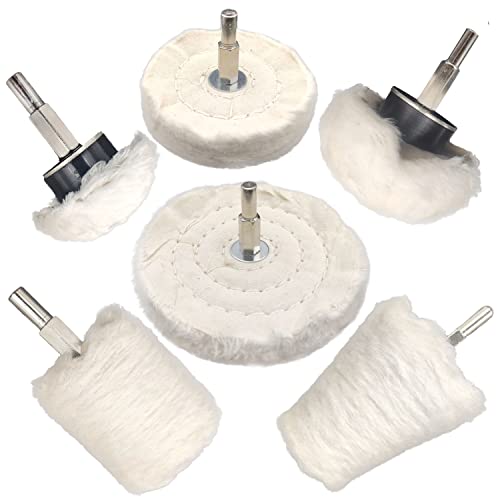


Before You Start
Assess the metal type and finish before choosing a cleaning method. Softer metals like aluminum or brass may scratch easily, while stainless steel and cast iron tolerate more aggressive cleaners. Ensure a clean, well-lit workspace and wear safety glasses and gloves. Protect nearby surfaces from splatter and apply ventilation if using chemical cleaners. Typical time for a basic clean ranges from 15 minutes for light dust to 1–2 hours for heavy rust removal.
Caution: Do not mix cleaning agents unless specified by product instructions. Never use abrasive pads on polished or antique finishes unless you intend to remove the patina. Work slowly and test in an inconspicuous area first.
Step-By-Step: How To Clean Metal
- Prepare the surface: Remove loose dirt with a soft brush or microfiber cloth. For stubborn grime, wipe with a diluted mild detergent solution and dry completely.
- Assess the finish: Check for coatings, patina, or oxidation. This determines whether to use gentle cleaners or more aggressive mechanical methods.
- Choose aCleaning Method: For delicate finishes, use a soft cloth or small brush with a gentle cleaner. For rust-prone metals, switch to a rust-removal attachment or polishing kit designed for metal.
- Apply a rust remover (optional): If rust is present, apply the product as directed, usually allowing it to dwell briefly before scrubbing with a wire brush or nylon brush.
- Use a rotary tool for stubborn spots: Fit a polishing wheel or metal finishing grinding wheel set, and work in small sections with light pressure and overlapping strokes.
- Buff and shine: Move to a polishing wheel and apply a suitable rouge compound. Buff in a consistent motion until the desired luster is achieved.
- Rinse and dry: Wipe away residues with a clean cloth and rinse if the product requires. Dry thoroughly to prevent new oxidation.
- Seal or protect: For high-sheen finishes, apply a protective spray or wax designed for metal to reduce future tarnish.
- Inspect the area: Recheck for dull spots or remaining corrosion and repeat steps as necessary, focusing on even coverage.
- Clean up: Remove tools, store attachments securely, and dispose of any waste according to local regulations.
- Document results: Note which methods worked best for future projects and keep a small kit of go-to cleaners handy.
Troubleshooting
| Symptom | Likely Cause | Fix | Prevention |
|---|---|---|---|
| Scratches appear after cleaning | Too aggressive pressure or abrasive compounds on soft metals | Switch to softer brushes or milder polishes; use light pressure | Test first; choose appropriate grade for material |
| Rubbing color or residue left behind | Residual cleaner or polish not fully removed | Wipe with a damp cloth and dry thoroughly; re-wipe if needed | Follow product directions for removal steps |
| Persistent rust after treatment | Deep corrosion or inaccessible areas | Use a dedicated rust remover and mechanical brush in those areas | Regular maintenance to prevent buildup |
| Uneven sheen after polishing | Inconsistent pressure or incorrect wheel/compound | Refine technique and switch to compatible polishing compounds | Consistent passes and correct wheel choice |
Common Mistakes
- Using steel wool on delicate finishes, which can scratch easily
- Over-wetting surfaces that should remain dry during polishing
- Skipping test spots before full application of chemicals
- Rushing through steps, leading to dull or uneven results
Tips For Best Results
- Match the tool and abrasive to the metal’s hardness and finish.
- Use overlapping strokes and maintain a steady speed for consistent polish.
- Keep heat in check; excessive friction can warp thin metals.
- Clean tools promptly after use to prevent cross-contamination of residues.
- Protect surrounding areas with masking tape or drop cloths if needed.
Call A Professional
Consider professional help if the metal is heavily corroded, structurally compromised, or if corrosion is near critical components (e.g., structural hardware, load-bearing parts). Seek a pro for antique finishes or when restoration requires refinishing knowledge beyond routine cleaning. Stop and consult a professional if any unusual smells, discoloration, or heat buildup occurs during cleaning.
FAQ
What is the safest way to clean brushed metal finishes?
Use a soft cloth with a mild cleaner and avoid abrasive pads that can dull or scratch the texture.
Can I use a drill to speed up cleaning?
Yes, but choose appropriate attachments and operate at low speeds to prevent damage and overheating.
How do I remove rust from metal tools safely?
Apply a rust remover designed for metal, then scrub with a brush and finish with a rust-preventive treatment.
Should I seal metal after cleaning?
For many surfaces, applying a protective coating or wax helps resist tarnish and corrosion.
What preparation is needed before cleaning antique metal?
Test on a hidden area first and avoid aggressive methods that could remove valuable patinas.
Is it okay to use household cleaners on metal?
Some household cleaners are safe; always check the product label for metal compatibility and potential damage.
Buying Guide
When choosing tools for metal cleaning, consider several factors to fit projects and budget. Size matters: larger kits cover more surface area but may be heavier and longer to set up. Noise level can influence where you work, especially in shared spaces. Energy efficiency is less critical for manual tasks, but powered tools should offer efficient motors and effective speed ranges. Look for adjustable controls, variable speed options, and comfortable grips to reduce fatigue. Placement considerations include accessibility in your workshop and storage for attachments. Compare components like the polishing wheels, rust-removal brushes, and rouge compounds to ensure compatibility with your typical metal types, such as steel, aluminum, copper, or cast iron. Also assess warranty coverage and included accessories to maximize value and minimize the need for frequent replacements.
Leave a Reply