How to Get Rid of Stick Drift on Controllers
Stick drift is a common issue for modern game controllers, where the in-game aim or cursor moves without any input. This guide explains practical, step-by-step methods to reduce or eliminate drift using common repair tools and replacement kits. It focuses on DIY fixes that are safe for typical consumer electronics when done carefully.
Quick Answer
Diagnose whether drift originates from the joystick hardware or the software calibration, then try recalibration, cleaning, and, if needed, replacing worn analog sticks with a specialized kit. Start with simple steps like cleaning and recalibration before moving to hardware replacements.
What You’ll Need
Having the right tools on hand makes the process smoother. The following items are recommended:
- Nintendo Switch Joy-Con analog stick replacement kit
- PlayStation DualSense/PS5 controller analog stick replacement module kit
- electronics precision screwdriver set for game controller repair
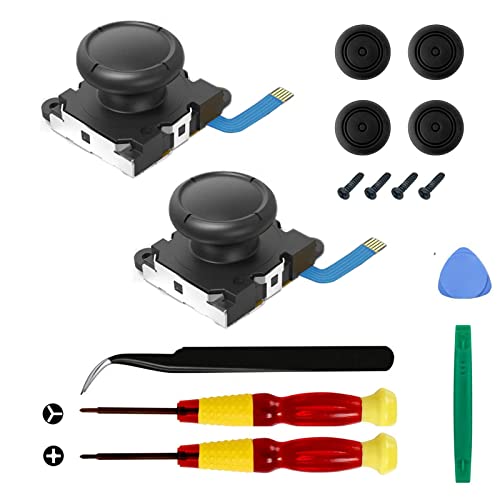


Before You Start
Prepare a clean, well-lit workspace and lay out small parts in labeled containers. Power off all devices completely and remove batteries if possible. Use an anti-static mat or wrist strap to minimize static discharge. Time estimates vary by device; plan for 60–120 minutes for a full replacement, longer if you are new to repairs.
Step-By-Step: How To Get Rid Of Stick Drift
- Remove the controller shell screws with an appropriate precision screwdriver, keeping track of each screw’s position.
- Carefully lift the shell to expose the internal assembly, noting cable orientations and connector types.
- Inspect the analog stick assembly for wear, loose components, or visible debris around the pivot and potentiometer.
- Use a can of compressed air or a small brush to remove dust and grime from the joystick base and surrounding PCB.
- Recalibrate the joystick if available in the device settings, following the console’s on-screen instructions for axis alignment.
- If drift persists, replace the worn analog stick using a Nintendo Switch Joy-Con analog stick replacement kit or a PlayStation DualSense/PS5 controller analog stick replacement module kit, depending on the device.
- Install the new stick with care, ensuring the potentiometer connector seats firmly and the spring tension feels consistent with the other sticks.
- Reattach the shell, reconnect any cables, and reinsert screws in a cross pattern to avoid warping the housing.
- Power on the device and perform a test in a controlled environment. Calibrate again if the device offers a joystick calibration option.
Troubleshooting
| Symptom | Likely Cause | Fix | Prevention |
|---|---|---|---|
| Drift only on one axis | POT/potentiometer wear or a bent lever | Replace the affected analog stick with a kit | Handle sticks gently; avoid dropping the controller |
| Drift after cleaning | Moisture or residue left behind | Disassemble and clean again; ensure dry completely | Use minimal moisture when cleaning; use isopropyl alcohol sparingly |
| Calibration fails | Software calibration not matching hardware | Run full calibration sequence; reset controller to default | Keep firmware updated |
| Stiff or loose stick after replacement | Improper seating or damaged connector | Reopen and reseat or replace connector/board | Follow kit installation instructions precisely |
Common Mistakes
- Rushing the disassembly and reassembly process, risking damaged connectors
- Using excessive force on delicate ribbon cables
- Not testing calibration after reinstalling components
- Mixing screws from different locations, causing misalignment
Taking time to organize screws and connectors can prevent many issues during a stick drift repair.
Tips For Best Results
- Work in a static-free environment and use an anti-static wrist strap
- Document each step with notes or photos to verify correct orientation
- Test the controller with multiple games to confirm consistency
- If replacing with a kit, compare the kit variant to your exact model (Joy-Con vs. DualSense) to ensure compatibility
- Keep spare small tools or a magnet for locating tiny screws that may roll away
Call A Professional
Seek professional help if you encounter any of the following: persistent drift after multiple replacement attempts, damaged housing, swollen battery concerns, or missing or torn internal cables. If the device is under warranty or you’re unsure about handling delicate components, contact the manufacturer support or a certified repair service to avoid voiding coverage.
FAQ
What causes stick drift on Nintendo Switch Joy-Cons?
Drift can result from worn potentiometers, dust in the joystick assembly, or mechanical looseness in the stick mechanism.
Can I fix drift without replacing parts?
Yes, recalibration and thorough cleaning can reduce drift, but persistent drift often requires replacing worn components.
Is it safe to open a PS5 controller for replacement?
Opening a PS5 controller is possible but delicate; follow exact instructions and disconnect power before starting.
Will replacing the analog stick affect warranty?
Opening the device can void the warranty. Check manufacturer policy before attempting repairs yourself.
Do I need special tools?
A precision screwdriver set and small precision tools are essential for safe disassembly and reassembly.
Buying Guide
When choosing parts and tools to address stick drift, consider these factors to ensure a solid repair:
- Compatibility: Ensure the replacement kit matches your control model (Nintendo Switch Joy-Con vs. PS5 DualSense).
- Quality: Select kits with high-quality potentiometers and durable housings to extend lifespan.
- Tools: A reliable electronics precision screwdriver set helps prevent stripped screws and damaged components.
- Installation Difficulty: Some kits are easier to install than others; review included instructions and video guides.
- Warranty and support: Look for sellers offering basics like spare parts or responsive support in case of fit issues.
- Cost vs. risk: Consider the cost of replacement vs. potential professional repair, especially if multiple replacements might be needed.
- Noise and feel after repair: Check that new sticks provide smooth motion with consistent resistance comparable to other sticks.
For many players, a dedicated replacement kit paired with an electronics precision screwdriver set delivers the best balance of cost, reliability, and ease of use. Is your controller’s drift persistent after cleaning and recalibration, or is a full stick swap the right move? Evaluating the device and your comfort with DIY repairs will guide the right choice.
Leave a Reply