How to Clean Keurig Needle Safely and Effectively
The Keurig brewing system relies on a needle that punctures K-Cups to deliver hot water through the coffee grounds. Over time, mineral buildup, coffee oils, and debris can clog the needle, affecting flavor and flow. This guide walks American users through a clear, practical cleaning process using common tools and a dedicated Keurig needle cleaning kit.
Following these steps helps maintain optimal pressure, prevent leaks, and extend the life of a Keurig machine without disassembly or professional service.
Quick Answer
Quick method: unplug the machine, remove the insert from the K-Cup holder, use a Keurig needle cleaning kit to flush clean water through the needle from both sides, and rinse thoroughly. Reassemble and run a test brew with a few cups of plain water to ensure proper flow.
What You’ll Need
Gather tools and materials before you begin. The items listed here cover routine needle cleaning and minor maintenance.
- Keurig needle cleaning kit
- K-Cup needle cleaning tool for Keurig
- Keurig coffee maker needle cleaning brush kit
- Soft, lint-free cloth
- Warm water
- Dish soap (mild)
- Optional: small flashlight for visibility inside the housing
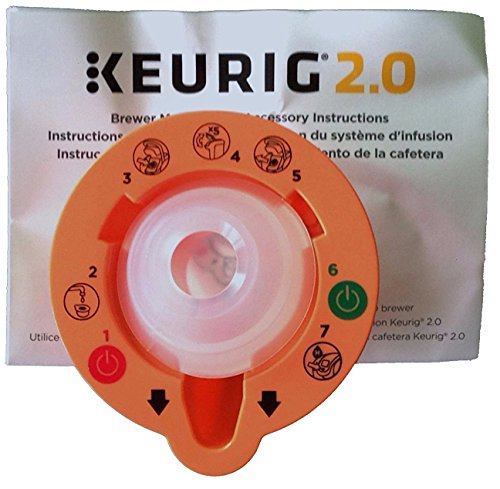 |
Keurig 4335457458 2.0 Needle Cleaning Tool, kkk, Orange |
Before You Start
Prepare the workspace on a kitchen counter with a towel underneath to catch drips. Unplug the brewer and allow it to cool completely before handling hot components. Avoid using harsh cleaners or metal tools, which can scratch internal parts. Inspect the drip tray and underside for any loose parts. Time estimate: 15–25 minutes for a standard cleaning session.
Step-By-Step: How To Clean Keurig Needle
- Power off and unplug the machine, then remove the water reservoir if accessible. This reduces the risk of accidental activation during cleaning.
- Open the K-Cup holder and remove the piercing needle cap or insert, depending on the model. Keep the area steady to prevent dropping small parts.
- Prepare the cleaning kit. If the kit includes a slender cleaning tool, lubricate it lightly with warm water to ease insertion into the needle.
- Insert the cleaning tool into the needle from the back side and gently push through to dislodge coffee grounds and scale. Do not force the tool; stop if resistance increases.
- Flush clean water through the needle from the opposite side to ensure both sides are free of debris. Repeat several times until the water runs clear.
- Wipe the exterior of the needle housing and K-Cup area with a damp cloth to remove residual oils and coffee.
- Rinse the cleaning tool under warm water, then reinsert the needle cap or insert to secure the assembly. Reinstall the reservoir if removed.
- Run a test brew with just water to verify proper flow. If the brew still drips slowly, repeat the cleaning steps once more, focusing on any stubborn clogs.
- For ongoing maintenance, schedule a monthly cleaning or follow the cleaner’s recommended intervals for your machine model.
- Store the kit in a dry place and dry all components thoroughly to prevent mold or rust.
- Once complete, perform two or three additional water-only brews to clear any remaining cleaning solution.
- Resume normal operation with your usual coffee settings and enjoy a clean, smooth pour.
Troubleshooting
| Symptom | Likely Cause | Fix | Prevention |
|---|---|---|---|
| Slow brew or partial flow | Partial needle clog | Repeat needle cleaning steps, ensure all debris is removed | Clean monthly; use filtered water |
| Water dripping around the needle | Worn or loose needle parts | Inspect and re-seat or replace the needle cap/inserts | Handle parts carefully; avoid forcing fittings |
| Brews with off-taste | Old coffee oils or residue | Thorough exterior wipe; run several water-only cycles | Clean between flavors or use fresh water |
| Brewer not powering on after cleaning | Water exposure or loose wiring | Unplug, dry, re-seat connections; test again | Keep electrical parts dry; dry thoroughly |
Common Mistakes
- Using metal objects to probe the needle—risk of scratching or bending components.
- Rushing the cleaning process—avoid skipping steps or rushing water through without proper flushing.
- Neglecting exterior cleaning—coffee oils on the housing can attract debris and affect sealings.
- Reusing dirty tools—the cleaning kit should be kept clean and dry between uses.
- Over-tightening parts during reassembly—may cause leaks or misalignment.
Tips For Best Results
- Establish a cleaning routine aligned with your usage; a monthly clean suits most households.
- Use filtered or bottled water if your tap water is heavily mineralized to reduce scale buildup.
- Inspect the needle area for wear during each cleaning, and replace worn parts promptly.
- Keep a small, labeled container for the cleaning kit to prevent loss of tiny components.
- Document the model of your Keurig; some models have slightly different needle configurations.
Call A Professional
Consider professional assistance if you notice persistent leaks, cracks in the housing, or if the needle still clogs after multiple cleanings. Stop and contact a technician if the machine shows electrical issues, smells burning, or fails to power on after cleaning. Do not operate a machine that leaks or has damaged seals.
FAQ
How often should I clean the Keurig needle?
Most users benefit from a monthly cleaning, or more often if the machine shows slow brews or off-tastes.
Can I use too much cleaning solution on the needle?
Sticking to water or mild cleaners is recommended; avoid harsh chemicals inside the brew pathway.
Is the cleaning kit compatible with all Keurig models?
Most kits fit common Keurig models; check the product notes for compatibility with your brewer.
What should I do if the needle still clogs after cleaning?
Try repeating the cleaning steps and inspect for damaged components; if unresolved, seek professional help.
Is it okay to run hot water through the needle without coffee?
Yes, hot water cycles help flush the system and remove residual oils between brews.
Buying Guide
When choosing a Keurig needle cleaning kit, consider compatibility with your model, the quality and durability of the cleaning tools, and the included brushes. Look for kits labeled Specifically for Keurig and those that include a dedicated K-Cup needle cleaning tool for Keurig. Assess how many accessories are bundled, as a broader kit may save time on maintenance. A compact kit is ideal for small kitchens or travel, while a comprehensive kit suits households with frequent cleaning needs. Quick-access tools should allow cleaning from both sides of the needle, and a sturdy brush helps remove stubborn buildup without scratching interior surfaces.
Leave a Reply