How to Clean Ceramic Bearings
Ceramic bearings are prized for their hardness, light weight, and resistance to wear. Regular cleaning helps maintain performance and longevity, especially in precision applications. This guide provides practical, user-friendly steps for Americans seeking safe, effective methods to restore ceramic bearing efficiency using common tools and products.
Quick Answer
Best practice: use a dedicated cleaning kit, an ultrasonic unit for small parts, and a ceramic-bearing degreaser solvent. Rinse with clean solvent, dry completely, and re-lubricate if recommended by the manufacturer. Avoid contact with harsh cleaners and high temperatures that can damage seals or coatings.
What You’ll Need
- Ceramic bearing cleaning kit
- Ultrasonic cleaner for small parts bearings
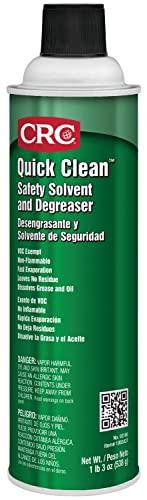
- Bearing degreaser solvent for ceramic bearings
- Lint-free cloths or microfiber towels
- Isopropyl alcohol or distilled water for rinsing (as appropriate)
- Soft-bristle brush (optional)
- Gloves and safety glasses
- Microfiber tray or rack to air-dry


Before You Start
Prepare a clean workspace and gather all items before beginning. Read the bearing manufacturer’s guidelines for cleaning and lubrication to avoid voiding warranties. If the bearings are installed in a device, remove power, disassemble according to the user manual, and handle components with care. Expect a total task time of 30–60 minutes depending on kit size and the number of bearings. Avoid using aggressive cleaners or high heat, which can degrade ceramic materials and seals.
Step-By-Step: How To Clean Ceramic Bearings
- Remove bearings from the device and inspect for visible damage or corrosion.
- Prepare the cleaning station: set the ultrasonic cleaner to a gentle cycle, and fill it with the recommended cleaning solution from the bearing cleaning kit.
- Place bearings in the ultrasonic unit and run a short, low-power cycle to loosen debris from races and balls.
- Carefully remove bearings and inspect again. If stubborn grime remains, gently brush with a soft-bristle brush while avoiding the seals.
- Rinse bearings in a solvent recommended for ceramic bearings or in isopropyl alcohol to remove residual cleaner. Do not reuse dirty rinse water for other parts.
- Dry bearings thoroughly using lint-free towels, then air-dry on a microfiber rack or tray. Ensure all moisture is evaporated before lubrication.
- Re-lubricate if required by the component’s design. Use the recommended lubricant for ceramic bearings; some are designed for dry or minimal-lubricant operation.
- Reassemble the device and perform a functional test to verify smooth rotation without binding or abnormal noise.
- Document any signs of wear or damage that appeared during cleaning and replace parts if necessary.
- Store cleaning tools and bearings in a clean, dust-free environment to maintain readiness for the next maintenance cycle.
- If the device requires periodic maintenance, set a routine schedule to repeat cleaning and inspection every few months or as dictated by usage.
- Record the cleaning date and any observations to help track bearing longevity and performance trends.
Troubleshooting
| Symptom | Likely Cause | Fix | Prevention |
|---|---|---|---|
| Bearings feel gritty after cleaning | Residual debris or uneven lubrication | Repeat cleaning cycle and apply the recommended lubricant in small amounts | Use fresh solvent and ensure complete drying |
| Bearings seize or bind | Over-lubrication or damaged seals | Disassemble, inspect seals, and apply minimal lubricant only if approved | Follow manufacturer guidance for lubrication quantity |
| Noise or rough rotation | Surface damage to races or balls | Inspect for wear; replace bearings or damaged components | Handle bearings gently and use appropriate tools |
| Excessive heat after reassembly | Lubricant grabbing or misalignment | Clean again and reassemble with correct orientation | Check mounting tolerances and seating |
Common Mistakes
- Using harsh household cleaners that can corrode ceramic surfaces
- Skipping thorough drying, which traps moisture and accelerates corrosion
- Over- or under-lubricating; both can affect performance and longevity
- Ignoring manufacturer lubrication recommendations or seals
- Forcing bearings during reassembly, which can cause misalignment
Tip: Keep a simple log of cleaning dates and observed performance to catch trends early and schedule preventive maintenance.
Tips For Best Results
- Choose a dedicated cleaning kit designed for ceramic bearings to ensure compatible solvents and brushes
- Use an ultrasonic bath on a gentle setting to avoid micro-cracking or seal damage
- Rinse with clean solvent and dry completely before lubrication to prevent residue buildup
- Store bearings in a sealed, dust-free container between maintenance sessions
- If bearings operate in extreme environments, consider a more frequent cleaning schedule
Call A Professional
Seek professional help if there is visible deformation, persistent corrosion, or if bearings show recurring performance issues after cleaning. Stop using the device if abnormal noises, excessive heat, or binding persist after reassembly. Complex assemblies or aircraft and medical equipment bearing maintenance should be handled by qualified technicians to ensure safety and compliance.
FAQ
Can I use regular soap and water to clean ceramic bearings?
Soap and water are generally not recommended for ceramic bearings, especially if they are sealed. Use manufacturer-approved solvents or a dedicated bearing cleaning kit.
How often should I clean ceramic bearings?
Cleaning frequency depends on usage and environment. High-dust or high-moisture settings may require more frequent cleaning. Refer to device guidelines and perform routine checks.
Is ultrasonic cleaning safe for all ceramic bearings?
Ultrasonic cleaning is effective for many small bearings, but verify compatibility with your specific bearings and seals before use.
Do ceramic bearings require lubrication after cleaning?
Many do, but some ceramic bearings are designed for dry operation. Always follow the manufacturer’s lubrication recommendations.
What should I do if the bearing surface looks scratched after cleaning?
Inspect for wear or damage. Scratched surfaces can degrade performance; replace the bearing if damage is evident.
Can I reuse cleaning solvents?
Reuse is not recommended; used solvents can redeposit contaminants. Use fresh solvent for each cleaning cycle.
Buying Guide
When shopping for components and tools to clean ceramic bearings, consider key buying factors to ensure the best results and long-term value.
Size and compatibility: Choose tools and cleaners that fit the bearing diameter and the device housing. Ensure that the kit includes appropriate brushes or adapters for your bearing size.
Noise level and performance: Some cleaners are quieter and gentler; select models known for safe operation with delicate components.
Energy efficiency: Ultrasonic cleaners with energy-saving modes reduce power usage during longer cleaning cycles.
Controls and settings: Look for adjustable cleaning cycles, temperature control, and timer options to tailor to different bearing types.
Placement and storage: Consider compact units for small workspaces and secure storage for solvents and components.
Product variety: A reputable ceramic bearing cleaning kit should include solvents, brushes, and jigs compatible with common ceramic bearings. When comparing options, prioritize kits that clearly specify compatibility with your bearing type and seals.
Leave a Reply