How to Clean Your Fridge Water Line
Maintaining a clean fridge water line ensures fresh-tasting water and ice while preventing mineral buildup and clogs. This guide walks through practical steps, the right tools, and safety notes to help American households perform a DIY clean effectively.
Quick Answer
Quick Method: Disconnect the water supply, use a fridge water line cleaning kit to flush the line, and run water or ice until the taste and flow are normal. For stubborn buildup, employ a food-safe descaler designed for appliance lines and repeat as needed.
What You’ll Need
- Refrigerator water line cleaning kit
- Ice maker line cleaning brush
- Fridge water line descaler kit
- Clean bucket or tray to catch drips
- Clamp or adjustable wrench (if fittings require)
- Soft cloth and mild dish soap
- Replacement fittings or a spare hose (optional)

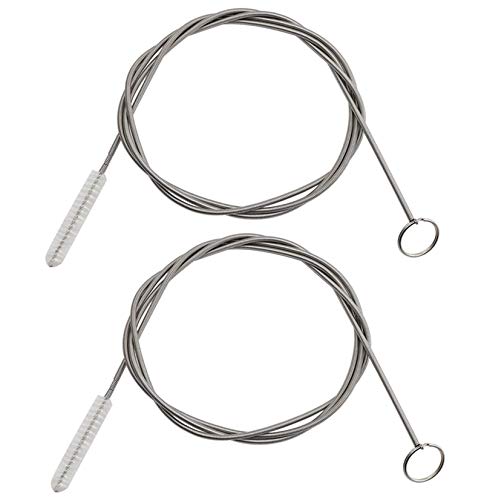
Before You Start
Before tackling the fridge water line, unplug or power off the appliance to avoid any electrical or water-related hazards. Place towels or a shallow tray under the connection to catch spills. Ensure you have a well-lit workspace and enough time for multiple flushes. Keep children and pets away from the area during the cleaning.
Step-By-Step: How To Clean Your Fridge Water Line
- Shut off the water supply valve connected to the fridge. If unsure, turn off the main household water valve to stop any flow.
- Disconnect the water line from the back of the refrigerator and place a catch tray under the connection.
- Prepare the cleaning solution according to the fridge water line descaler kit instructions. Do not mix harsh chemicals; use only recommended products.
- Attach the cleaning hose from the refrigerator water line cleaning kit to the water inlet. If fittings don’t match, use a spare adapter or the included fittings from the kit.
- Flush the line with clean water to remove loose debris. Collect effluent in the tray and inspect for sediment by eye or with a tissue test.
- Run the descaler solution through the line per the kit directions. Allow the solution to circulate for the specified dwell time, then flush with clean water until the taste and clarity improve.
- Reattach the water line to the fridge and tighten fittings securely. Turn the water supply back on slowly to prevent sudden pressure shocks.
- Run the ice maker or water dispenser for several cycles, discarding the first few servings to purge any residual cleaner. Check for leaks during operation.
- Inspect the filter status and replace any old filter if recommended by the refrigerator manufacturer. Wipe down the exterior and ensure no cleaner spills on internal components.
- Monitor the taste and flow for 24–48 hours afterward. If flavor or flow remains off, repeat the cleaning cycle or consider consulting a professional for further inspection.
- Store cleaning tools in a dry place. Recheck connections after a week to prevent slow leaks from developing over time.
Troubleshooting
| Symptom | Likely Cause | Fix | Prevention |
|---|---|---|---|
| Weak water flow from dispenser | Partial clog or mineral buildup | Repeat cleaning cycle with descaler | Regular clean every 6–12 months |
| Unpleasant taste after cleaning | Residual cleaner or improper rinsing | Flush with plenty of fresh water until taste is neutral | Use recommended products and follow rinse steps |
| Leaks at fittings | Loose or damaged connections | Tighten and inspect fittings; replace damaged hoses | Use proper adapters and avoid overtightening |
| Dispenser not dispensing water after reconnect | Air in line | Run several cycles to purge air; recheck connections | Ensure proper sealing during reassembly |
Common Mistakes
- Using incompatible cleaners or mixing chemicals not designed for appliance lines
- Forgetting to flush thoroughly, leaving residues that affect flavor
- Over-tightening fittings, causing cracks or leaks
- Neglecting the ice maker line maintenance schedule
Careful adherence to product instructions helps avoid these issues and keeps drinks safe and tasting fresh.
Tips For Best Results
- Schedule cleaning on a day when you can run multiple cycles without interruptions
- Keep a spare hose and adapters on hand to accommodate different fridge models
- Label the cleaning time and date for easy future reference
- Consider using a dedicated fridge water line descaler kit to minimize mineral buildup
Call A Professional
Call a professional if you notice persistent leaks, cracked hoses, corroded fittings, or if the water line is difficult to detach safely. Seek help immediately if there is any sign of mold growth around the ice maker or dispenser area, or if the appliance shows electrical fault indicators during the process.
FAQ
How often should I clean the fridge water line?
Typically every 6–12 months, or sooner if you notice off-taste, reduced flow, or mineral buildup.
Can I use regular vinegar to descale fridge lines?
Vinegar is not recommended for all appliance lines. Use only products specified in the fridge water line descaler kit instructions to avoid damage.
Is it safe to run water through the line after cleaning?
Yes. Run cold water through the dispenser for several cycles to clear any residual cleaner.
What if the ice maker still tastes odd after cleaning?
Disposal of the first few batches is advised, and consider replacing the water filter if your model indicates it’s due for replacement.
Do I need to disconnect the fridge from the wall outlet?
Yes. Power down the unit to prevent any risk while handling water lines and connections.
Should I always use a cleaning kit or descaler kit?
Using kit-specific tools designed for fridge lines typically yields the safest and most effective results.
When is it necessary to replace the entire water line?
If fittings are degraded, hoses are cracked, or leaks persist despite maintenance, replacement may be the safer option.
Buying Guide
When selecting tools for cleaning a fridge water line, consider size, compatibility, and ease of use. Key buying factors include:
- <bSize and compatibility: Ensure the kit matches your fridge’s inlet size and connector types. Some models require adapters.
- <bNoise and ease: Look for kits with simple hand tools or compact components to minimize setup time and noise during use.
- <bEnergy efficiency and impact: Cleaning won’t affect energy use, but a well-maintained line helps the dispenser work efficiently without extra strain on the ice maker.
- <bControls and safety features: Kits with clearly labeled steps and safe jaw clamps reduce the risk of leaks or damage.
- <bPlacement considerations: Choose flexible hoses that prevent kinking and fit easily behind the fridge and under sinks.
Different kits offer varying degrees of completeness. If you own an older fridge, a dedicated ice maker line cleaning brush paired with a descaler kit can provide the most comprehensive approach. For newer models, ensure any cleaning kit or descaler is compatible with your appliance’s water system to maintain warranty coverage and avoid unintended damage.
Leave a Reply