How to Get Rid of Air Bubbles in Buttercream
Buttercream bubbles can ruin a smooth finish on cakes and cupcakes. With the right technique and a few trusted tools, you can achieve a flawless, velvety coat every time. This guide walks American bakers through practical steps to minimize and eliminate air pockets, along with pro tips to maintain a pristine surface from the first spread to the final polish.
Quick Answer
Achieve a smooth buttercream surface by warming the buttercream slightly, working in a calm environment, and using proper smoothing tools. Remove air pockets with a gentle, deliberate pass and finish with a quick, controlled scrape. Chill when needed to reset textures and prevent new bubbles from forming.
What You’ll Need
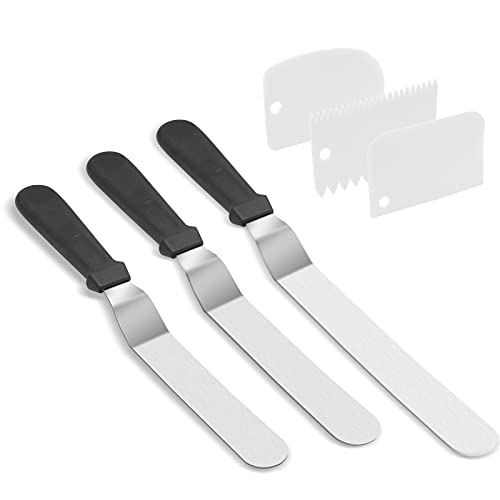
- Stainless steel offset spatula for buttercream smoothing
- Cake bench scraper icing smoother
- Fondant smoother icing smoothing tool
- Mixing bowls and a stand mixer or whisk
- Buttercream spatula or piping bag for precise filling


Before You Start
Ensure the working surface is clean and dry, and the room is free from drafts that can introduce dust or cause the buttercream to skin too quickly. Warmth is key—a slightly warmed bowl and a gently warmed spatula help release trapped air. Time estimates vary with batch size, but plan for 30–60 minutes total from preparation to final smoothness. Safety notes: keep knives and blades away from edges, and avoid overworking the buttercream after it reaches a glossy sheen, which can introduce more bubbles.
Step-By-Step: How To Smooth Buttercream And Eliminate Bubbles
- Start with a well-matched batch. If butter is too cold, it can trap air better; if too warm, it may become too soft to hold shape. Aim for a creamy, medium-soft texture.
- Apply a crumb coat first. A thin layer captures most crumbs and forms a barrier so subsequent layers don’t trap air behind the surface.
- Let the crumb coat crust slightly in a cool area or a brief chill, then re-stir to restore smoothness without introducing new air pockets.
- Transfer a generous portion of buttercream to the center of the cake. Use the stainless steel offset spatula for buttercream smoothing to spread a first, even coat from the top outward.
- Hold the cake bench scraper icing smoother at a shallow angle and run it around the sides in short, steady passes. Gentle pressure helps push out embedded air without creating new bubbles.
- For stubborn pockets, rotate the cake slowly and re-smooth with the offset spatula, pressing outward toward the edge. Do not lift and drop; smooth, even movements reduce air entrapment.
- If waves or pits appear, rewarm the spatula briefly and re-threaten the surface with light, continuous motion. Avoid over-working; rest the cake briefly if the buttercream becomes too firm.
- Finish with the fondant smoother icing smoothing tool along the top and edges to seal the surface and flatten minor imperfections.
- Chill the cake for 10–15 minutes to set the surface. If bubbles reappear, re-smooth using the same technique and avoid excessive air introduction during final shaping.
- Apply a final gloss pass if needed, using a clean, warm spatula and a light touch to avoid trapping air again.
- For multiple layers, repeat smoothing after each layer to maintain a seamless finish throughout the build.
Troubleshooting
| Symptom | Likely Cause | Fix | Prevention |
|---|---|---|---|
| Bubbles persist after smoothing | Buttercream too cold or grainy | Warm slightly, re-beat to restore silky texture | Keep buttercream at a consistent, moderate temperature |
| Surface looks dull or matte | Buttercream too soft or under-crusted | Chill briefly to set, then re-smooth | A proper crumb coat helps prevent this |
| Air pockets near edges | Imbalanced pressure during smoothing | Apply pressure evenly with bench scraper around the circumference | Maintain a steady hand and even motion |
| Ridges after final pass | Overworking surface | Pause, rest the tools, and re-smooth with light strokes | Work in small sections to avoid fatigue |
Common Mistakes
- Overworking buttercream after it starts to set, which traps air.
- Using tools that are too cold or too hot, causing inconsistent texture.
- Rushing the crumb coat; skipping it increases surface irregularities.
- Trying to fix a high spot by pressing too hard, creating new indentations.
Taking time to prepare the surface and control temperature dramatically reduces visible bubbles and improves overall finish.
Tips For Best Results
- Warm the spatula briefly between passes to reduce drag and encourage smooth spreading.
- Chill the cake between major smoothing steps to set layers and prevent bubble formation during handling.
- Use the right tools for each task: an offset spatula for initial spreading, a bench scraper for sides, and a fondant smoother for final polishing.
- Maintain a clean, low-dust environment to avoid surface inclusions that look like air pockets.
Call A Professional
Seek professional help if bubbles persist after multiple smoothing attempts or if the cake surface appears damaged or uneven due to structural issues. Additionally, contact a pro if you are piping delicate work with stiff buttercream and encounter persistent air pockets that affect stability or appearance.
FAQ
Why do air bubbles form in buttercream?
Air bubbles can form during mixing, by incorporating air when spreading, or from temperature changes that trap pockets as the surface dries.
How can I prevent bubbles while beating buttercream?
Beat at moderate speed until smooth, avoid over-beating, and let the buttercream come to a consistent texture before spreading.
Is chilling necessary between steps?
Chilling helps set the surface and prevents new bubbles from forming during smoothing.
Can I use fondant smoothers on buttercream?
Yes, a fondant smoother can help for a final sleek finish, but use it gently to avoid compressing or tearing the buttercream.
What temperature should buttercream be to smooth best?
Room temperature to slightly cool is ideal; very warm buttercream can sag, while cold buttercream traps air more easily.
Buying Guide
When selecting tools for smoothing buttercream, consider size, material, and ergonomics. A stainless steel offset spatula should feel balanced in your hand and maintain sharp edges for clean lines. A durable cake bench scraper icing smoother helps you guide surface tension evenly around the sides. The fondant smoother icing smoothing tool is great for a final polish, especially on larger surfaces. Look for heat-resistant grips, easy-clean finishes, and compatible sizes with your cake dimensions.
Size considerations matter: smaller spatulas offer precise control on cupcakes, while larger tools excel on sheet cakes. Noise level is a minor factor, but a sturdy, well-built tool reduces arm fatigue during longer smoothing sessions. Energy efficiency is not a direct factor here, but choosing reusable, high-quality tools reduces waste and maintenance costs. Controls and placement: choose tools with comfortable handles and guards to protect fingers during edge work. For placement, a non-slip work surface and stable turntable improve handling and reduce bubble formation.
Additionally, evaluate compatibility with your workflow: some bakers prefer one good set of tools across buttercream and fondant projects, while others rotate specialized devices per task. Consider storage space and ease of cleaning, as buttercream residues can affect tool performance over time. If you frequently bake in small kitchens, look for compact tool sets that still deliver professional results.
Leave a Reply