How to Clean an AirPods Microphone Safely and Effectively
AirPods deliver crisp audio and reliable microphone performance, but daily handling, exposure to dust, and moisture can affect mic quality. This guide explains practical steps to clean an AirPods microphone without causing damage, with careful attention to safety and best practices for American users.
Regular maintenance helps preserve call clarity, voice recognition, and overall headset hygiene. By following these steps, users can minimize noise, pops, and muffled sound from blocked microphones.
Quick Answer
Gently remove debris using a soft brush or cotton swab, then wipe with a microfiber cloth. If needed, use alcohol wipes in small amounts sparingly, avoiding moisture going into speaker openings. Allow components to dry completely before reuse.
What You’ll Need
- AirPods Pro cleaning kit brush microfiber cloth alcohol wipes
- AirPods microphone cleaning brush and nozzle cleaner
- Earbuds cleaning kit for AirPods with soft brush cotton swabs
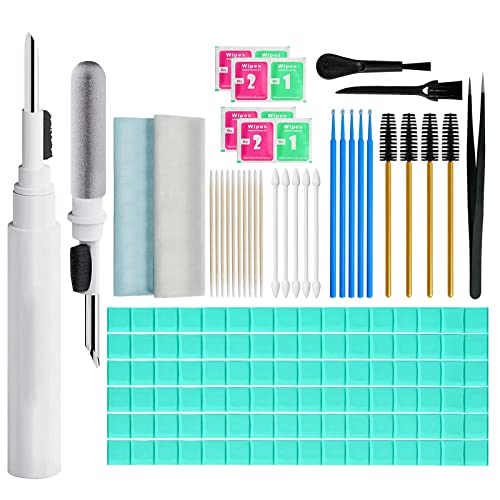 |
MUIIGOOD Airpods Cleaner Kit 221 Pcs Earbud Cleaning Putty Remove Ear Wax Phone Cleaning kit Cleaner Pen Brush Microfiber Cloth for Airpods Pro/1/2/3 Charging Case Headphones Camera Hearing Aids |
Before You Start
Power off and disconnect any Bluetooth connections before cleaning. Work in a clean, well-lit area to spot tiny particles. Use gentle pressure to avoid pushing debris further into the microphone opening. Avoid liquid saturation and never spray liquids directly onto the AirPods. Allow time for the devices to dry completely if any moisture is used.
Time estimate: 5–10 minutes per cleaning session. If you notice persistent mic issues after cleaning, consider professional service or replacement parts.
Step-By-Step: How To Clean AirPods Microphone
- Power off the AirPods and disconnect them from any device.
- Inspect the microphone openings under good light and locate any visible debris.
- Use a soft brush from the AirPods Pro cleaning kit to gently sweep away dust around the mic mesh.
- For stubborn particles, lightly use a cotton swab from the Earbuds cleaning kit for AirPods, to lift debris without pressing into the mesh.
- Wipe the exterior with a microfiber cloth to remove oils that could attract more dust.
- If you need moisture, dampen a cloth or wipe lightly with an alcohol wipe and carefully dab the surface—never apply liquid directly to the openings.
- Let any treated areas air-dry completely before reconnecting the AirPods to a device.
- Reconnect and test the microphone by making a quick call or recording a short note to ensure clarity.
- If mic issues persist, repeat the gentle cleaning steps or inspect for damage before seeking help.
- Store AirPods in their case when not in use to reduce exposure to dust and moisture.
- For frequent use in dusty environments, perform a light cleaning weekly to maintain performance.
- Consider replacing worn cleaning tools regularly to maintain effectiveness.
Troubleshooting
| Symptom | Likely Cause | Fix | Prevention |
|---|---|---|---|
| Muffled or unclear microphone | Dust obstructing mic mesh | Clean mic mesh with soft brush and cotton swab | Clean regularly; avoid touching mic openings |
| Static or crackling during calls | Moisture or residue on mic area | Wipe with dry microfiber and allow to dry completely | Keep away from liquids; store in case |
| Mic not detected by device | Loose connection or debris | Re-seat AirPods in case; clean connectors if needed | Handle with clean hands; inspect for damage |
| Intermittent mic performance | Debris shifting during use | Deep clean with non-abrasive tools | Perform lighter cleanings more frequently |
Common Mistakes
- Using excessive liquid or soaking materials near the mic openings
- Pushing tools too hard into the mesh, causing damage
- Rushing cleaning steps and skipping drying time
- Ignoring signs of wear or corrosion around the connectors
Tips For Best Results
- Stay consistent with a light maintenance routine to prevent buildup
- Choose tools with soft bristles and lint-free cloths to minimize abrasion
- Test mic performance after each cleaning step to gauge effectiveness
- Keep cleaning tools away from headphones’ speaker grills to avoid cross-contamination
Call A Professional
Contact a professional if cleaning does not improve mic quality or if there are signs of physical damage, such as frayed cables or internal corrosion. Stop using the device if you notice unusual heat, buzzing, or failures that persist after cleaning.
FAQ
How often should I clean AirPods microphones?
Clean the microphone area during routine maintenance, or more often if you use AirPods in dusty or sweaty environments.
Can I use alcohol on the mic mesh?
Yes, but apply sparingly with a lint-free cloth or swab and avoid excess moisture near openings.
What’s the best tool for cleaning AirPods microphones?
Soft brushes and cotton swabs from a dedicated AirPods cleaning kit work well without damaging the mesh.
Is it safe to clean AirPods Pro mic mesh with wipes?
Wipes can be used cautiously on the exterior, but avoid direct contact with the mic openings and allow any moisture to dry.
Buying Guide
When choosing cleaning supplies for AirPods microphones, consider size and portability, noise levels of brushes, and surface materials. Look for kits that include soft brushes, microfiber cloths, and cotton swabs designed for electronics. Energy efficiency is less relevant for cleaning tools, but durable materials reduce waste. Controls are simple: a few brushes, wipes, and swabs. Placement matters—store tools in a protective case to reduce contamination. Compare options by bundle contents, material quality, and customer reviews to ensure compatibility with AirPods models.
Leave a Reply